Alternating Fishbone Crochet Cable Pattern
Last Updated on June 6, 2025
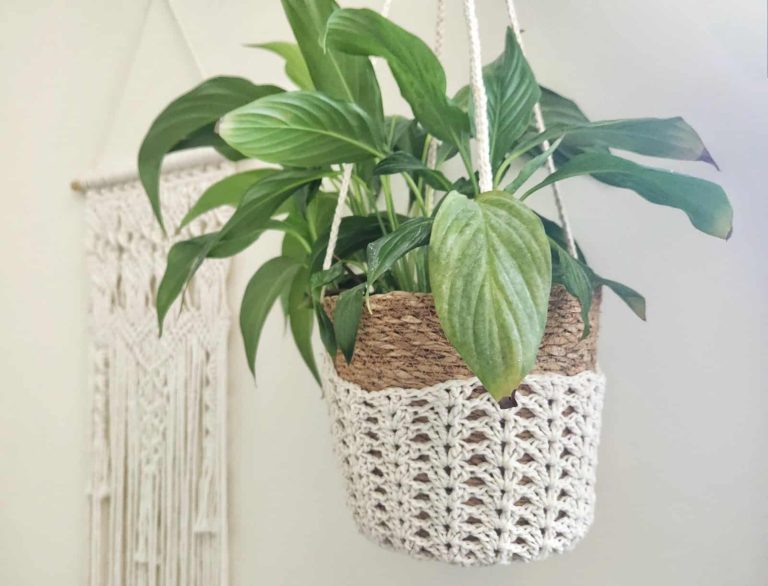
The Drifting Puss is a beautifully textured crochet puff stitch pattern. This pattern uses a slanted puff stitch to create a braided-like crochet stitch, but more lacy than the classic braided puff stitch.
This pattern is the first section of the Springtime Journey Blanket. You can use this pattern to create a puff stitch blanket of your own, or follow the instructions for the Springtime Journey blanket.
Scroll down for the instructions and detailed photo-tutrial.

** Some of the links in this post may include affiliate links. Making a purchase through one of these links pays me a small referral fee at no added cost to you. These small fees add up and help me keep the blog running. View our disclosure and privacy policy for more information.
How to change the width of this pattern – this crochet cable pattern can be easily changed to any width you want to make a bigger blanket (or anything you’d like).
Just follow this stitch multiple: chain a multiple of 12, then add 3 more chains, and another 2 more chains for the turning chains. For example, 27= 24+3+2.

Want to save this post for later? Go ahead and PIN it!
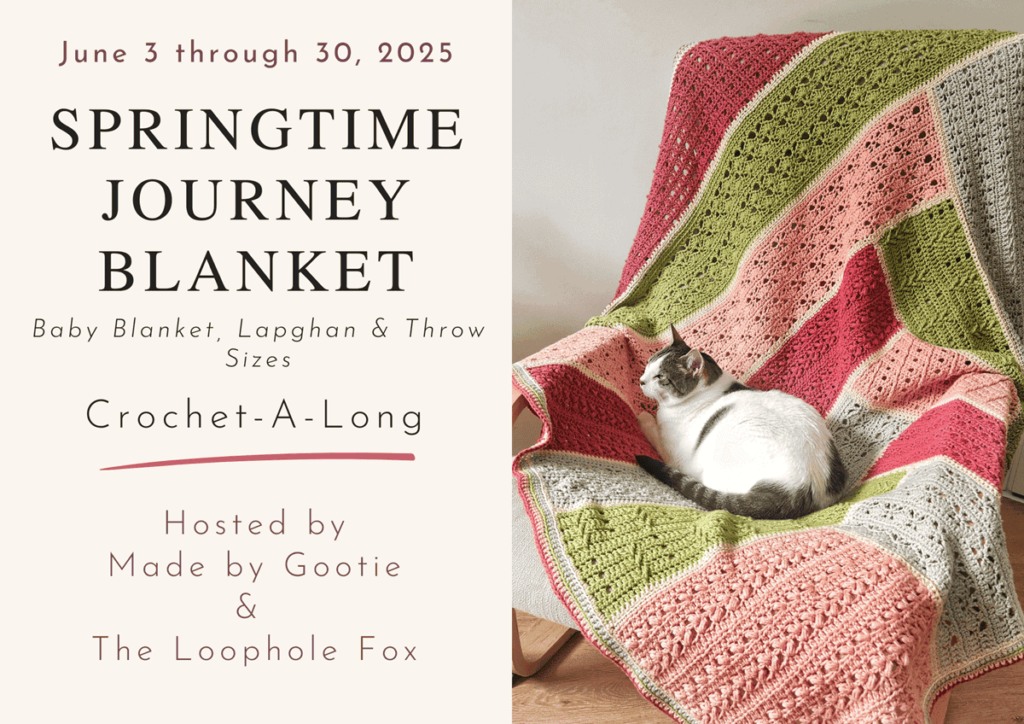
The Springtime Journey Blanket
This pattern is part of the Springtime Journey Blanket Crochet-Along. This is the third part of a 12-part blanket crochet pattern.
The Springtime Journey crochet blanket is a co-design blanket by Shannon from The Loophole Fox and Agat from Made by Gootie, that can be made either as a baby blanket, lapghan or a throw.
The free crochet along blanket is hosted through June 3rd-30th. The pattern is free to view on the designers’ blogs as every part released.
If you prefer a cohesive, ad-free full blanket PDF pattern, you can purchase it HERE
Materials
– Crochet hook 4.5 mm (I love the Etimo Hooks).
– Worsted (#4) weight yarn – I used We Crochet- Comfy Worsted – You can use this pattern to make a blanket with a different yarn weight and a suitable hook size.
Total amount of yarn needed for the Springtime Journey Blanket sections:
For Section 3 (Color C) – 60gr/ 131yds/ 120m
Gauge – In pattern: 16 sts x 12 rows will result in a 4×4 in (10×10 cm) square.
Finished Size – If you’re making the Springtime Journey blanket:
Section 3 – Approx. 19×5.8 in (48×14.7 cm) square – after blocking.
Abbreviations (US)
- ch – chain
- dc – double crochet
- FPtr – front post treble crochet: yo twice, insert hook from the front to the back and then to the front of the indicated stitch (working around the post), yo and pull up a loop, (yo and pull through 2 loops) x twice, yo again and pull through 2 remaining loops.
- dc-FPtr-tog – dc & FPtr worked together into 2 different sts – see special stitches below.
- FPtr-dc-tog – FPtr & dc worked together into 2 different sts – see special stitches below.
- RS – right side
- sp – space
- st – stitch
- sc – single crochet
- STsc – stacked single crochet: work 1 single crochet in the first st, then work another single crochet into the left leg of the single crochet you just worked.
- WS – wrong side
- […] – crochet the instructions within brackets into the same indicated st/sp.
-
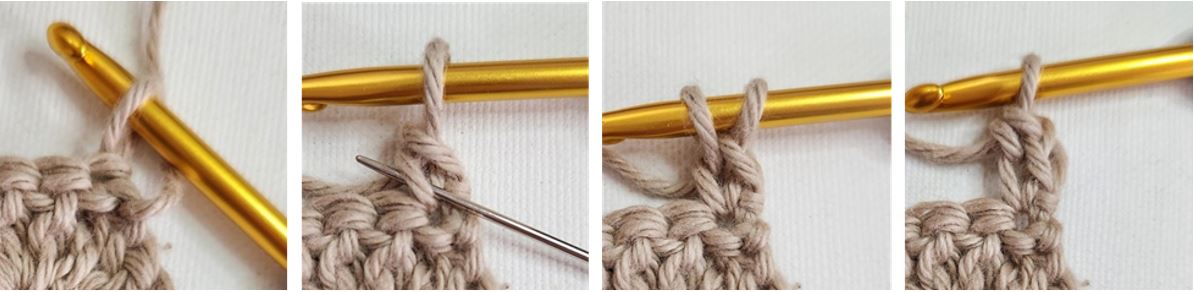
How to crochet the Stacked Single Crochet (STsc):
This stitch is an alternative to extended half double crochet, its intention in this pattern is to replace the ch3, or ch2 + dc at the beginning of the pattern and get a straighter edge.
At the beginning of the row, do not chain, keep your yarn behind your hook and work 1 single crochet in the first stitch, then work another single crochet into the left leg of the single crochet you just worked.
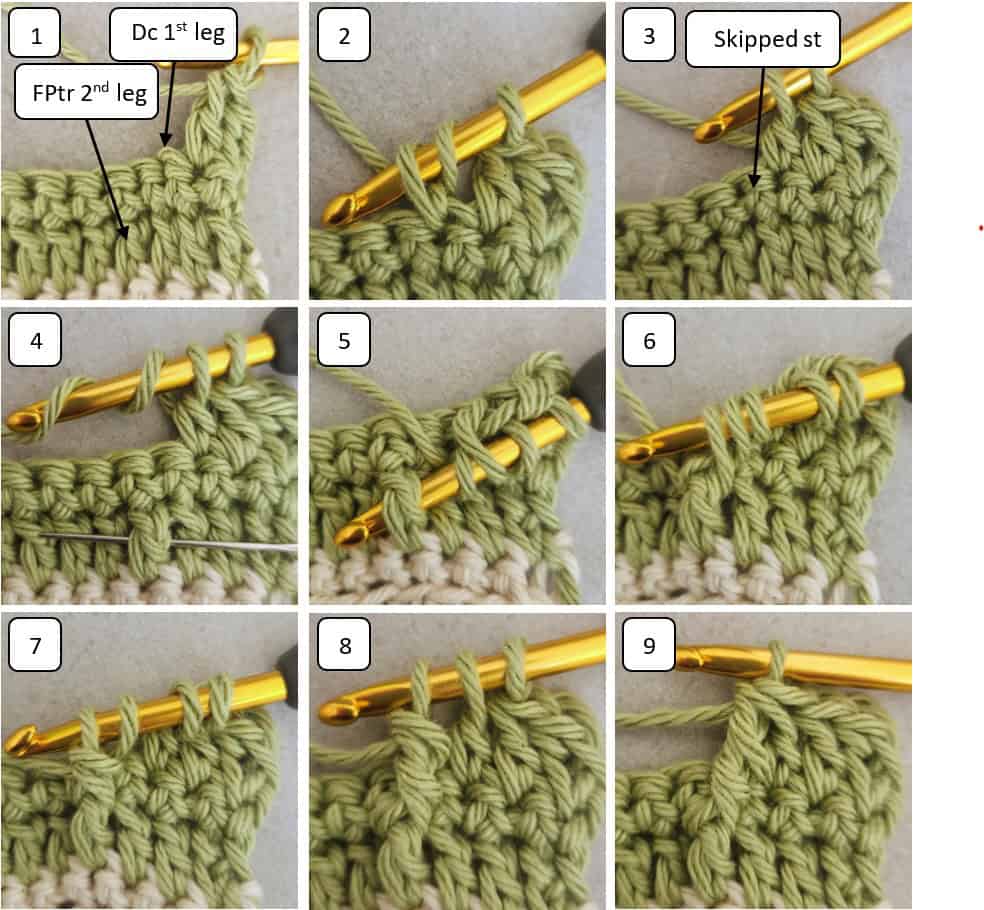
How to Crochet the Double Crochet Front Post Treble Together (dc-FPtr-tog):
Work the 1st dc leg: Yo insert hook into indicated st (pic 1), yo and pull up a loop (pic 2), yo and pull the yarn through 2 loops only, skip next st (pic 3).
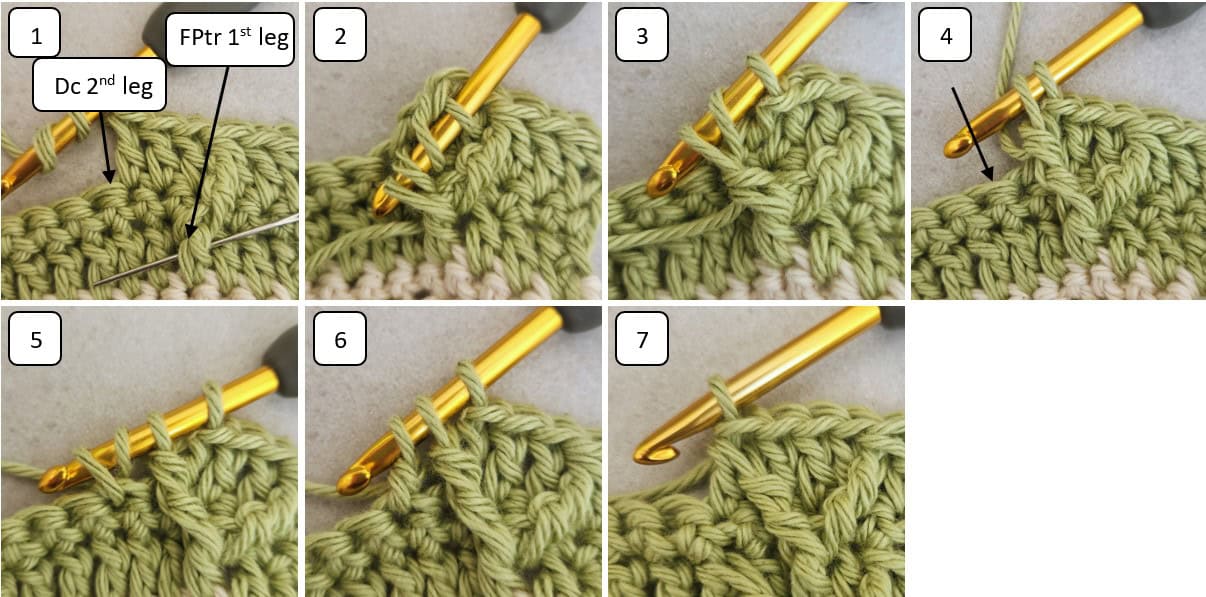
Work the 2nd FPtr leg: Yo twice (pic 4), insert hook from the front to the back and then to the front of the indicated stitch (working around the post – pic 5), yo and pull up a loop and draw the hook back (pic 6), yo and pull through 2 loops (4 loops remain on the hook – pic 7), yo and pull through 2 loops (3 loops remain on the hook – pic 8), yo again and pull through 3 remaining loops (pic 9).
How to Crochet the Front Post Treble Double Crochet Together (FPtr-dc-tog):
Work the 1st FPtr leg: Yo twice (pic 1), insert hook from the front to the back and then to the front of the indicated stitch (working around the post), yo pull up a loop and draw the hook back (pic 2), yo and pull through 2 loops (3 loops remain on the hook – pic 3), yo and pull through 2 loops (2 loops remain on the hook – pic 4).
Work the 2nd dc leg: Yo, insert hook into indicated st (pic 4), yo and pull up a loop (pic 5), yo and pull the yarn through 2 loops only (3 loops remain on the hook – pic 6), yo again and pull through 3 remaining loops (pic 7).
Notes
- Stitch Multiple: multiple of 12 + 2 (+2 turning ch, if starting with chains).
- STsc is an alternative to the 1st double crochet, its intention in this pattern is to get a straighter edge. If you prefer, you can replace it with ch3, or ch2 + dc at the beginning of each row.
- Ch 1 at the beginning of the row does not count as a stitch.
- This part might turn out a bit wider than the prev. Parts. This will be adjusted as you continue working the blanket.

Alternating Fishbone – Crochet Cable Pattern
If you are making the Spring Journey Blanket –
For section 3 – follow the pattern and stitch count at the end of the row.
If you are not making the Spring Journey Blanket – chain a multiple of 12 + 2 (+2 turning ch, if starting with chains). = after making a multiple of 12, add 2 chains, then add 2 more chains for turning ch. Ignore the stitch count at the end of the rows.
Row 1 (RS) –
If you are starting with chains: work 1 dc in 3rd ch from hook and in each ch across, turn.
If you are working on the Springtime Journey Blanket Section 3: STsc in 1st st, 1 dc in each st to the end of the row, turn. (Section 3 – 74 dc)
Row 2 (WS) – Ch 1 (doesn’t count as a st), 1 sc in each st (each dc & ch1) to the end of the row, turn. (74 sc)
Row 3 (RS) – STsc in 1st st.
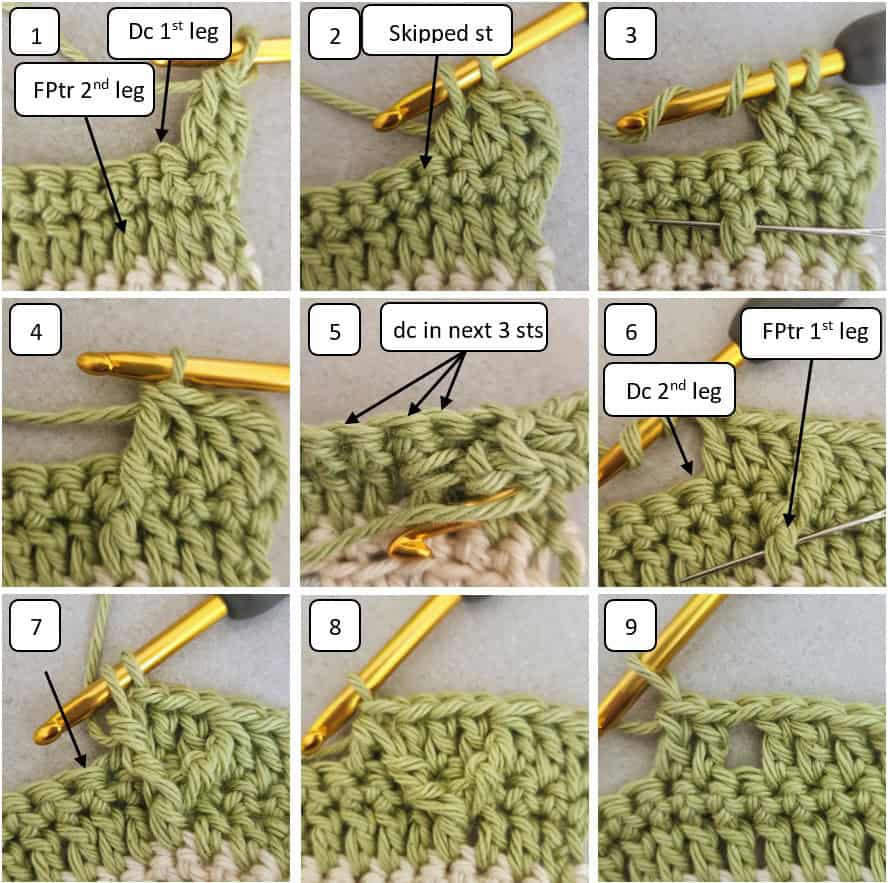
* 1 dc in next sc, 1 dc-FPtr-tog: work the 1st dc leg in next sc (pics 1-2), then skip 1 sc and work the 2nd FPtr leg around the dc 2 rows below (3rd hdc from the beginning – pics 3-4).
1 dc in next 3 sc (don’t skip sts – pic 5), 1 FPtr-dc-tog: work the 1st FPtr leg around the dc 2 rows below you just worked before (pic 6) then work the 2nd dc leg in next sc (pics 7-8).
1 dc in next 3 sc, ch 1, skip next sc, 1 dc in next 2 sc (pic 9); repeat from * until only 1 sc left, 1 dc in last sc, turn. (Section 3 – 74 sts = 56 dc, 6 dc-FPtr-tog, 6 FPtr-dc-tog, 6 ch-1 sp)
Rows 4-7 – Repeat rows 2-3 twice.
Rows 8 (WS) – Repeat row 2.
Row 9-10 – Repeat rows 1-2.
Row 11 (RS) – STsc in 1st st.
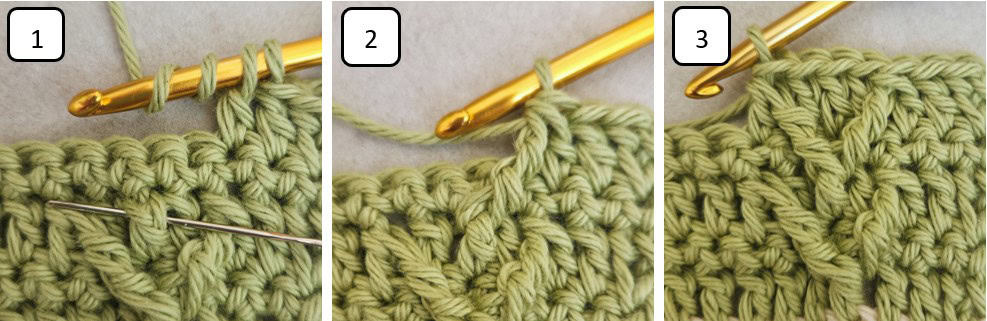
* 1 dc in next 3 sc, ch 1, skip next sc, 1 dc in next 3 sc, 1 dc-FPtr-tog: work the 1st dc leg in next sc then skip 1 sc and work the 2nd FPtr leg around the dc 2 rows below (pic 1).
1 dc in next 3 sc (don’t skip sts), 1 FPtr-dc-tog: work the 1st FPtr leg around the dc 2 rows below you just worked before then work the 2nd dc leg in next sc (pic 3); repeat from * until only 1 sc left, 1 dc in last sc, turn. (Section 3 – 74 sts = 56 dc, 6 dc-FPtr-tog, 6 FPtr-dc-tog, 6 ch-1 sp)
Row 12 (WS) – Ch 1 (doesn’t count as a st), 1 sc in each dc to the end of the row, turn. (Section 3 – 74 sc)
Rows 13-16 – Repeat rows 11-12 twice.
If making the Springtime Journey Blanket – change to Color E and continue to work Transition Rows for Section 3.

More Crochet Patterns Using Cable Stitch
Did you try this out? Share your project!
– Let me know how it went and leave a comment below.
– Tag me on Instagram @madebygootie
– Join and share in our FB Community
Want to save this post for later? Go ahead and PIN it!