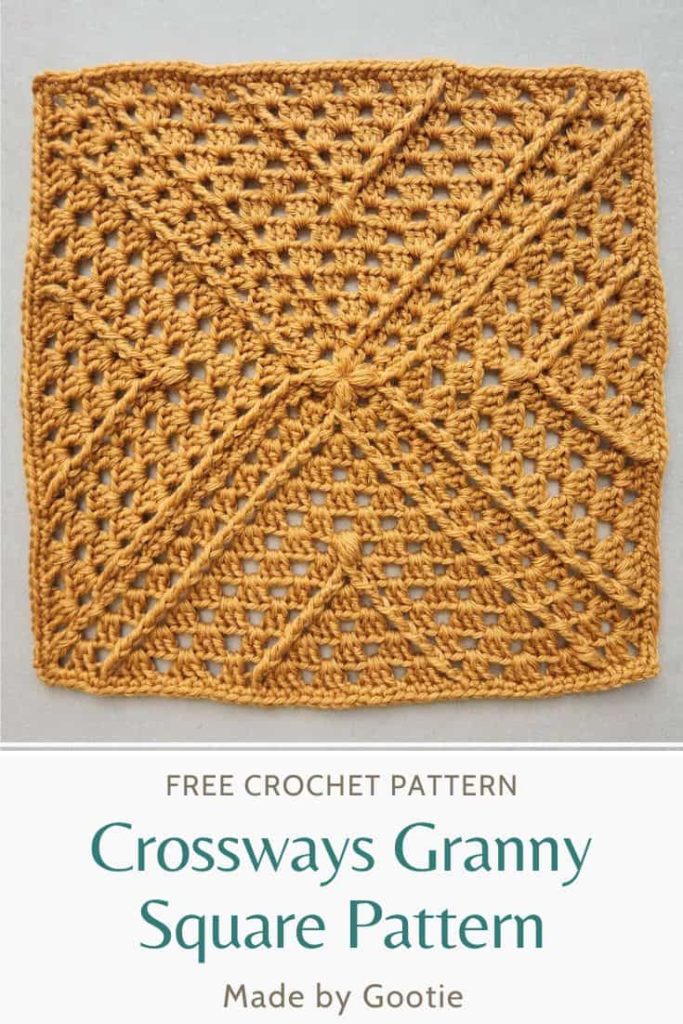
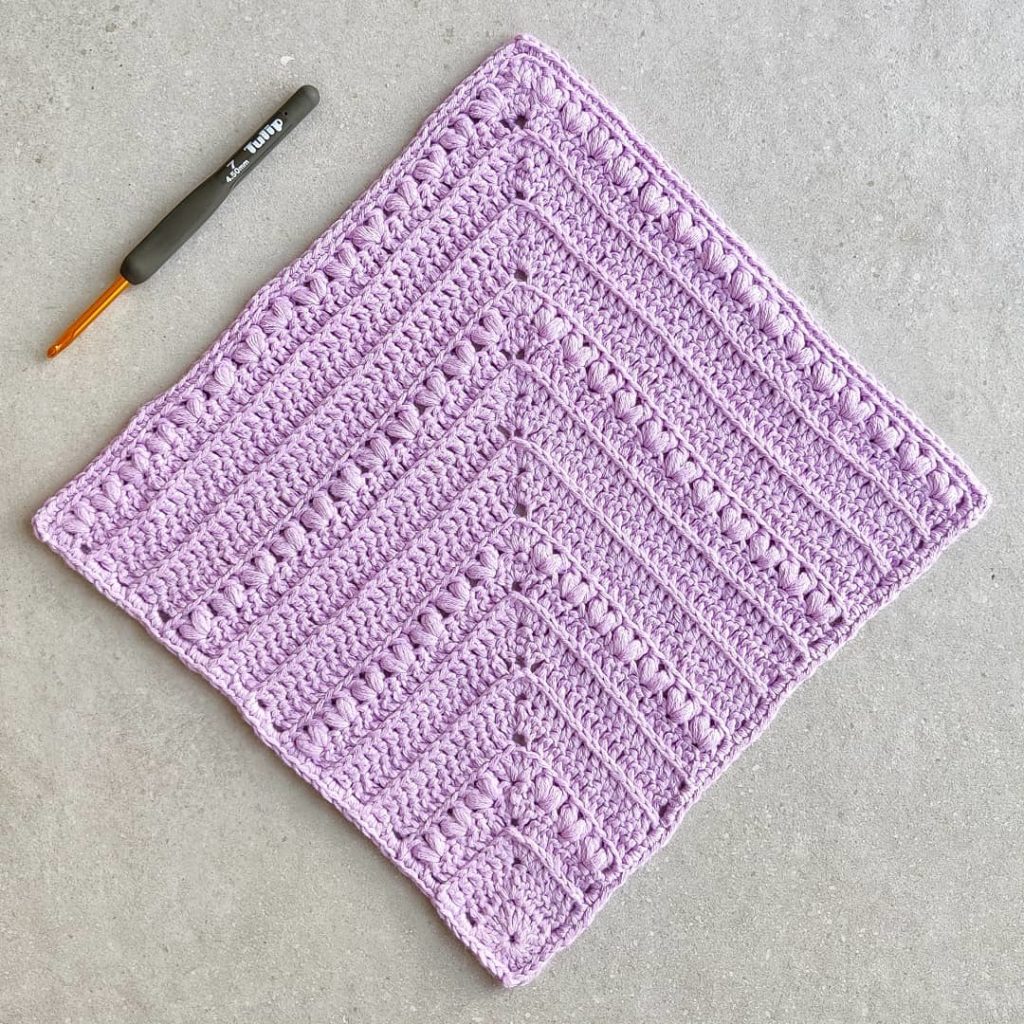
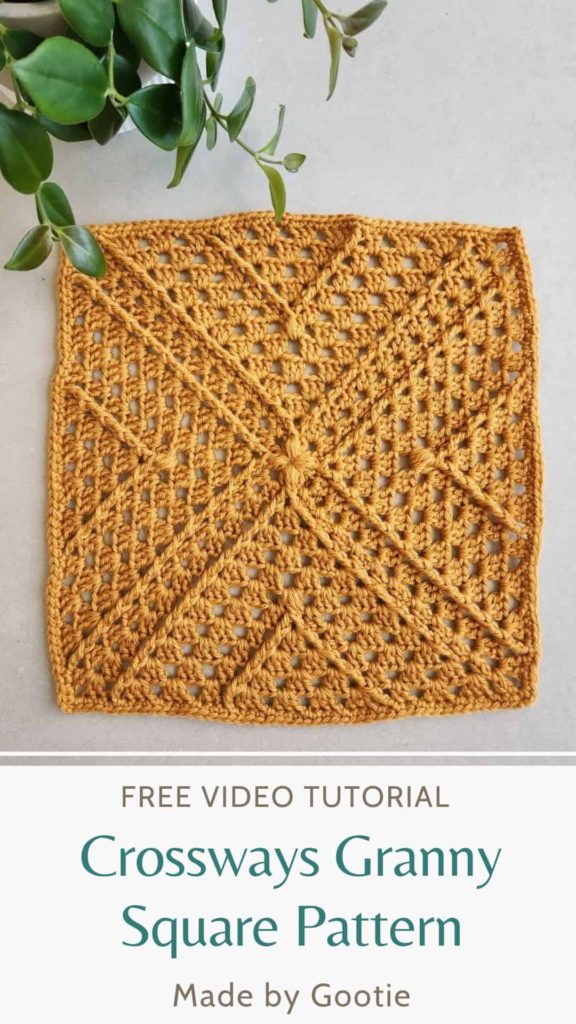
The Crossways Granny Square
Last Updated on December 14, 2023
I came out with the Crossways Granny Square when Debbie from MadameStitch invited me to join the Granny Stitch Sampler CAL.
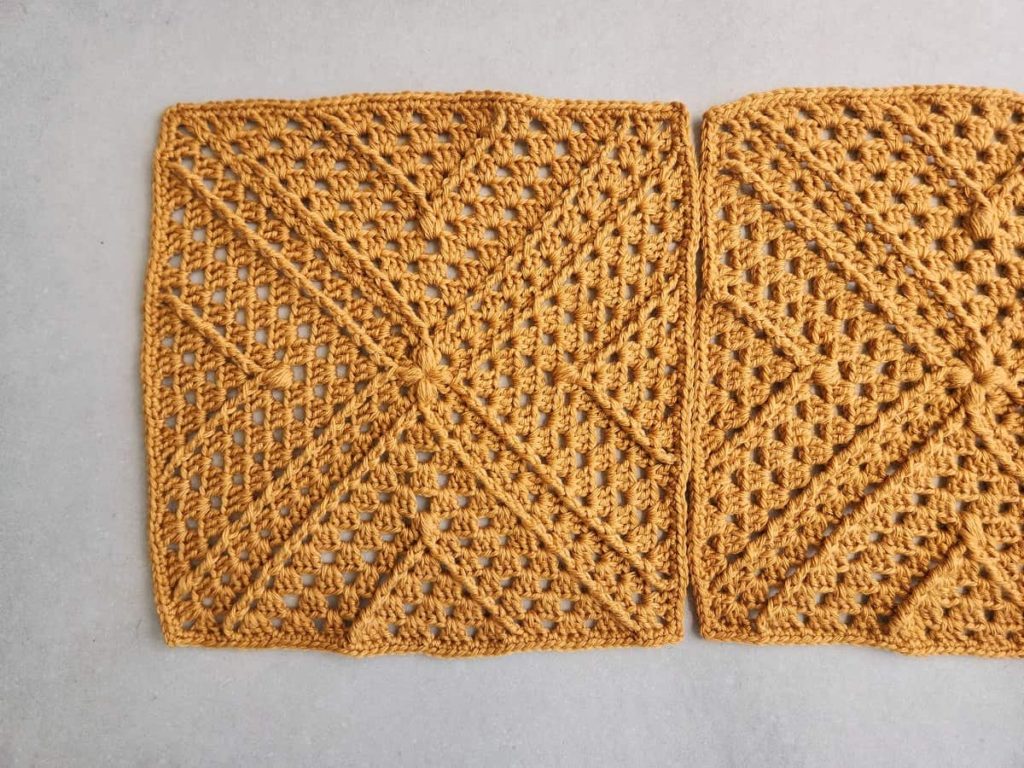
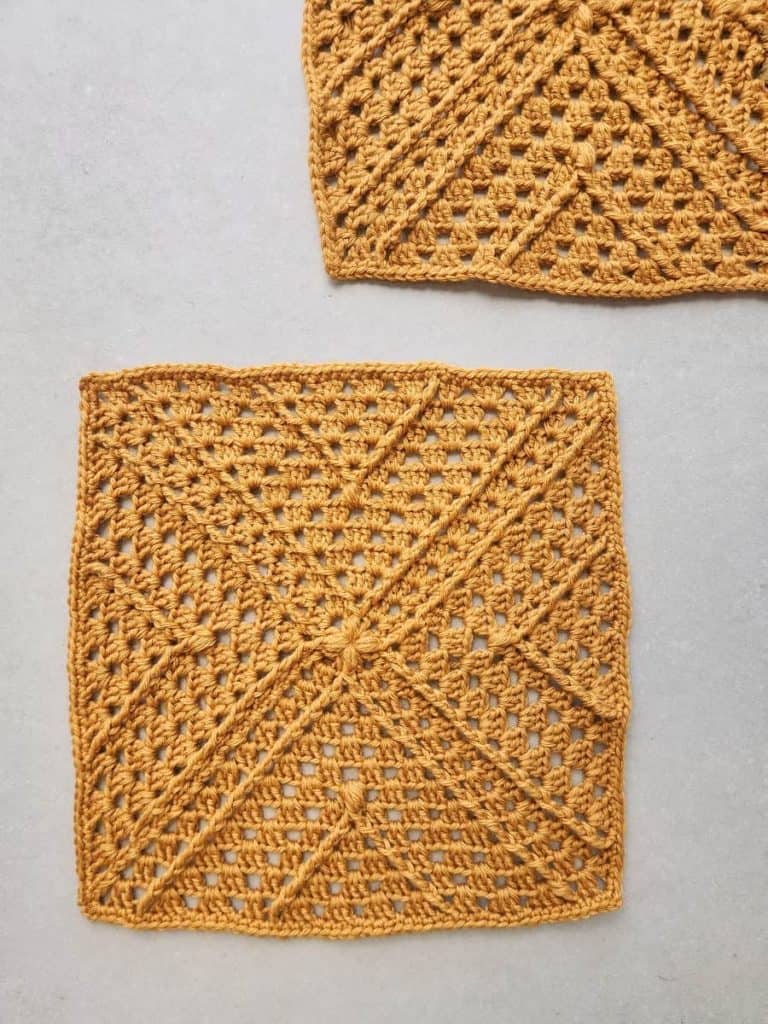
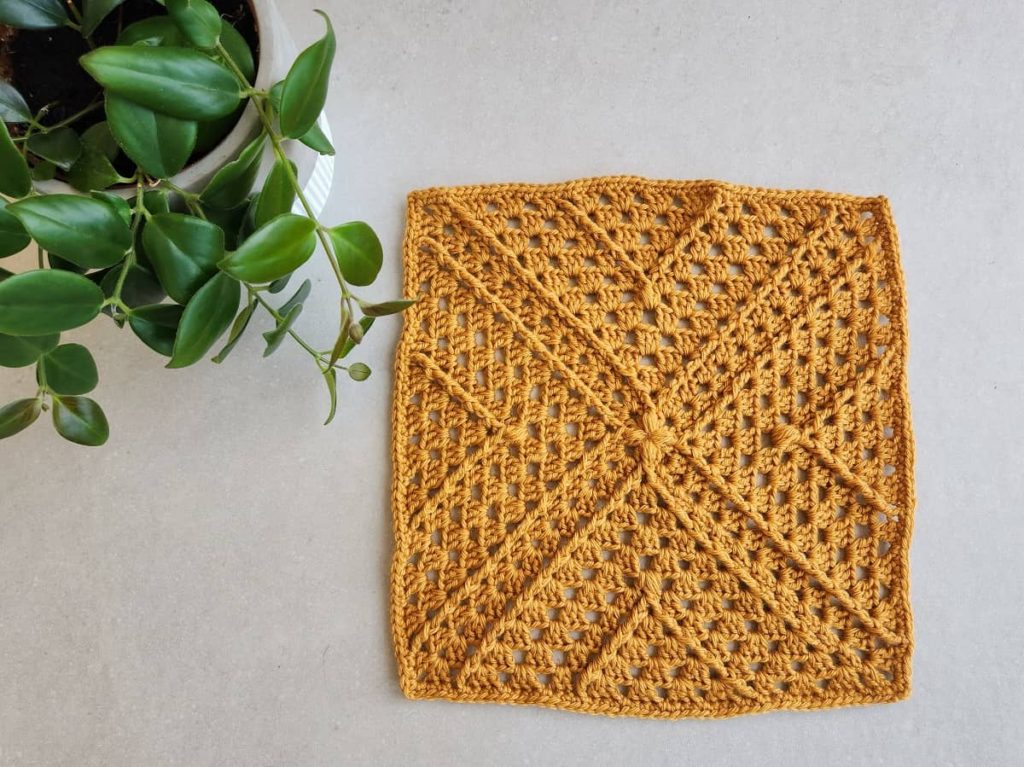
This unusual granny square crochet pattern is made using cable stitches to create diagonal lines across the square’s corners. The design is based on the classic granny square pattern, but the result is a beautiful alternative granny square pattern.
Scroll down for the video tutorial and written instructions!
Some of the links in this post may include affiliate links. Making a purchase through one of these links pays me a small referral fee at no added cost to you. These small fees add up and help me keep the blog running. View our disclosure and privacy policy for more information.
If you already mastered the classic granny square and love the look of it, but want to take your granny square crochet blanket to the next level, then you should definitely try out the Crossways Granny Square!
In this unusual granny square crochet pattern, the puffs and cables in this pattern create interesting diagonal lines from the center of the square.
If you want to crochet a granny square blanket with this pattern: you can either use this square pattern and keep enlarging it to make a big square. Or you can make as many squares as needed and join them together (I like to join with slip stitch through back loops and with the invisible seam).
Want to save this post for later? Go ahead and PIN it!
Unusual Granny Square Pattern PDF
You can find the ad-free PDF pattern with the full photo-tutorial at one of my shops below:


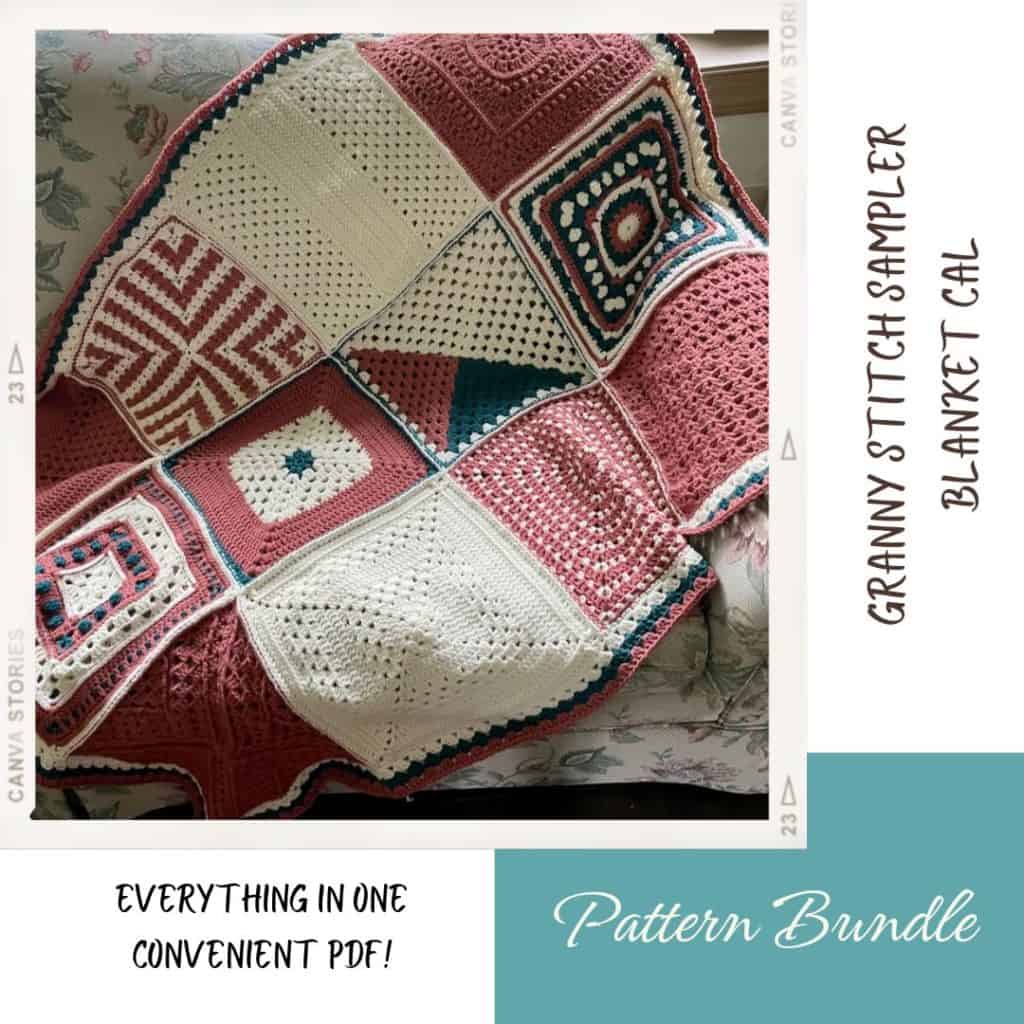
Granny Stitch Sampler Blanket Pattern
The Crossways Granny Square pattern was part of the collaborative crochet along Granny Stitch Sampler Blanket! This CAL was hosted by Debbie from MadameStitch.
The Blanket consists of 12 different 12″ granny squares, each square was designed by a different designer. Visit the linked blog post above for the free version, or click below if you want to purchase the PDF eBook.
Different Granny Square Video Tutorial
Crossways Granny Square – free unusual granny square crochet pattern
* Want to save this post for later? Go ahead and PIN it!
* Add this pattern to your Ravelry queue HERE!
Skill level – Intermediate
Materials
– Crochet hook 5 mm / H (I like this hook)
– Worsted (#4) yarn (I used Sirdar Country Classic Worsted for the blanket square)
Total amount of yarn needed for 1 square:
85 grams/140m/153yds
Gauge – Working rounds 1-4 will result in a 4” (10 cm) square.
Finished Size – 12×12″ (30.5×30.5 cm)
Abbreviations (US)
ch – chain
dc – double crochet
FPdc – front post double crochet: Yo, insert hook from the front to the back and then to the front of the indicated stitch (working around the post), yo and pull up a loop, continue working as a regular double crochet.
FPtr – front post treble crochet: Yo twice, from the front to the back and then to the front of the indicated stitch (working around the post), yo and pull up a loop, (yo and pull through 2 loops) x twice, yo again and pull through 2 remaining loops.
puff – (yo, insert hook into indicated st/sp, yo and pull up a loop) x 4 times working into same st/sp, yo and pull through 8 loops, yo again and pull through 2 remaining loops.
sc – single crochet
sp – space
ss – slip stitch
st – stitch
yo – yarn over
** See photo tutorial for special stitches below
How to Crochet the Puff Stitch
(yo, insert hook into indicated st/sp, yo and pull up a loop) x 4 times working into same st/sp, yo and pull through 8 loops, yo again and pull through 2 remaining loops.
How to crochet the Front Post Double Crochet Around Puff St (FPdc)
Yo, insert hook from the front to the back and then to the front of the indicated stitch (working around the post), yo and pull up a loop, yo and pull through 2 loops (2 loops remain on the hook), yo again and pull through 2 remaining loops.
How to crochet the Front Post Treble Crochet (FPtr)
Yo twice, from the front to the back and then to the front of the indicated stitch (working around the post), yo and pull up a loop, yo and pull through 2 loops (3 loops remain on the hook), yo and pull through 2 loops (2 loops remain on the hook), yo again and pull through 2 remaining loops.
Notes
- Ch 5 at the beginning of the round counts as 1 dc & ch-2 sp.
- (…) – Crochet the instructions within brackets as many times as directed.
- […] – Crochet the instructions within brackets into the same indicated stitch.
Crossways granny square pattern instructions
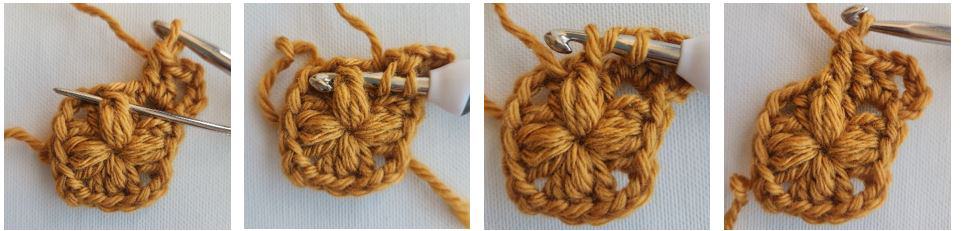
Make a magic ring.
Round 1: Ch 5 (counts as 1 dc & ch-2 sp here and throughout the pattern), working into the ring: (1 dc, 1 puff, 1 dc, ch 2) x 3 times, 1 dc, 1puff, ss to 3rd ch of the beginning ch-5. Pull the ring tight. (8 dc, 4 puff, 4 ch-2 sp)
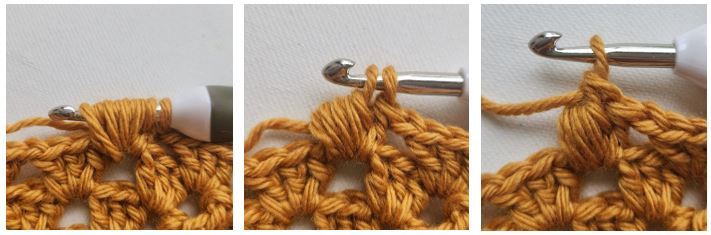
Round 2: Ss into next ch-2 sp (corner), ch 5.
* 2 dc in same ch-2 sp, 1 FPdc in next puff, ch 1, 1 FPdc around the same puff you made the previous FPdc, 2 dc in next ch-2 sp (corner), ch 2; Repeat from * 2 more times.
2 dc in same ch-2 sp, 1 FPdc in next puff, ch 1, 1 FPdc around the same puff you made the previous FPdc, 1 dc in initial ch-2 sp (corner), ss to 3rd ch of the beginning ch-5. (16 dc, 8 FPdc, 4 ch-1 sp, 4 ch-2 sp)
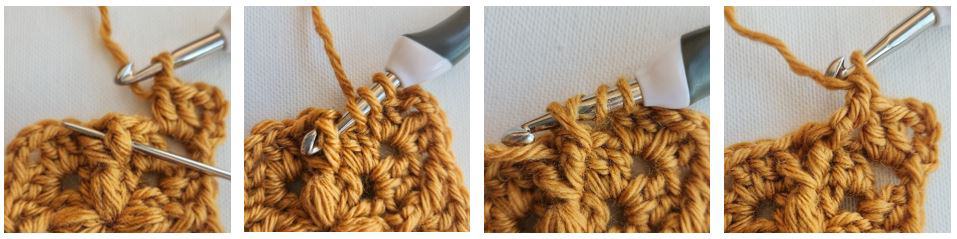
Round 3: Ss into next ch-2 sp (corner), ch 5.
* 2 dc in same ch-2 sp, 1 FPtr in next FPdc (pic 2), ch 1, 3 dc in next ch-1 sp (between the 2 FPdc), ch 1, 1 FPtr in next FPdc, 2 dc in next ch-2 sp (corner), ch 2; Repeat from * 2 more times.
2 dc in same ch-2 sp, 1 FPtr in next FPdc, ch 1, 3 dc in next ch-1 sp, ch 1, 1 FPtr in next FPdc, 1 dc in initial ch-2 sp (corner), ss to 3rd ch of the beginning ch-5. (28 dc, 8 FPtr, 8 ch-1 sp, 4 ch-2 sp)
Round 4: Ss into next ch-2 sp (corner), ch 5.
* 2 dc in same ch-2 sp, 1 FPtr in next FPtr, ch 1, (3 dc in next ch-1 sp, ch 1) x twice, 1 FPtr in next FPtr, 2 dc in next ch-2 sp (corner), ch 2; Repeat from * 2 more times.
2 dc in same ch-2 sp, 1 FPtr in next FPtr, ch 1, (3 dc in next ch-1 sp, ch 1) x twice, 1 FPtr in next FPtr, 1 dc in initial ch-2 sp (corner), ss to 3rd ch of the beginning ch-5. (40 dc, 8 FPtr, 12 ch-1 sp, 4 ch-2 sp)
o you prefer photo tutorials? Get the premium, ad-free, full photo-tutorial, printable PDF version on Ravelry or Etsy!
Round 5: Ss into next ch-2 sp (corner), ch 5.
* 2 dc in same ch-2 sp, 1 FPtr in next FPtr, ch 1, (3 dc in next ch-1 sp, ch 1) x 3 times, 1 FPtr in next FPtr, 2 dc in next ch-2 sp (corner), ch 2; Repeat from * 2 more times.
2 dc in same ch-2 sp, 1 FPtr in next FPtr, ch 1, (3 dc in next ch-1 sp, ch 1) x 3 times, 1 FPtr in next FPtr, 1 dc in initial ch-2 sp (corner), ss to 3rd ch of the beginning ch-5. (52 dc, 8 FPtr, 16 ch-1 sp, 4 ch-2 sp)
Round 6: Ss into next ch-2 sp (corner), ch 5.
* 2 dc in same ch-2 sp, 1 FPtr in next FPtr, ch 1, (3 dc in next ch-1 sp, ch 1) x 4 times, 1 FPtr in next FPtr, 2 dc in next ch-2 sp (corner), ch 2; Repeat from * 2 more times.
2 dc in same ch-2 sp, 1 FPtr in next FPtr, ch 1, (3 dc in next ch-1 sp, ch 1) x 4 times, 1 FPtr in next FPtr, 1 dc in initial ch-2 sp (corner), ss to 3rd ch of the beginning ch-5. (64 dc, 8 FPtr, 20 ch-1 sp, 4 ch-2 sp)
Round 7: Ss into next ch-2 sp (corner), ch 5.
* 2 dc in same ch-2 sp, 1 FPtr in next FPtr, ch 1, (3 dc in next ch-1 sp, ch 1) x twice, [1 dc, 1 puff, 1 dc] in next ch-1 sp, ch 1, (3 dc in next ch-1 sp, ch 1) x twice, 1 FPtr in next FPtr, 2 dc in next ch-2 sp (corner), ch 2; Repeat from * 2 more times.
2 dc in same ch-2 sp, 1 FPtr in next FPtr, ch 1, (3 dc in next ch-1 sp, ch 1) x twice, [1 dc, 1 puff, 1 dc] in next ch-1 sp, ch 1, (3 dc in next ch-1 sp, ch 1) x twice, 1 FPtr in next FPtr, 1 dc in initial ch-2 sp (corner), ss to 3rd ch of the beginning ch-5. (72 dc, 8 FPtr, 4 puff, 24 ch-1 sp, 4 ch-2 sp)
Round 8: Ss into next ch-2 sp (corner), ch 5.
* 2 dc in same ch-2 sp, 1 FPtr in next FPtr, ch 1, (3 dc in next ch-1 sp, ch 1) x twice, 2 dc in next ch-1 sp, 1 FPdc in next puff, ch 1, 1 FPdc around the same puff you made the previous FPdc, 2 dc in next ch-1 sp, ch 1, (3 dc in next ch-1 sp, ch 1) x twice, 1 FPtr in next FPtr, 2 dc in next ch-2 sp (corner), ch 2; Repeat from * 2 more times.
2 dc in same ch-2 sp, 1 FPtr in next FPtr, ch 1, (3 dc in next ch-1 sp, ch 1) x twice, 2 dc in next ch-1 sp, 1 FPdc in next puff, ch 1, 1 FPdc aound the same puff you made the previous FPdc, 2 dc in next ch-1 sp, ch 1, (3 dc in next ch-1 sp, ch 1) x twice, 1 FPtr in next FPtr, 1 dc in initial ch-2 sp (corner), ss to 3rd ch of the beginning ch-5. (80 dc, 8 FPtr, 8 FPdc, 28 ch-1 sp, 4 ch-2 sp)
Round 9: Ss into next ch-2 sp (corner), ch 5.
* 2 dc in same ch-2 sp, 1 FPtr in next FPtr, ch 1, (3 dc in next ch-1 sp, ch 1) x twice, 2 dc in next ch-1 sp, 1 FPtr in next FPdc, ch 1, 3 dc in next ch-1 sp (between the 2 FPdc), ch 1, 1 FPtr in next FPdc, 2 dc in next ch-1 sp, ch 1, (3 dc in next ch-1 sp, ch 1) x twice, 1 FPtr in next FPtr, 2 dc in next ch-2 sp (corner), ch 2; Repeat from * 2 more times.
2 dc in same ch-2 sp, 1 FPtr in next FPtr, ch 1, (3 dc in next ch-1 sp, ch 1) x twice, 2 dc in next ch-1 sp, 1 FPtr in next FPdc, ch 1, 3 dc in next ch-1 sp, ch 1, 1 FPtr in next FPdc, 2 dc in next ch-1 sp, ch 1, (3 dc in next ch-1 sp, ch 1) x twice, 1 FPtr in next FPtr, 1 dc in initial ch-2 sp (corner), ss to 3rd ch of the beginning ch-5. (92 dc, 16 FPtr, 32 ch-1 sp, 4 ch-2 sp)
Round 10: Ss into next ch-2 sp (corner), ch 5.
* 2 dc in same ch-2 sp, 1 FPtr in next FPtr, ch 1, (3 dc in next ch-1 sp, ch 1) x twice, 2 dc in next ch-1 sp, 1 FPtr in next FPtr, ch 1, (3 dc in next ch-1 sp, ch 1) x in each ch-1 sp until FPtr, 1 FPtr in next FPtr, 2 dc in next ch-1 sp, ch 1, (3 dc in next ch-1 sp, ch 1) x twice, 1 FPtr in next FPtr, 2 dc in next ch-2 sp (corner), ch 2; Repeat from * 2 more times.
2 dc in same ch-2 sp, 1 FPtr in next FPtr, ch 1, (3 dc in next ch-1 sp, ch 1) x twice, 2 dc in next ch-1 sp, 1 FPtr in next FPtr, ch 1, (3 dc in next ch-1 sp, ch 1) x in each ch-1 sp until FPtr,
1 FPtr in next FPtr, 2 dc in next ch-1 sp, ch 1, (3 dc in next ch-1 sp, ch 1) x twice, 1 FPtr in next FPtr, 1 dc in initial ch-2 sp (corner), ss to 3rd ch of the beginning ch-5. (104 dc, 16 FPtr, 36 ch-1 sp, 4 ch-2 sp)
Rounds 11-12: Repeat round 10. At this point your square should measure approx. 11.5” (29.21 cm) after blocking.
** Block your square before adding the border and measure it. If your square is smaller, keep working round 10, until you reach approx. 11.5” (29.21 cm).
If your square is bigger, frog 1 or 2 rounds to reach 11.5” (29.21 cm).
Continue to work the border.
Border For Granny Square
Ss into next ch-2 sp (corner), ch 1 (doesn’t count as a st), [1 sc, ch 2, 1 sc] in same ch-2 sp.
* Work 1 sc in each stitch and ch-1 sp until ch-2 sp (corner), [1 sc, ch 2, 1 sc] in next ch-2 sp (corner); Repeat from * 2 more times.
Work 1 sc in each stitch and ch-1 sp until beginning ch-1, ss to 1st sc. (196 sc, 4 ch-2 sp)
Fasten off, soak and block if needed.
More Free Crochet Square Patterns
Granny Squares FAQs
How many different granny square patterns are there?
Well, that’s a big question! There is a range of different granny square patterns, while the classic granny square pattern is made out of double crochet stitches and chains, there is also a solid granny square (without holes).
There are also many different granny square patterns that feature different stitches, such as lacey stitches, and granny squares with flowers in the middle. Even modern granny squares like my Iris in a Square pattern.
You can find more unusual granny square patterns on these round up posts:
20 Granny Square Patterns
18 Flower Granny Square Patterns
How do you sew granny squares together invisibly?
There are many ways to join granny squares together.
My favorite way to join crochet squares together invisibly is by slip stitching through the back loops. In this method, you place both squares with their right sides facing together, then slip stitch through the outer loops (the ones on the wrong sides) along the squares.
I used this joining method in my Flower Granny Square Blanket and Diamonds Hexagon Blanket.
What are the different ways to start a granny square?
You can start a granny square in 3 different ways.
The first way and my favorite, is by making a magic ring, then chain 5 chains which count as 1 dc & ch-2 space, and start working into the ring. This method creates a tidy and tight center.
The second way is by working into a single chain. You start by chaining the beginning chains for the first round, plus 1 chain. Then work the first round into the first chain you made.
The third way to start a granny square, is by creating a loop of chain and working into that loop. But this will make the whole much more noticeable.
Did you try this out? Share your project!
– Let me know how it went and leave a comment below.
– Tag me on Instagram @madebygootie
– Join and share in our FB Community
Want to save this post for later? Go ahead and PIN it!
What a great square. Lately I’ve been so obsessed with hexi sweaters, I want to add 2 corners to this and make i into a sweater. It’d be a great one!
Oh it will be so pretty!!
Please let me know if you get to make it!
Great square! I tried to save it to Pinterest and Ravelry for use in the future but both links go to a different pattern – the Modern Granny Square
Thank you so much for catching that! It is fixed now 🙂