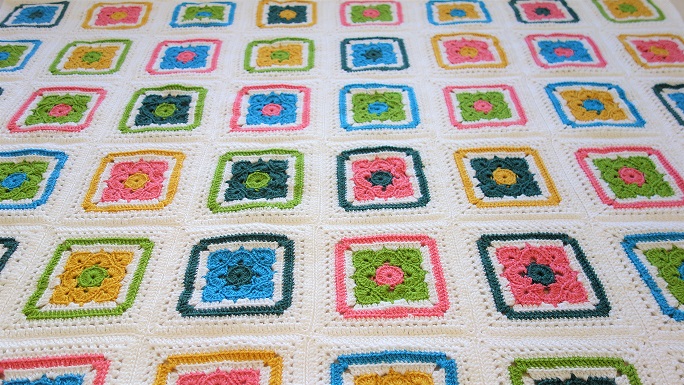
Flower Granny Square Blanket Free Pattern
Last Updated on July 11, 2024
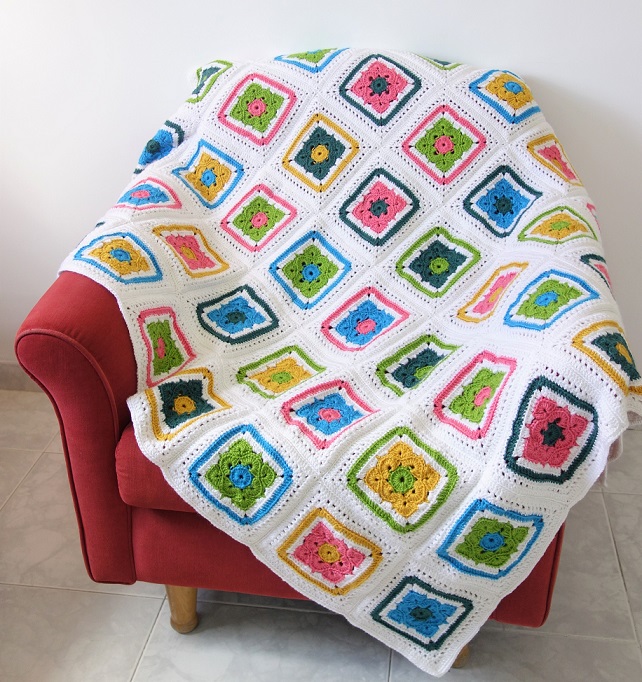
There’s nothing timeless like the classic crochet granny square. Although we do like to change things a little and try something different. So how about a flower granny square? This pattern starts with a flower motif which you then worked into a square.
** Some of the links in this post may include affiliate links. For more details, view our disclosure and privacy policy.
About This Modern Granny Square Blanket Pattern
This pattern was developed from my Flower Square Coaster pattern. I submitted the coaster design to I Like Crochet magazine and suggested various uses for it, and the editors eventually opted for a blanket. I wanted to optimize the original pattern, so I made the squares bigger and less dense, and I think the end result turned out beautiful!
What Yarn Should You Use for the Flower Granny Square blanket?
This Flower Granny Square Blanket pattern is actually very versatile! You can use any yarn weight and composition you want, and make enough squares to create a blanket as big as you want.
I used Alize Extra yarn, but I know it’s not accessible for most of you, so HERE you can find some other great yarn options.
This pattern is also great for using up all your left overs yarn! You don’t need a lot of yarn for the flower motives, and can use your leftovers for that.
You can find the ad-free PDF pattern with the full photo-tutorial at one of my shops below:

Flower Granny Square blanket
Materials
– 4.5 mm Crochet hook (I love the Furls and Clover hooks).
– DK (#3) Weight yarn – for this pattern I used Alize Extra yarn (100gr/220m/241yds), you can find more great yarn options HERE.
Total amount of yarn needed for a throw size blanket:
Background color – 8 skeins (800gr/1,760m/1,928yds)
Flowers – I used 5 different colors – 1 skein (100gr/220m/241yds) per color (I didn’t use the whole skein, you can use scrap yarn for the flowers!)
Skill level – Intermediate
Gauge (in single crochet) – 24 stitches and 32 rows = 10 cm
* Want to save this post for later? Go ahead and PIN it!
Abbreviations (US)
ss – Slip stitch
ch – Chain
dc – Double crochet
ss blo – Slip stitch back loop only
sc blo – Single crochet back loop only
hdc blo – half double crochet back loop only
dc blo – double crochet back loop only
Gauge – 16 sc and 16 rows = 4 in/10 cm with 4.5mm hook
Finished size – 41×53” (106×136 cm)
Notes
- You can use any other yarn with a suitable hook.
- You can change the size of the flower granny square blanket as you wish, by making a different number of squares.
Looking for More Crochet Inspiration? Check out these other free patterns on the blog:

Flower Granny Square Blanket Written Pattern
Round 1: With color 1
ch5, form a ring with ss into first ch.
Round 2:
ch3 (counts as first dc), 19dc in the ring, ss to top of ch3.
Round 3: Attach color 2 through back loop
[ch5 + ss blo] in same st you attached the yarn, sc blo in next st, ch3 (skip 2 sts), sc blo in next st.
* [ss blo + ch5 + ss blo] in the same st, sc blo in next st, ch3 (skip 2 sts), sc blo in next st; Repeat from * two more times, ss into first ch5 loop.
Prefer a detailed step-by-step photo tutorial?
Get the premium, ad free, printable PDF version on Ravelry or Etsy!
Round 4:
ch2, turn- you’ll be working on the wrong side, ss to ch3 of previous round, turn again- back to right side.
* 5dc into ch5 loop, ch1, 5 dc into same loop, ss in ch3; Repeat from * two more times.
5dc into ch5 loop, ch1, 5 dc into same loop, ss first ss (in ch3).
Round 5:
[ch4 + ss] in same ss (first st), sc blo in next 3 dc (make sure not to skip the first dc), ch3 (skip 2 dc), sc blo in ch1 (gap), ch3 (skip 2 dc), sc blo in 3rd dc and next 2 dc.
* [ss blo + ch4 + ss blo] in same st, sc blo in next 3 dc (don’t skip first st), ch3 (skip 2 dc), sc blo in ch1 (gap), ch3 (skip 2 dc), sc blo in 3rd dc and next 2 dc; Repeat from * two more times, ss into first ch4 loop.
Round 6:
ch2, turn- you’ll be working on the wrong side, ss into last ch3 of previous round (same as round 4), turn again- back to right side, 8 dc into ch4 loop, ss into ch3, ch3, ss in sc blo, ch3.
* ss into ch3, 8dc into ch4 loop, ss into ch3, ch3, ss in sc blo, ch3; Repeat from * two more times, ss in first ss of round, fasten off.
Round 7: Attach color 3 through back loop of first dc
ch3 (counts as first dc blo), dc blo in next 2 dc, 2dc blo in next dc, ch2, 2dc blo in next dc, dc blo in next 3 dc, [dc + 3hdc] in space under two ch3 chains of two previous rounds, [3hdc + dc] in next space.
* dc blo in next 3 dc (don’t skip first dc), 2dc blo in next dc, ch2, 2dc blo in next dc, dc blo in next 3 dc, [dc + 3hdc] in space undes blo in the next ch1 st (belongs to the left square corner) ch1 (counts as first sc blo), sc blo along the blanket. When you reach a corner (ch2 gap), sc blo in first ch1, ch 1, sc blo in second ch1. Continue sc blo and work corners accordingly all around, ss to top of ch1, fasten off.
Round 8: Attach color 1 through back loop of top ch3
Ch3 (counts as first dc blo), dc blo in next 4 sts.
* [2dc + ch2 + 2dc] in ch2 gap, dc blo in next 18 sts; Repeat from * two more times.
[2dc + ch2 + 2dc] in ch2 gap, dc blo in next 13 sts, ss to top of ch3, fasten off.
Round 9: Attach color 3 through back loop of top ch3
Ch2 (counts as first hdc blo), hdc blo in next 6 sts.
* [2hdc + ch2 + 2hdc] in ch2 gap, hdc blo in next 22 sts; Repeat from * two more times.
[2hdc + ch2 + 2hdc] in ch2 gap, hdc blo in next 15 sts, ss to top of ch2.
Prefer to take the pattern instructions on the road with you? Get the premium, ad free, printable PDF version onRavelry or Etsy!
Round 10:
Ch 2 (counts as first hdc), ch 1(counts as gap), skip st and hdc in the next st.
[ch1, skip st and hdc in next st] in next 6 sts.
* [2hdc + ch2 + 2hdc] in ch2 gap, [ch 1, skip st and hdc in next st] in next 26 sts; Repeat from * two more times.
[2hdc + ch2 + 2hdc] in ch2 gap, [ch 1, skip st and hdc in next st] in next 16 sts, ch1, skip st, ss to top of ch2.
Round 11:
Ch3 (counts as first dc), dc in next 10 sts (until ch2 gap)
Note: you need to dc in ch1 gap and in next dc all the way, and then dc in next 2 dc.
* [2dc + ch2 + 2dc] in ch2 gap, dc in next 30 sts; Repeat from * two more times.
[2dc + ch2 + 2dc] in ch2 gap, dc in next 19 sts, ss to top of ch3, fasten off.
Assembly
Place the squares with 6 squares horizontally and 8 vertically (see blanket diagram below). With right sides held together (wrong side facing you), work through outer loops only, ss squares together with color A. Work horizonal rows, and then vertical rows. When you’re done with the last vertical row, don’t fasten off, you’ll continue the border from this point.
Border
Working on the right side, ss blo in the next ch1 st (belongs to the left square corner) ch1 (counts as first sc blo), sc blo along the blanket. When you reach a corner (ch2 gap), sc blo in first ch1, ch 1, sc blo in second ch1. Continue sc blo and work corners accordingly all around, ss to top of ch1, fasten off.
Flower Granny Square Blanket Assembly Diagram
Did you try this out? Let me know how it went and leave a comment below or tag me @madebygootie !
* Want to save this post for later? Go ahead and PIN it!
this us a scam. nowhere different I see a download button for a free copy of this pattern. I really don’t. like it when people don’t care about others and send us on wild goose chased.
Hi Barbara,
I’m not sure who sent you here saying there is a free download for this pattern.
But as you can clearly see, this pattern is free for you on the website 🙂
I’m sorry you got confused!