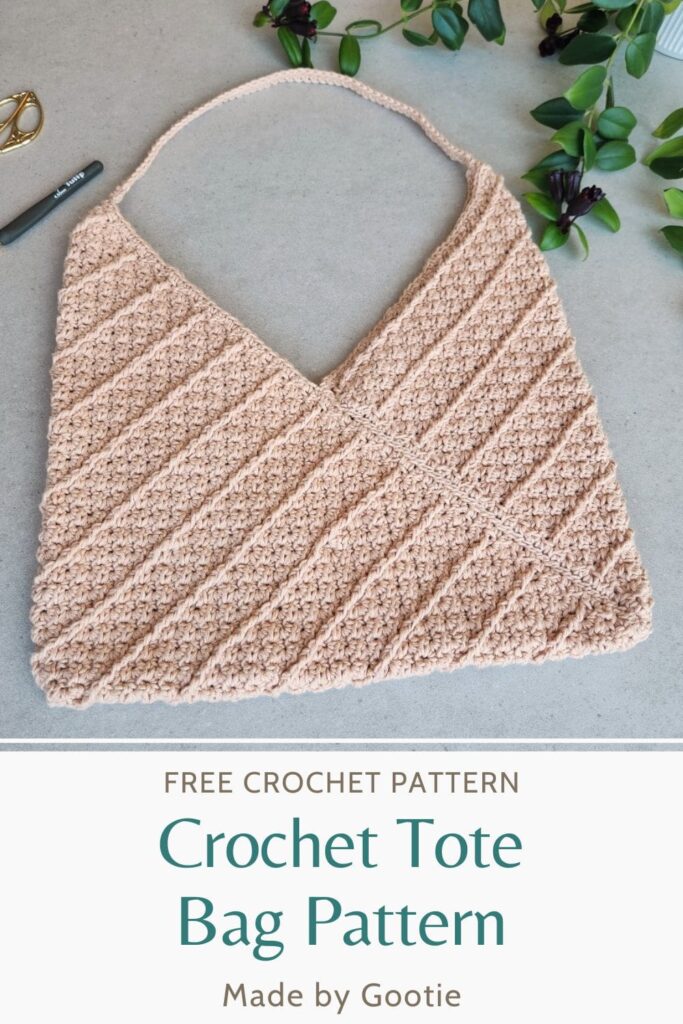
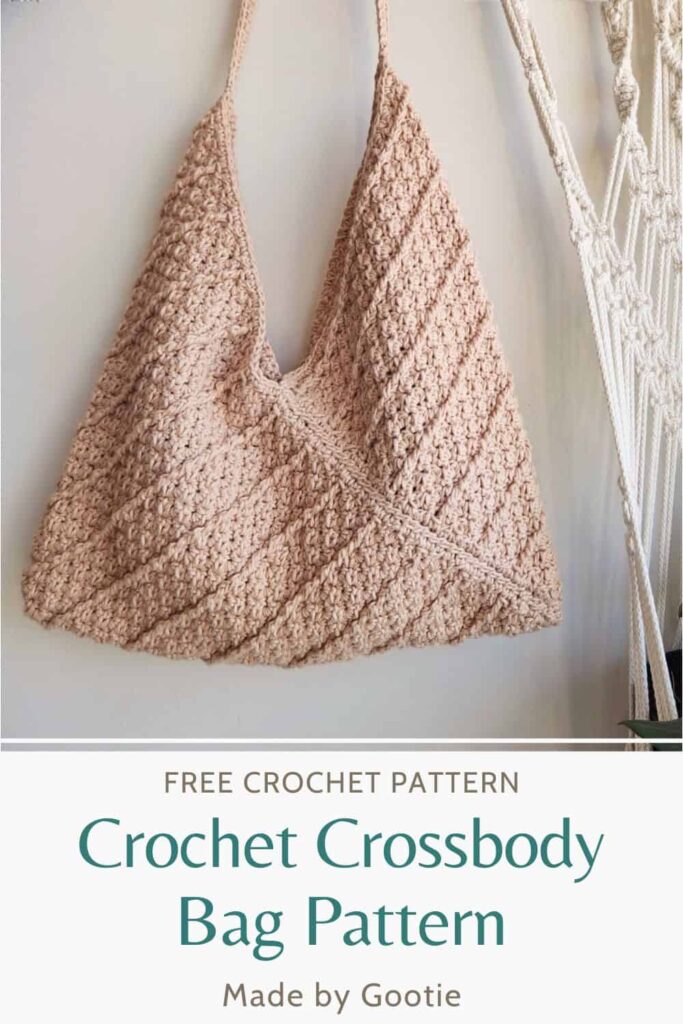
Sandy Ridges Crochet Crossbody Bag Pattern
Last Updated on February 20, 2025
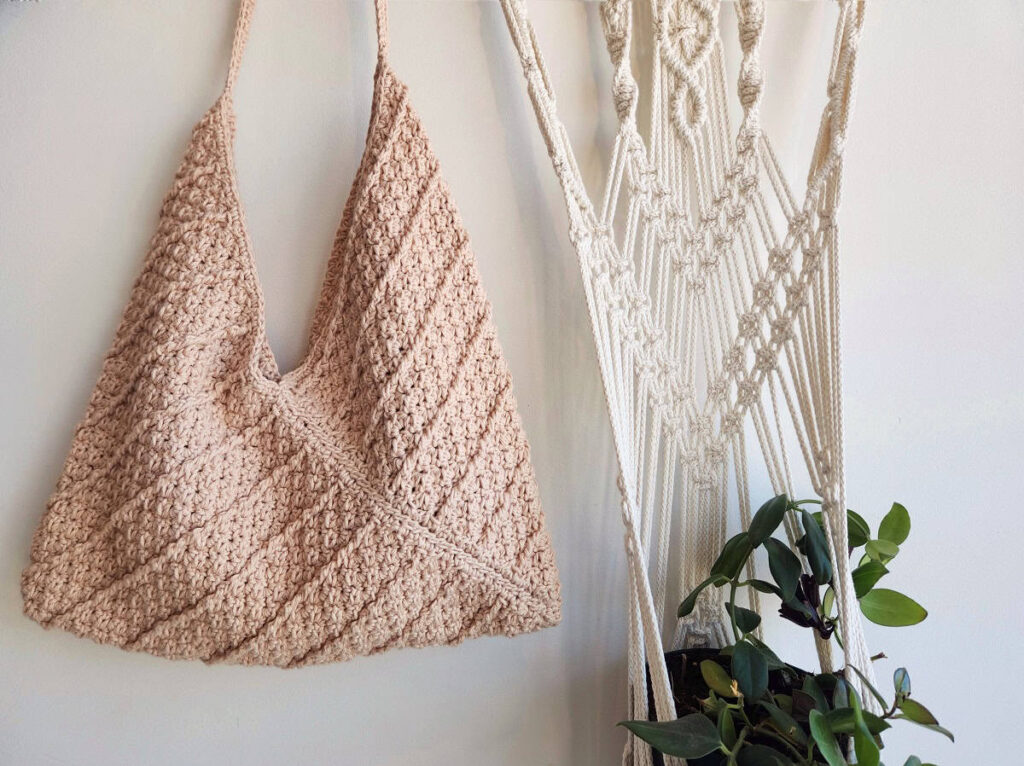
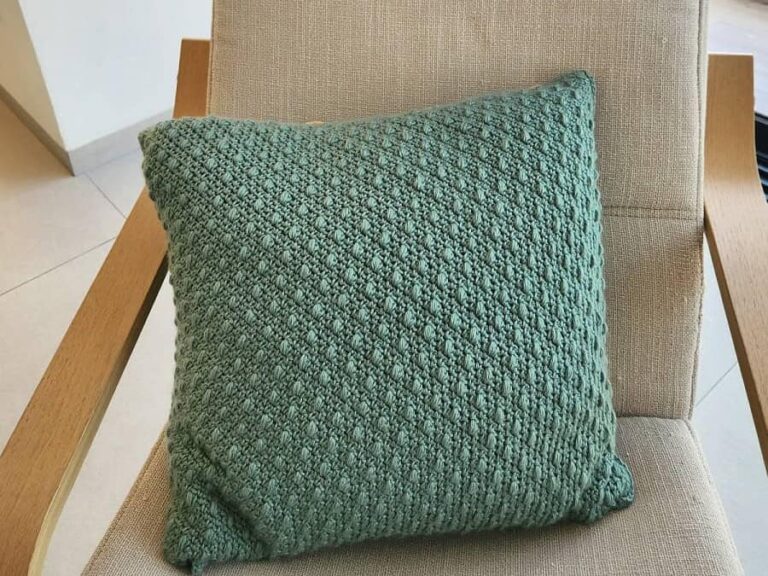
The Sandy Ridges Crochet Crossbody Bag pattern is made by folding and sewing a rectangle into the perfect-sized crossbody (or crochet messenger bag).
The bag pattern is worked in the C2C method and creates a stylish crossbody bag, with a unique texture.
The crochet bag pattern includes easy-to-follow written instructions and a full video tutorial.
** Some of the links in this post may include affiliate links. Making a purchase through one of these links pays me a small referral fee at no added cost to you. These small fees add up and help me keep the blog running. View our disclosure and privacy policy for more information.
I love the construction of this bag, it creates the perfect crochet tote bag. It’s incredible what you can make from just a rectangle!
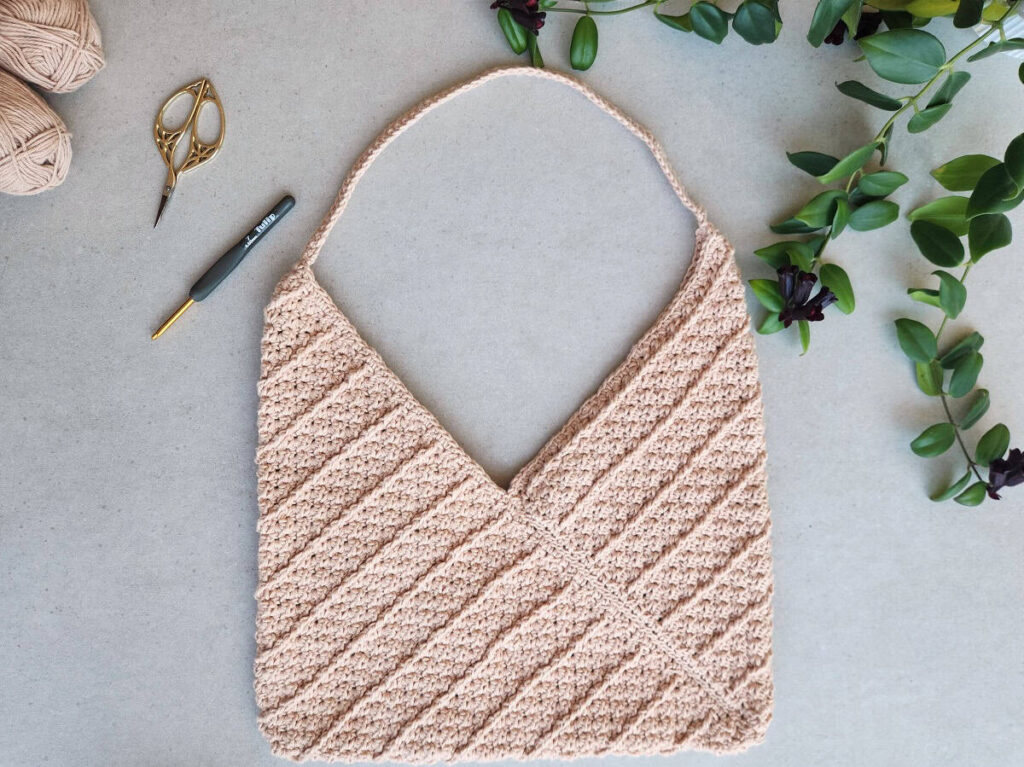
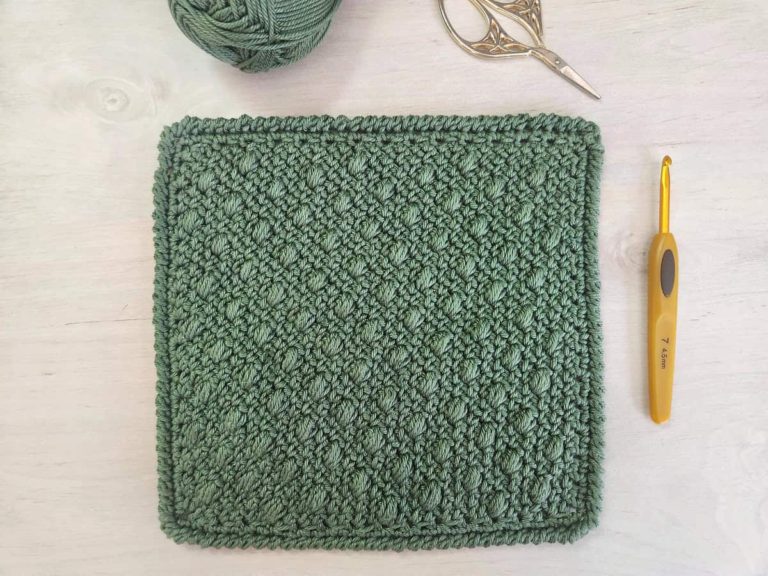
The unique texture is created by crocheting a combination of crochet cable stitch with single crochet and half double crochet from corner to corner. If you’ve never worked different C2C stitches, don’t worry, the pattern has an easy-to-follow photo tutorial and video tutorial to help you conquer this pattern!
If you want to make the bag bigger, or smaller, follow the instructions, and keep your rectangle in 1:3 dimensions.
Want to save this post for later? Go ahead and PIN it!
The Yarn I Used for My Crochet Rectangle Bag
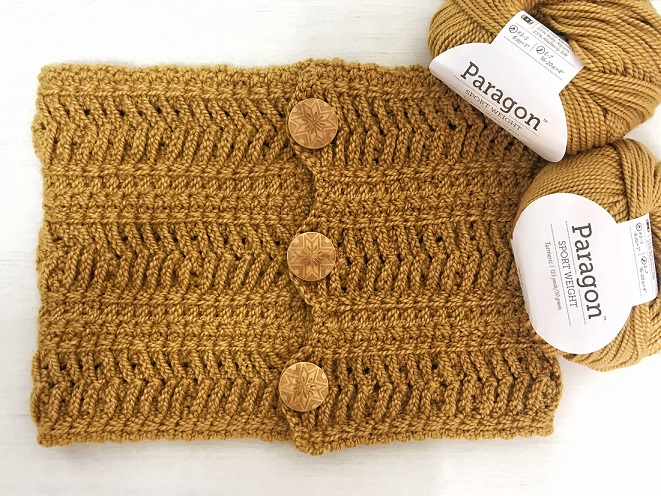
For my crochet bag, I used Worsted (#4) weight 100% cotton yarn. The sturdiness of the cotton is important for the bag to hold up its shape over time.
I used Dishie yarn, which is 100% cotton and comes in many beautiful colors. This yarn is soft but sturdy and durable, and can be washed easily. I chose not to add a liner to my bag because I felt the crocheted fabric is dense enough. But feel free to add a liner to your bag if you want to!
Sandy Ridges Crochet Bag Pattern Video Tutorial
Click the image below to go to the video tutorial.

For the free crochet pattern, please scroll down.
If you prefer the ad-free, full photo tutorial PDF pattern, you can purchase it at one of my shops below:
Materials
– Crochet hook 4.5 mm (I love the Tulip Etimo and Clover hooks).
– Worsted (#4) weight cotton yarn (I used Knit Picks – Dishie)
Total amount of yarn needed: 300gr/520m/570yds
– 2 Stitch markers (optional)
– Tapestry needle
Finished Size – 14×15” (35.5×38 cm) not including strap.
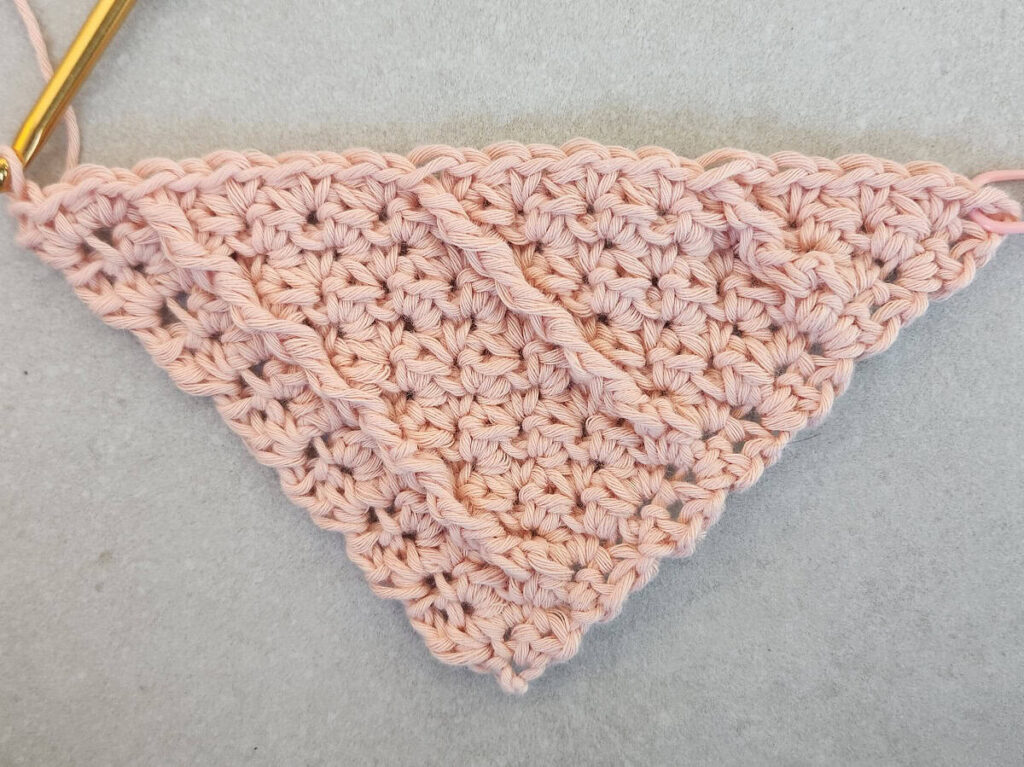
Gauge (in pattern): Working Rows 1-9 will result in a triangle with 4’’ (10cm) sides.
Abbreviations (US)
ch – chain
dc – double crochet
Esc– extended single crochet: insert hook into indicated st, yo and pull up a loop, yo and pull the yarn through 1 loop only. Yo and pull the yarn through remaining 2 loops.
FPdc – front post double crochet: Yo, insert hook from the front to the back and then to the front of the indicated stitch 1 row below, yo and pull up a loop, continue working as a regular double crochet.
FPtr – front post treble crochet: Yo twice, from the front to the back and then to the front of the indicated stitch (working around the post), yo and pull up a loop, (yo and pull through 2 loops) x 2 times, yo again and pull through 2 remaining loops.
hdc – half double crochet
PM – place marker
sc – single crochet
sc2tog – single crochet 2 together
sk – skip
sp – space
ss – slip stitch
st – stitch
yo – yarn over
[…] – crochet the instructions within brackets into the same indicated st.
(…) – crochet the instructions within brackets as many times as directed.
* – Repeats are shown via asterisks. Repeat begins at * and ends at ;
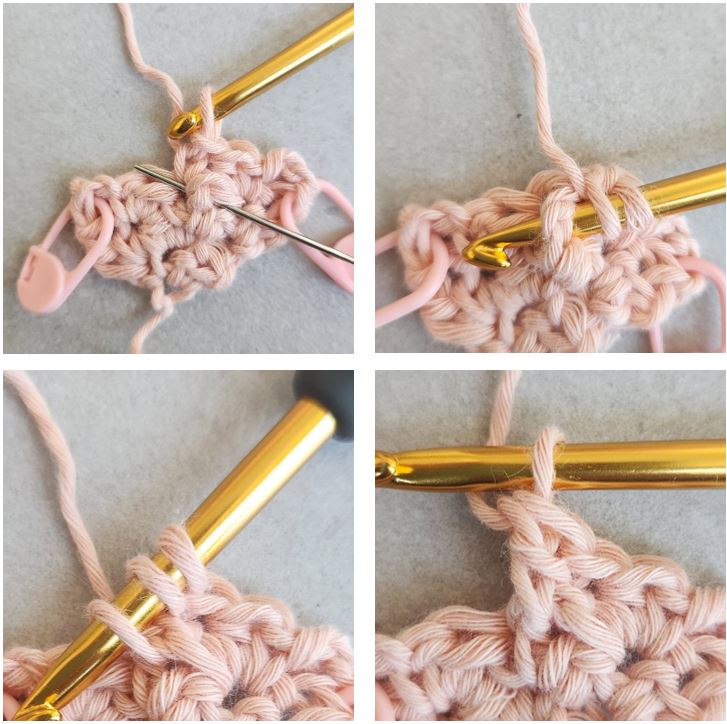
How to crochet the Extended Single Crochet (Esc):
Insert hook into indicated st, yo and pull up a loop, yo and pull the yarn through 1 loop only. Yo and pull the yarn through remaining 2 loops.
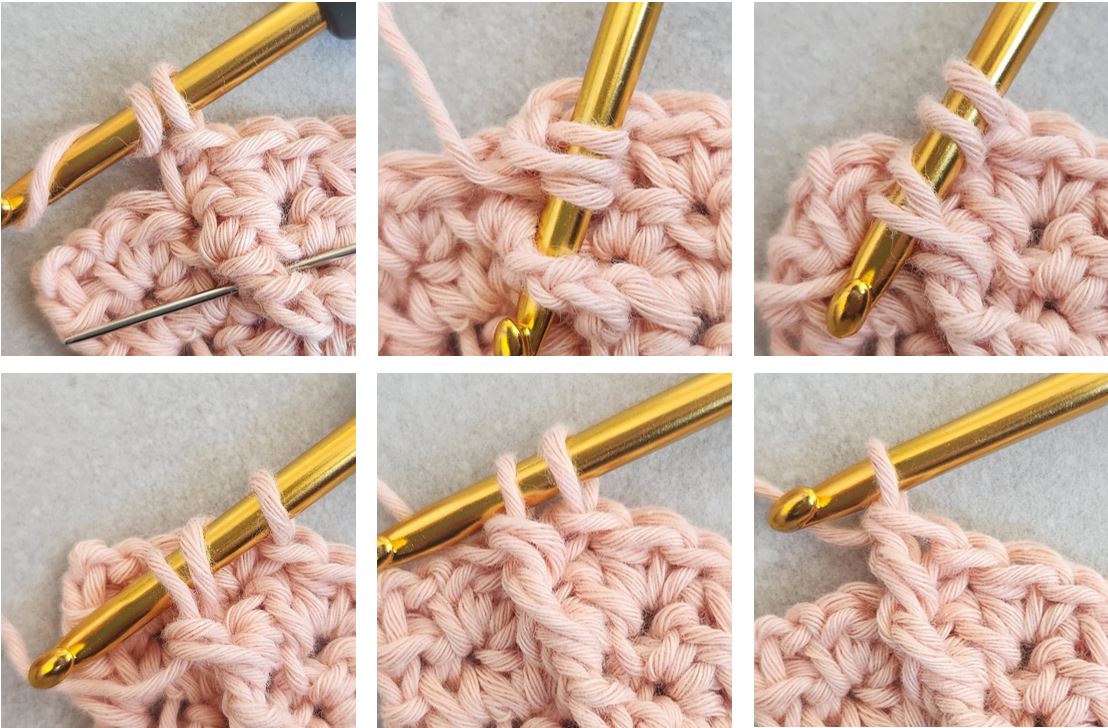
How to crochet the Front Post Double Crochet around Extended Single Crochet:
Yo, insert hook from the front to the back and then to the front of Esc stitch 1 row below, yo and pull up a loop, continue working as a regular double crochet.
How to crochet the Front Post Treble Crochet around Extended Single Crochet:
Yo twice, from the front to the back and then to the front of the indicated stitch (working around the post), yo and pull up a loop, (yo and pull through 2 loops) x 2 times, yo again and pull through 2 remaining loops.
Notes
- To make it easier to find the ch3/ch2 spaces at the end of the row, place a stitch marker when you ch3/ch2 at the beginning of each row.
- The Front Post stitches are separated by 3 x[1 sc, 1 hdc].
- The bag is crocheted from corner to corner to create a 10×30” rectangle.
- To change the size of the bag – you can make the rectangle bigger or smaller, just make sure to keep a ratio of 1:3.
Crochet Bag Free Pattern
Increase
Ch 4,
Row 1 (WS): [1 sc, 1 hdc] in 4th ch from hook (PM around ch-3 sp), turn. (1 x[1 sc, 1 hdc], 1 ch-3 sp)
Row 2 (RS): Ch 3-PM, sk 1st hdc, [1 sc, 1 hdc] in next sc, [1 sc, 1 dc] in ch-3 sp, turn.
(1 x[1 sc, 1 hdc], 1 x[1 sc, 1 dc], 1 ch-3 sp)
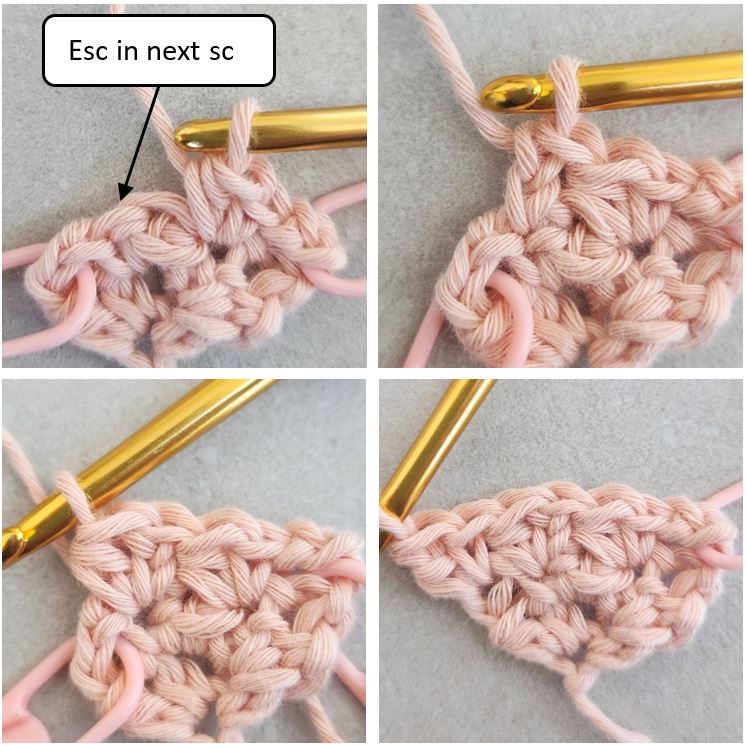
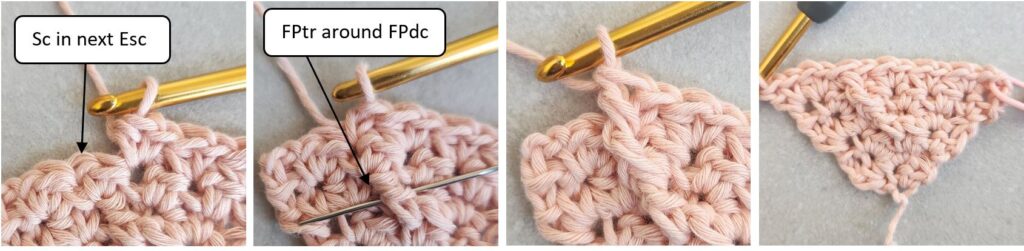
Row 3 (WS): Ch 3-PM, sk 1st dc, [1 sc, 1 hdc] in next sc, sk next hdc, [1 Esc, 1 hdc] in next sc,
[1 sc, 1 dc] in ch-3 sp, turn. (1 x[1 sc, 1 hdc], 1 x[1 Esc, 1 hdc], 1 x[1 sc, 1 dc], 1 ch-3 sp)
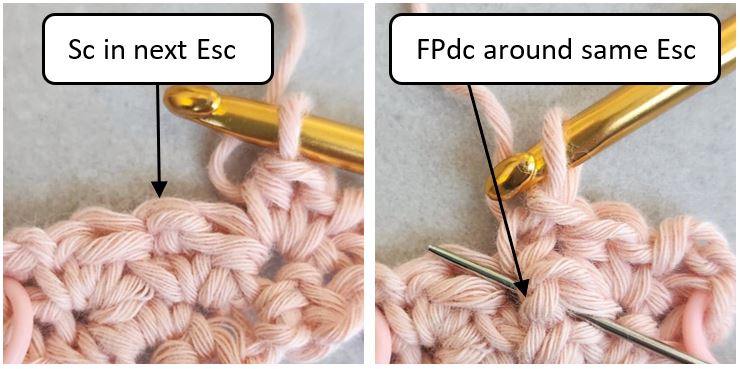
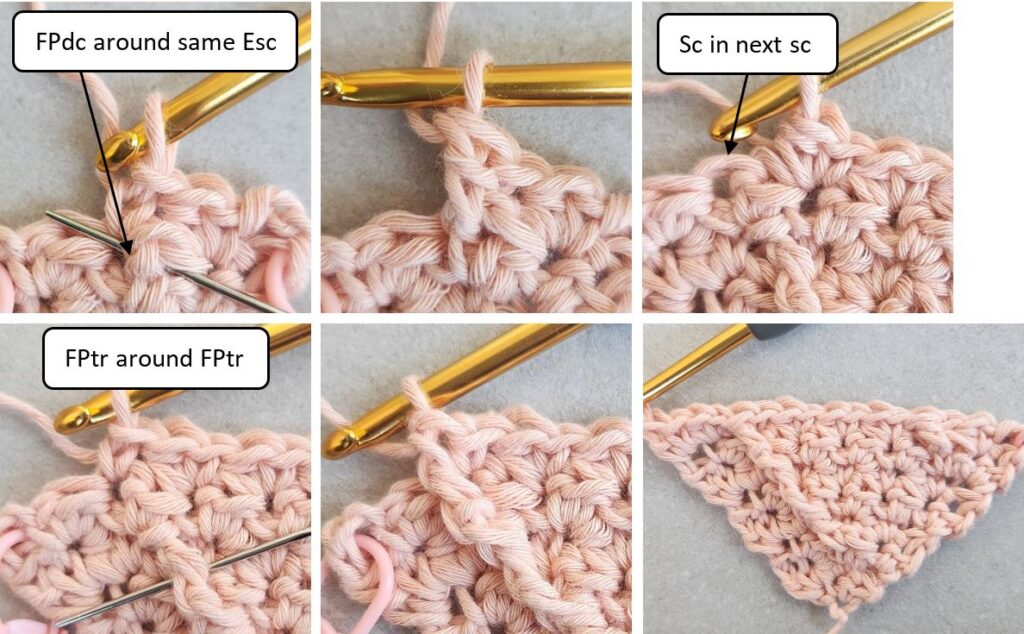
Row 4 (RS): Ch 3-PM, sk 1st dc, [1 sc, 1 hdc] in next sc, sk next hdc, 1 sc in next Esc, 1 FPdc around same Esc you just worked into, sk next hdc, [1 sc, 1 hdc] in next sc, [1 sc, 1 dc] in ch-3 sp, turn. (2 x[1 sc, 1 hdc], 1 x[1 sc, 1 FPdc], 1 x[1 sc, 1 dc], 1 ch-3 sp)
Row 5 (WS): Ch 3-PM, sk 1st dc, [1 sc, 1 hdc] in next sc.
* Sk next st, [1 sc, 1 hdc] in next sc; Repeat from * until ch-3 sp. [1 sc, 1 dc] in ch-3 sp, turn. (4 x[1 sc, 1 hdc], 1 x[1 sc, 1 dc], 1 ch-3 sp)
Row 6 (RS): Ch 3-PM, sk 1st dc, [1 sc, 1 hdc] in next sc, sk next hdc.
([1 sc, 1 hdc] in next sc, sk next hdc)x 2 times, 1 sc in next sc, 1 FPtr around FPdc 2 rows below, sk next hdc, [1 sc, 1 hdc] in next sc, [1 sc, 1 dc] in ch-3 sp, turn. (4 x[1 sc, 1 hdc], 1 x[1 sc, 1 FPtr], 1 x[1 sc, 1 dc], 1 ch-3 sp)
Row 7 (WS): Ch 3-PM, sk 1st dc, [1 sc, 1 hdc] in next sc.
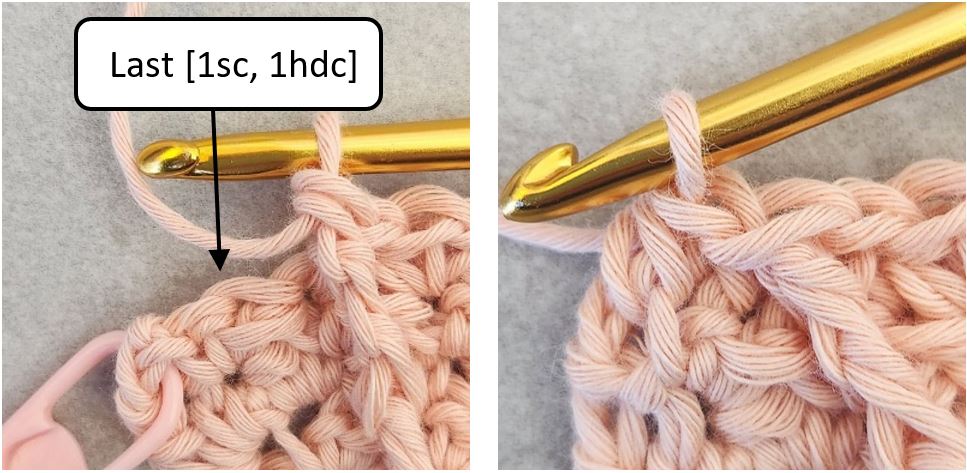
* Sk next st, [1 sc, 1 hdc] in next sc; Repeat from * until only 1 [1 sc, 1 hdc] left before ch-3 sp.
Sk next hdc, [1 Esc, 1hdc] in next sc, [1 sc, 1 dc] in ch-3 sp, turn. (5 x[1 sc, 1 hdc], 1 x[1 Esc, 1 hdc], 1 x[1 sc, 1 dc], 1 ch-3 sp)
Row 8 (RS): Ch 3-PM, sk 1st dc, [1 sc, 1 hdc] in next sc, sk next hdc, 1 sc in next Esc, 1 FPdc around same Esc you just worked into, sk next hdc.
([1 sc, 1 hdc] in next sc, sk next hdc)x 3 times, 1 sc in next sc, 1 FPtr around FPtr 2 rows below, sk next hdc, [1 sc, 1 hdc] in next sc, [1 sc, 1 dc] in ch-3 sp, turn. (5 x[1 sc, 1 hdc], 1 x[1 sc, 1 FPdc], 1 x[1 sc, 1 FPtr], 1 x[1 sc, 1 dc], 1 ch-3 sp)
Row 9 (WS(: Ch 3-PM, sk 1st dc, [1 sc, 1 hdc] in next sc.
* Sk next st, [1 sc, 1 hdc] in next sc; Repeat from * until ch-3 sp. [1 sc, 1 dc] in ch-3 sp, turn. (8 x[1 sc, 1 hdc], 1 x[1 sc, 1 dc], 1 ch-3 sp)
Row 10 (RS): Ch 3-PM, sk 1st dc.
([1 sc, 1 hdc] in next sc, sk next hdc)x 3 times, 1 sc in next sc, 1 FPtr around FPdc 2 rows below, sk next hdc.
([1 sc, 1 hdc] in next sc, sk next hdc)x 3 times, 1 sc in next sc, 1 FPtr around FPtr 2 rows below, sk next hdc, [1 sc, 1 hdc] in next sc, [1 sc, 1 dc] in ch-3 sp, turn. (7 x[1 sc, 1 hdc] , 2 x[1 sc, 1 FPtr], 1 x[1 sc, 1 dc], 1 ch-3 sp)
Row 11 (WS): Ch 3-PM, sk 1st dc, [1 sc, 1 hdc] in next sc.
* Sk next st, [1 sc, 1 hdc] in next sc; Repeat from * until only 1 [1 sc, 1 hdc] left before ch-3 sp.
Sk next hdc, [1 Esc, 1hdc] in next sc, [1 sc, 1 dc] in ch-3 sp, turn. (9 x[1 sc, 1 hdc], 1 x[1 sc, 1 dc], 1 x[1 Esc, 1 hdc])
Row 12 (RS): Ch 3-PM, sk 1st dc, [1 sc, 1 hdc] in next sc, sk next hdc, 1 sc in next Esc,
1 FPdc around same Esc you just worked into, sk next hdc.
* ([1 sc, 1 hdc] in next sc, sk next hdc)x 3 times, 1 sc in next sc, 1 FPtr around FPtr 2 rows below, sk next hdc; Repeat from * until only 1 [1 sc, 1 hdc] left before ch-3 sp.
[1 sc, 1 hdc] in next sc, [1 sc, 1 dc] in ch-3 sp, turn. (8 x[1 sc, 1 hdc], 1 x[1 sc, 1 FPdc], 2 x[1 sc, 1 FPtr], 1 x[1 sc, 1 dc], 1 ch-3 sp)
Row 13 (WS): Ch 3-PM, sk 1st dc, [1 sc, 1 hdc] in next sc.
* Sk next st, [1 sc, 1 hdc] in next sc; Repeat from * until ch-3 sp. [1 sc, 1 dc] in ch-3 sp, turn. (12 x[1 sc, 1 hdc], 1 x[1 sc, 1 dc], 1 ch-3 sp)
Row 14 (RS): Ch 3-PM, sk 1st dc, ([1 sc, 1 hdc] in next sc, sk next hdc)x 3 times, 1 sc in next sc, 1 FPtr around FPdc 2 rows below, sk next hdc.
* ([1 sc, 1 hdc] in next sc, sk next hdc)x 3 times, 1 sc in next sc, 1 FPtr around FPtr 2 rows below, sk next hdc; Repeat from * until only 1 [1 sc, 1 hdc] left before ch-3 sp.
[1 sc, 1 hdc] in next sc, [1 sc, 1 dc] in ch-3 sp, turn. (10 x[1 sc, 1 hdc], 3 x[1 sc, 1 FPtr], 1 x[1 sc, 1 dc], 1 ch-3 sp)
Repeat rows 11-14 until the side of the triangle measures approx. 10” (25 cm). Make sure to finish with row 14.
Decreasing on One Side
Row 15 (WS): Ch 2-PM, sk 1st dc, [1 sc, 1 hdc] in next sc.
* Sk next st, [1 sc, 1 hdc] in next sc; Repeat from * until only 1 [1 sc, 1 hdc] left before ch-3 sp. Sk next hdc, [1 Esc, 1hdc] in next sc, [1 sc, 1 dc] in ch-3 sp, turn.
Row 16 (RS): Ch 3-PM, sk 1st dc, [1 sc, 1 hdc] in next sc, sk next hdc, 1 sc in next Esc,
1 FPdc around same Esc you just worked into, sk next hdc.
* ([1 sc, 1 hdc] in next sc, sk next hdc)x 3 times, 1 sc in next sc, 1 FPtr around FPtr 2 rows below, sk next hdc; Repeat from * until only 1 [1 sc, 1 hdc] left before ch-2 sp.
Row 17 (WS): Ch 2-PM, sk sc2tog & FPtr, [1 sc, 1 hdc] in next sc.
* Sk next st, [1 sc, 1 hdc] in next sc; Repeat from * until ch-3 sp. [1 sc, 1 dc] in ch-3 sp, turn.
Row 18 (RS): Ch 3-PM, sk 1st dc, ([1 sc, 1 hdc] in next sc, sk next hdc)x 3 times, 1 sc in next sc, 1 FPtr around FPdc 2 rows below, sk next hdc.
* ([1 sc, 1 hdc] in next sc, sk next hdc)x 3 times, 1 sc in next sc, 1 FPtr around FPtr 2 rows below, sk next hdc; Repeat from * until 3 x[1 sc, 1 hdc] left before ch-2 sp.
([1 sc, 1 hdc], sk next hdc)x 2 times in next sc, sc2tog in next sc & ch-2 sp, turn.
Row 19 (WS): Ch 2-PM, sk sc2tog & hdc, [1 sc, 1 hdc] in next sc.
* Sk next st, [1 sc, 1 hdc] in next sc; Repeat from * until only 1 x[1 sc, 1 hdc] left before ch-3 sp. Sk next hdc, [1 Esc, 1hdc] in next sc, [1 sc, 1 dc] in ch-3 sp, turn.
(29 x[1 sc, 1 hdc], 1 x[1 sc, 1 dc], 1 x[1 Esc, 1 hdc], 1 ch-2 sp)
Repeat rows 16-19, until the long side measures approx. 30” (76 cm). Make sure to finish the repetition with row 19.
Decreasing on Both Sides
Row 20 (RS): Ch 2-PM, sk 1st dc, skip also next sc&hdc, 1 sc in next Esc, 1 FPdc around same Esc you just worked into, sk next hdc.
* ([1 sc, 1 hdc] in next sc, sk next hdc)x 3 times, 1 sc in next sc, 1 FPtr around FPtr 2 rows below, sk next hdc; Repeat from * until only 1 x[1 sc, 1 hdc] left before ch-2 sp.
Sc2tog in next sc & ch-2 sp, turn.
Row 21 (WS): Ch 2-PM, sk sc2tog & FPtr, [1 sc, 1 hdc] in next sc.
* Sk next st, [1 sc, 1 hdc] in next st; Repeat from * until until only 1 x[1 sc, 1 FPdc] left before ch-2 sp. Sc2tog in next sc & ch-2 sp, turn.
Row 22 (RS): Ch 2-PM, sk sc2tog & hdc, 1 sc in next sc, 1 FPtr around FPdc 2 rows below, sk next hdc.
* ([1 sc, 1 hdc] in next sc, sk next hdc)x 3 times, 1 sc in next sc, 1 FPtr around FPtr 2 rows below, sk next hdc; Repeat from * until 3 x[1 sc, 1 hdc] left before ch-2 sp.
([1 sc, 1 hdc], sk next hdc)x 2 times in next sc, sc2tog in next sc & ch-2 sp, turn.
Row 23 (WS): Ch 2-PM, sk sc2tog & hdc, [1 sc, 1 hdc] in next sc.
* Sk next st, [1 sc, 1 hdc] in next st; Repeat from * until only 1 x[1 sc, 1 FPtr] left before ch-2 sp. Sc2tog in next sc & ch-2 sp, turn.
Row 24 (RS): Ch 2-PM, sk sc2tog & hdc, 1 sc in next sc, 1 FPtr around FPtr 2 rows below, sk next hdc.
* ([1 sc, 1 hdc] in next sc, sk next hdc)x 3 times, 1 sc in next sc, 1 FPtr around FPtr 2 rows below, sk next hdc; Repeat from * until 1 x[1 sc, 1 hdc] left before ch-2 sp.
Sc2tog in next sc & ch-2 sp, turn.
Row 25 (WS): Ch 2-PM, sk sc2tog & FPtr, [1 sc, 1 hdc] in next sc.
* Sk next st, [1 sc, 1 hdc] in next st; Repeat from * until only 1 x[1 sc, 1 FPtr] left before ch-2 sp. Sc2tog in next sc & ch-2 sp, turn.
Repeat rows 22-25 until you have only 4 x[1sc, 1hdc] left in your row.
Row 26 (RS): Ch 2-PM, sk sc2tog & hdc, 1 sc in next sc, 1 FPtr around FPtr 2 rows below, sk next hdc, ([1 sc, 1 hdc], sk next hdc)x 2 times in next sc, sc2tog in next sc & ch-2 sp, turn.
(2 x[1 sc, 1 hdc], 1 x[1sc, 1FPtr], 1 sc2tog, 1 ch-2 sp)
Row 27 (WS): Ch 2-PM, sk sc2tog & hdc, [1 sc, 1 hdc] in next sc, sk next st, [1 sc, 1 hdc] in next sc, sc2tog in next sc & ch-2 sp, turn. (2 x[1 sc, 1 hdc], 1 sc2tog, 1 ch-2 sp)
Row 28 (RS): Ch 2-PM, sk sc2tog & hdc, 1 sc in next sc, 1 FPtr around FPtr 2 rows below, sk next hdc, sc2tog in next sc & ch-2 sp, turn. (1 x[1sc, 1FPtr], 1 sc2tog, 1 ch-2 sp)
Row 29 (WS): Ch 2-PM, sk sc2tog & FPtr, sc2tog in next sc & ch-2 sp, turn. (1 sc2tog, 1 ch-2 sp)
Row 30 (RS): Ch 1, sk sc2tog, 1 ss into ch-2 sp.
Border (optional)
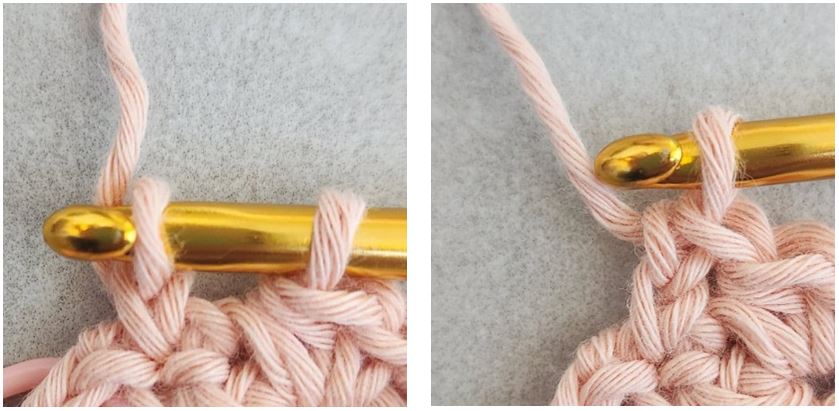
With the right side facing you, turn the rectangle 90 degrees, you’ll be crocheting into the side of the sts / chains (pic 1).
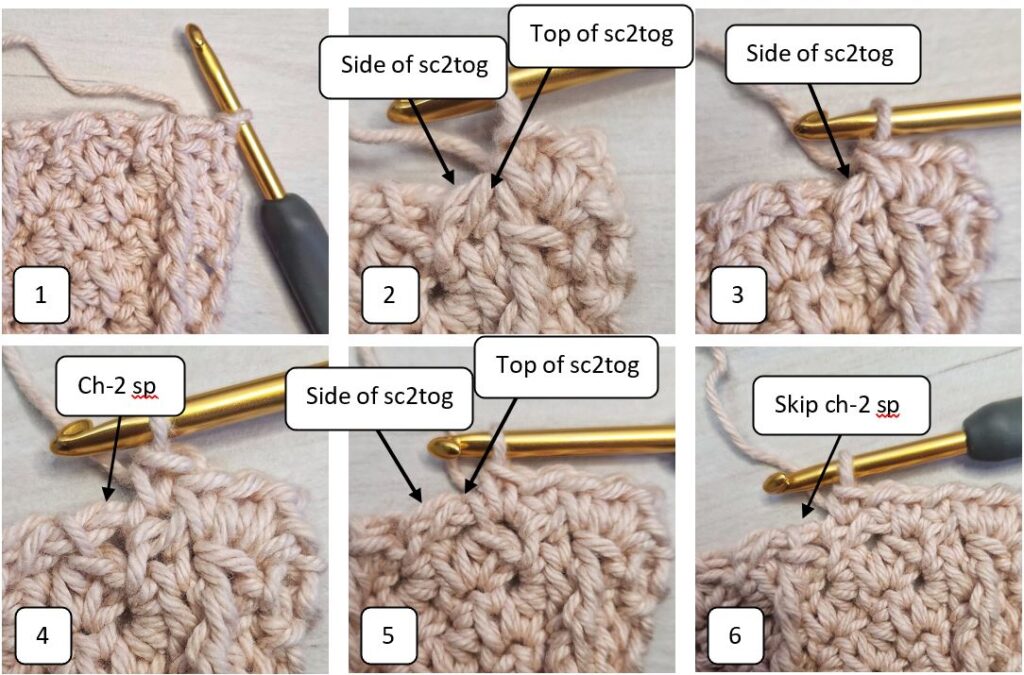
Ch 1, work [1 sc, ch 1, 1 sc] in the same ch-2 sp you last worked into (pic 2).
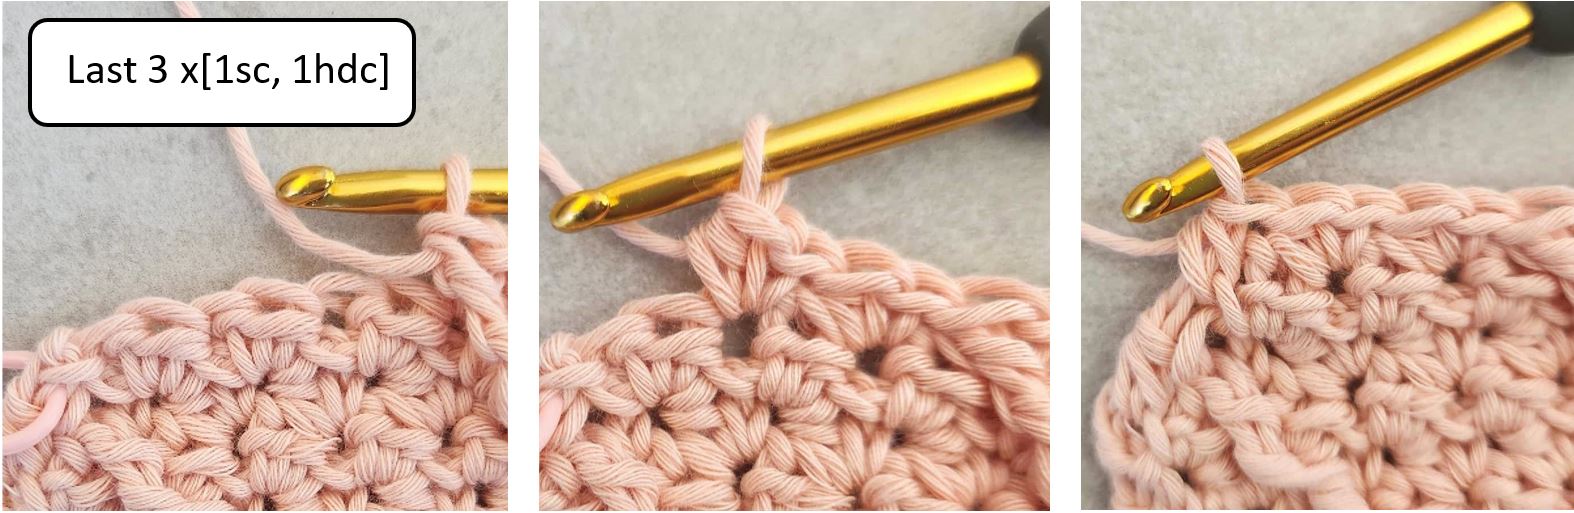
* 1 sc in top of next sc2tog, 1sc in side of sc2tog (pics 2&3), 1 sc in next ch-2 sp (, 1 sc in side of sc2tog (pic 5), sk next ch-2 sp (pic 6); repeat from * until corner (ch-2 sp).
** Each one has a different tension, if alternating working skipping the ch-2 sp creates a tight border for you, work 1 sc in each ch-2 sp. This applies to all the spaces skipping in the next rectangle’s sides.
Work corner in ch-2 sp: [1 sc, ch 1, 1 sc] in ch-2 sp (pic 7).
Continue working on the 2nd side of the rectangle: * 1 sc in top of next dc, 1 sc in side of dc (pic 8), 1 sc in next ch-3 sp (pic 9), 1 sc in top of next dc, 1 sc in side of dc, sk next ch-3 sp (pics 11&12); repeat from * until corner (1st chain of beginning chain).
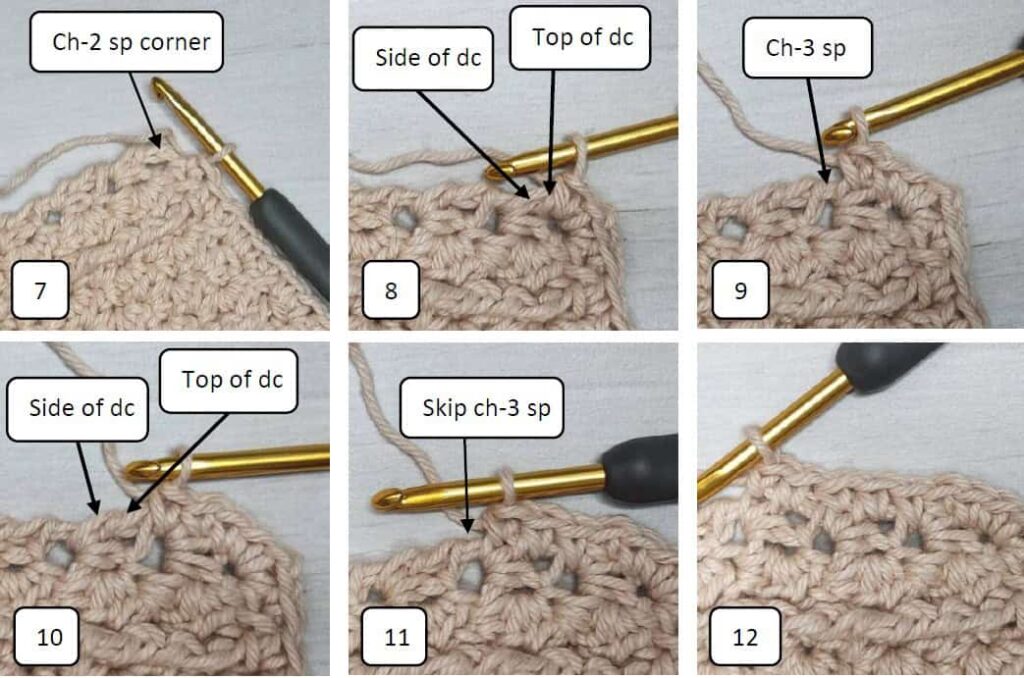
Work corner in ch-1: [1 sc, ch 1, 1 sc] in first chain of the beginning chain, 1 sc in side of next hdc.
Continue working on the 3rd side of the rectangle: * 1 sc in next ch-3 sp, 1 sc in side of next dc, 1 sc in top of dc, sk next ch-3 sp, 1 sc in side of next dc, 1 sc in top of dc; repeat from * until ch-3 sp corner.
Work corner in ch-2 sp: [1 sc, ch 1, 1 sc] in ch-2 sp.
Continue working on the 4th side of the rectangle: * 1 sc in side of next sc2tog, 1 sc in top of sc2tog, 1 sc in next ch-2 sp, 1 sc in side of next sc2tog, 1 sc in next ch-2 sp; repeat from * until the end of the round, ss to the 1st sc.
Weave in the ends and continue to assemble the bag.
Assembly
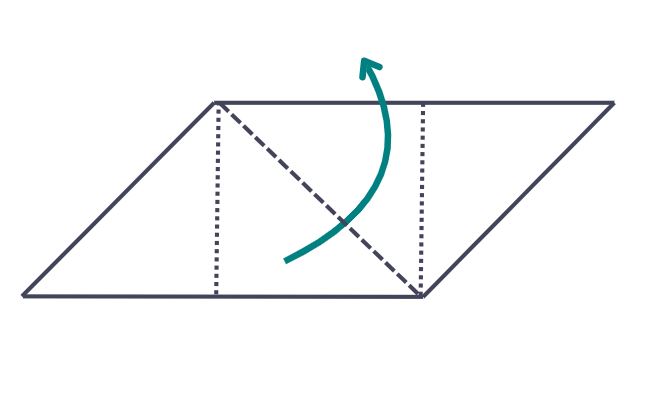
Folding
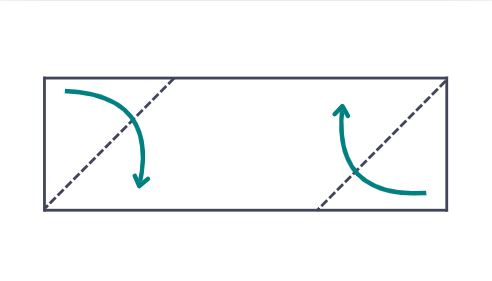
Lay the rectangle flat with the wrong side upwards, fold the bottom right corner up and top left corner down, then fold the bottom part up in 45 degrees toward the right, as shown in the diagram.
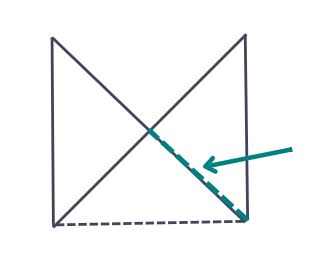
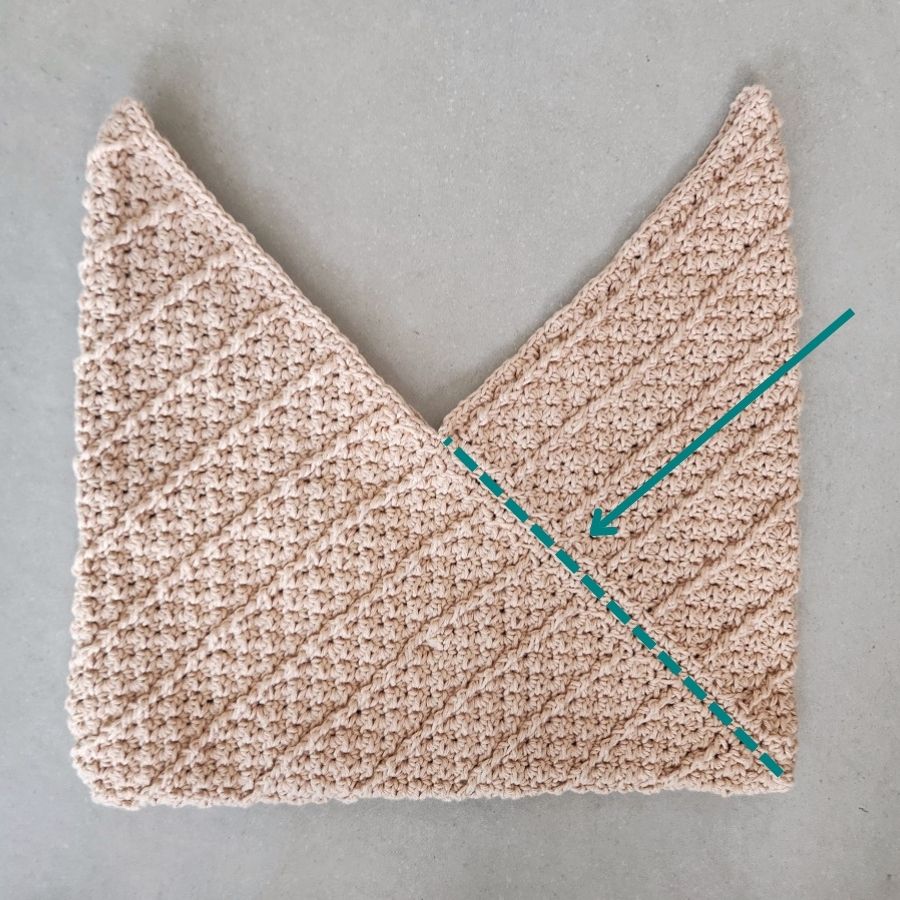
With the loop at the top, fold the 3 corners of the square towards the middle as shown in the photo.
Using a tapestry needle and one strand of your yarn, whip stitch as directed in the photo to sew up the front of the basket.
Seaming
Before seaming, try to align the bag, so the cables will be aligned.
To seam the bag, with a tapestry needle work a Whip stitch (or your preferred seaming method) on both sides of the bag, then fasten off and weave in the ends.
Making the strap
Leave a long enough tail to weave in the end, make a slip knot and join the yarn with a slip stitch to one of the top points of the bag.
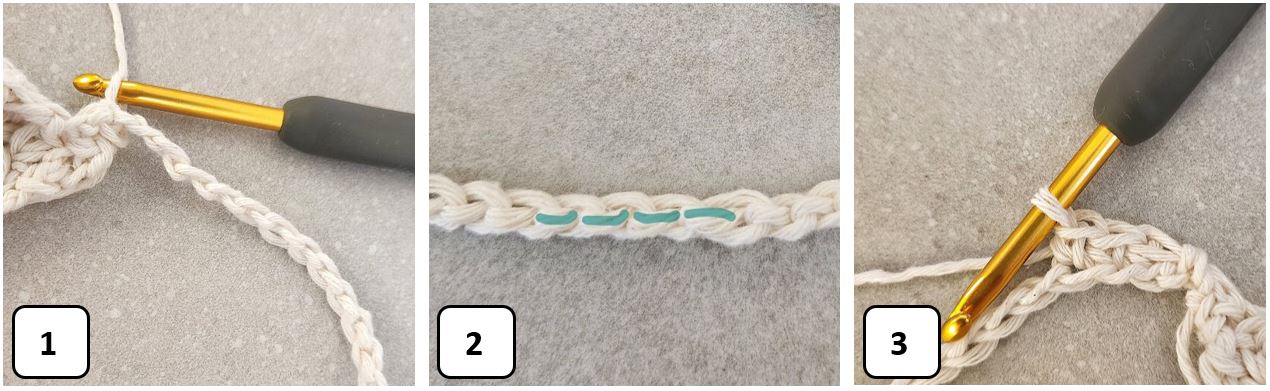
Chain 60 (or as long as you want the strap to be), make sure your chains are not twisted and slip stitch to the second top point (pic 1), turn.
Work sc into the middle loop of each of the chains across (pics 2&3), slip stitch to the top point of the bag, turn (make sure to turn in the same direction you turned last time).
Work sc in each of the sc across, slip stitch to the top point of the bag. Fasten off and weave in the end
Looking for More Crochet Accessory Patterns?
Did you try this out? Share your project!
– Let me know how it went and leave a comment below.
– Tag me on Instagram @madebygootie
– Join and share in our FB Community
Want to save this post for later? Go ahead and PIN it!
I’m in the process of making the Sandy Ridges bag. On the Border instructions, I think some pictures are missing. It references pic 8-12 in the instructions, but the pictures stop at #6. Am I missing them??
Hi Nancy, Thanks for bringing it to my attention.
You’re right, these photos have been missing, I added them now.
Thank you!!