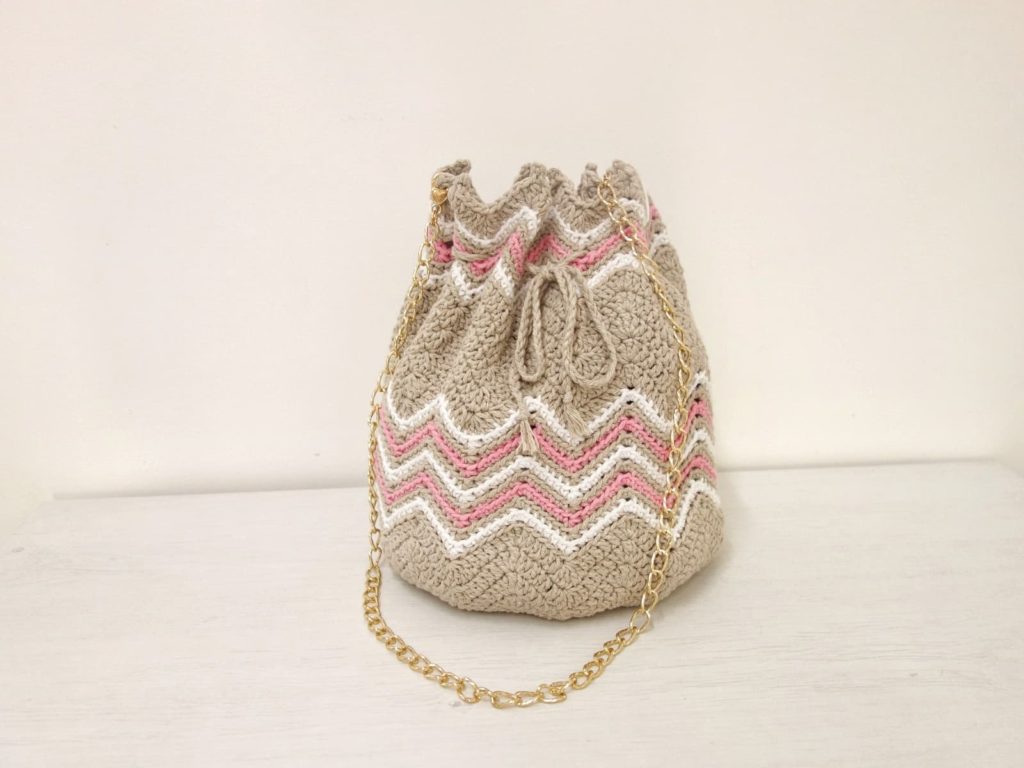
Chevron Bucket Bag Free Crochet Pattern
Last Updated on July 6, 2025
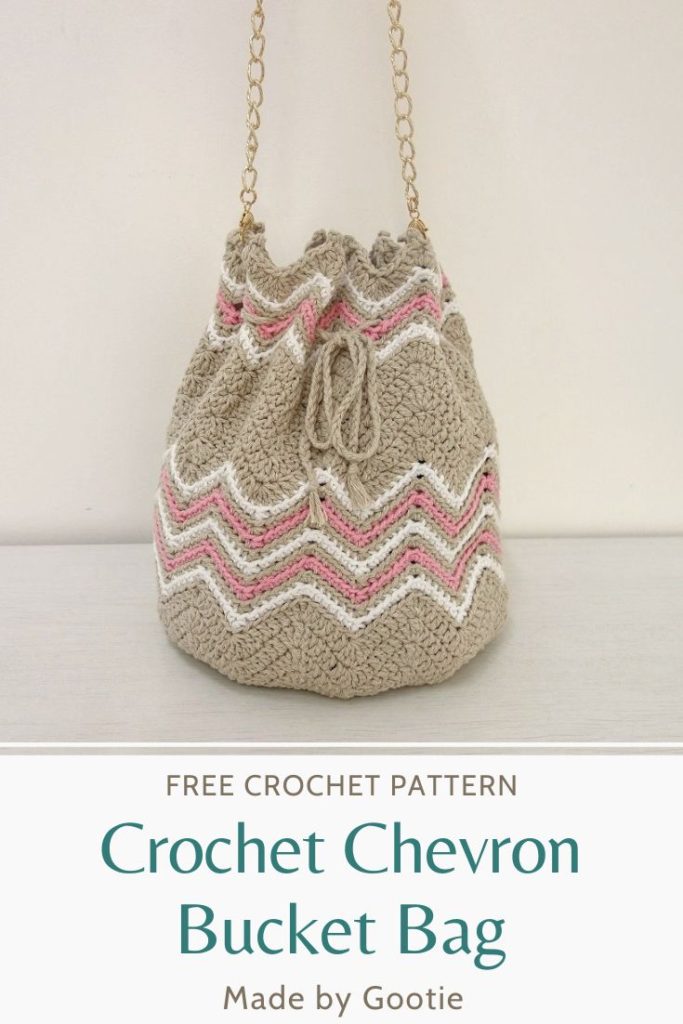
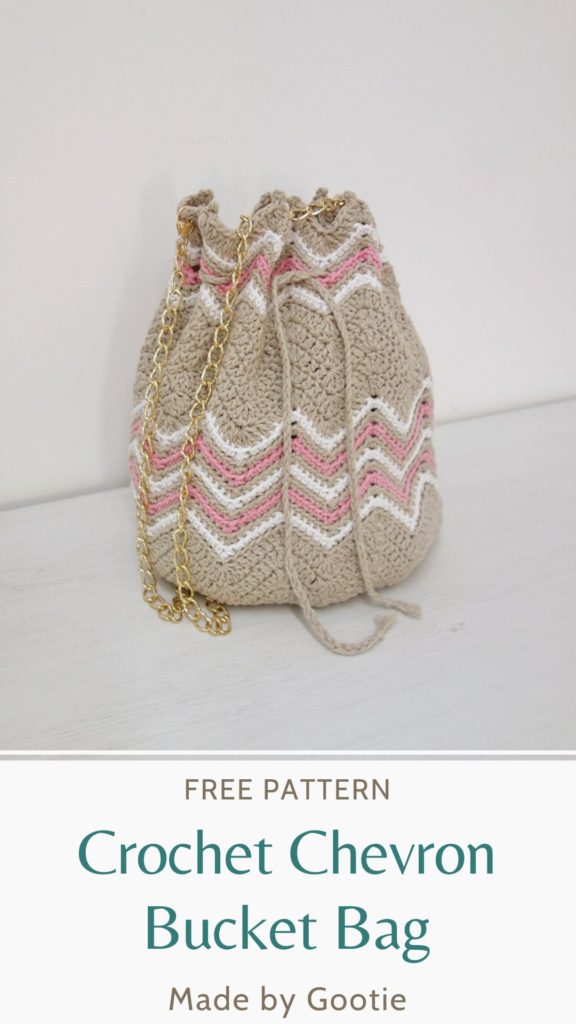
The Chevron crochet bucket bag is the perfect size for an everyday bag. It is comfortable and light, but big enough to carry all your essentials. The bag has a drawstring closer to keep all your belonging safe.
You can use contrasting colors of yarn to create an eye-catching bag, or more neutrals for a subtle look!
Scroll down for the bucket bag free crochet pattern.
** Some of the links in this post may include affiliate links. Making a purchase through one of these links pays me a small referral fee at no added cost to you. These small fees add up and help me keep the blog running. View our disclosure and privacy policy for more information.
About the Chevron Crochet Bucket Bag Design
This crochet bucket bag pattern was designed initially for I Like Crochet magazine for the Chevron Collection issue. After I got my copyright back, I’m happy to share with you this bucket bag free crochet pattern here!
I had such a fun time designing this bag! I wanted the colors to be somewhat neutrals, so I chose jute as the main color and added light pink and white to add some color and interest into the bag.
The pattern is worked in the round from the bottom to the top. At the top of the bag, we create eyelets to add a drawstring and a dainty metal strap is added to the bag (you can also use a fabric strap).
Want to save this post for later? Go ahead and PIN it!
How To crochet a bucket bag?
This bucket bag crochet pattern is easy. The pattern works up as a round bottom crochet bag pattern, then turns into a chevron pattern to create the sides of the bag.
The crochet chevron pattern is made using double crochet stitches when using the main color, and a single crochet chevron pattern when making the color stripes. At the top of the crochet bag we are making eyelets for the drawstring, and finishing with a picot border.
If you’re looking for more crochet bag patterns, check out the Floral Tote Bag.
Which Yarn Is Best For Crocheting a Bag?
When crocheting a bag, you want it to be sturdy enough, so it is better to use a thick yarn, such as Worsted (#4) or Bulky (#5) weight yarn.
For this bucket bag crochet pattern, I used YarnArt – Eco Cotton XL yarn, which is a Worsted weight yarn made of 80% cotton and 20% polyester.
Crochet Bucket Bag PDF Pattern
You can find the ad-free PDF pattern at one of my shops below:
Looking for More Crochet Inspiration? Check out these other free patterns on the blog:

Bucket Bag Free Crochet Pattern
Skill level – easy
Materials
– Crochet hook 4 mm / G-6 (I love the Furls and Clover Hooks)
– Worsted weight yarn
I used YarnArt – Eco Cotton XL (200gr – 200m/241yd):
Color A: 768 Jute – 400 grams (482yds/440m)
Color B: 760 White – 50 grams (120yds/110m)
Color C: 766 Pink – 50 grams (120yds/110m)
** You can use any 100% cotton or cotton blend worsted yarn.
– 32” (80cm) metal or fabric bag strap with clips.
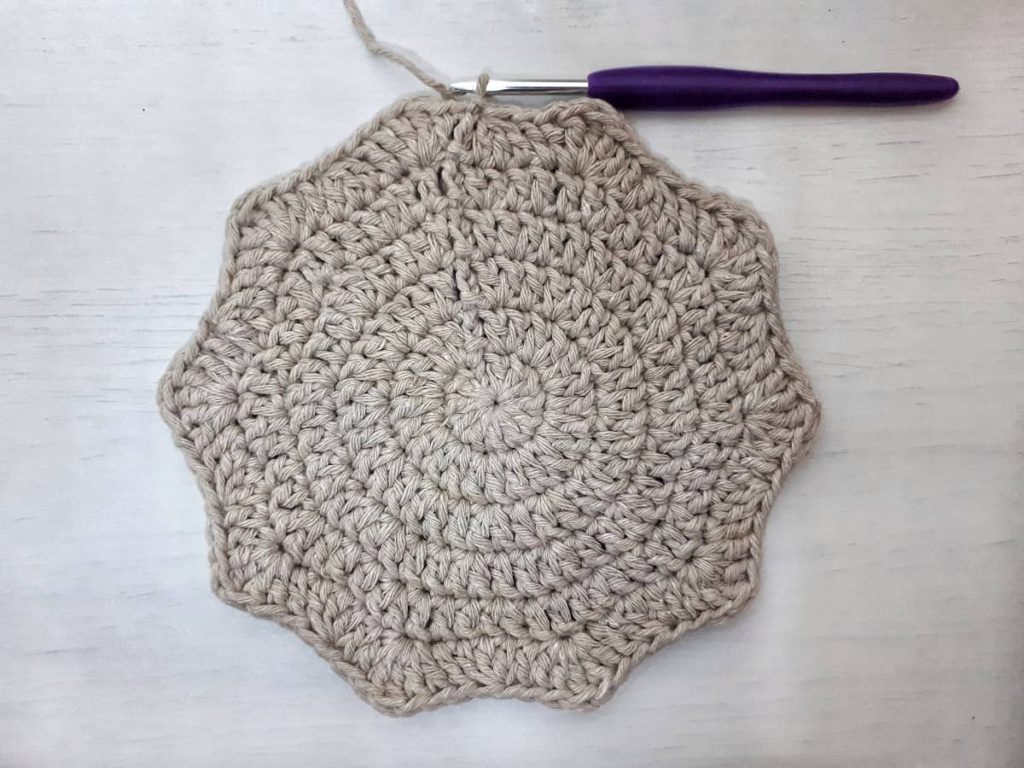
Gauge – Working rounds 1-4 will result in a 4” (10 cm) diameter circle.
Finished Size – 11.8×9.4×5.9 in (30x24x15 cm)
Abbreviations (US)
ch – chain
st – stitch
ss – slip st
sc – single crochet
dc – double crochet
tr – treble crochet
BLss – slip stitch back loop only
BLsc – single crochet back loop only
BLhdc – half double crochet back loop only
BLdc – double crochet back loop only
BLtr – treble crochet back loop only
dc3tog – double crochet 3 stitches together
dc5tog – double crochet 5 stitches together
BLdc3tog – double crochet 3 stitches together back loop only
BLdc5tog – double crochet 5 stitches together back loop only
Picot – chain 3, ss into the top of the previous st you made (last st before ch3).
Notes
- Ch1 in beginning of each round count as first sc.
- Ch3 in beginning of each round count as first dc.
- Changing colors: one row before the color change, at the last ss- pick up the new color while you slip stitch into the stitch.
Chevron Crochet Bucket Bag Pattern
With color A
Make a magic ring.
Rnd 1: Ch 3, 11 dc into magic ring, ss to the top of beg ch-3. (12)
Rnd 2: Ch 3, 1 dc in the same 1st st, 2 dc in each st across. Ss to the top of beg ch-3 (24)
Rnd 3: Ch 3, 2 dc in next st.
* 1 dc in next st, 2 dc in next st; rep from * across, ss to the top of beg ch-3 (36)
Rnd 4: Ch 3, 2 dc in next st, 1 dc in next st.
* 1 dc in next st, 2 dc in next st, 1 dc in next st; rep from * across, ss to the top of beg ch-3 (48)
Rnd 5: Ch 3, 1 dc in next 2 sts, 2 dc in next st.
* 1 dc in next 3 sts, 2 dc in next st; rep from * across, ss to the top of beg ch-3 (60)
** At this point we are starting to work in the chevron pattern.
** At this point we are starting to work in the chevron pattern.
Rnd 6: Ch 3, (2 dc, 1 tr, 2 dc) in next st, 1 dc in next st, dc3tog in next 3 sts.
* 1 dc in next st, (2 dc, 1 tr, 2 dc) in next st, 1 dc in next st, dc3tog in next 3 sts; rep from * across, ss to the top of beg ch-3 (80)
Rnd 7: Ss to next st, ch 3, 1 dc in next st, (2 dc, 1 tr, 2 dc) in next st, 1 dc in next 2 sts, dc3tog in next 3 sts.
* 1 dc in next 2 sts, (2 dc, 1 tr, 2 dc) in next st, 1 dc in next 2 sts, dc3tog in next 3 sts; rep from * across, ss to the top of beg ch-3 (100)
** When working the last dc3tog of this round, the last “leg” of the stitch will be worked into the top of ch-3 of previous round.
Rnd 8: Ss to next st, ch 3, 1 dc in next 2 sts, (2 dc, 1 tr, 2 dc) in next st, 1 dc in next 3 sts, dc3tog in next 3 sts.
* 1 dc in next 3 sts, (2 dc, 1 tr, 2 dc) in next st, 1 dc in next 3 sts, dc3tog in next 3 sts; rep from * across, ss to the top of beg ch-3 (120)
Rnd 9: Ss to next st, ch 3, 1 dc in next 3 sts, (2 dc, 1 tr, 2 dc) in next st, 1 dc in next 4 sts, dc3tog in next 3 sts.
* 1 dc in next 4 sts, (2 dc, 1 tr, 2 dc) in next st, 1 dc in next 4 sts, dc3tog in next 3 sts; rep from * across, ss to the top of beg ch-3 (140)
** At this point we are finished with the bottom of the bag and we are starting to build it up.
Rnd 10: Ss in next 2 sts (moving 2 sts to the left), ch 3, 1 dc in next 3 sts, (2 dc, 1 tr, 2 dc) in next st, 1 dc in next 4 sts, dc5tog in next 5 sts.
* 1 dc in next 4 sts, (2 dc, 1 tr, 2 dc) in next st, 1 dc in next 4 sts, dc5tog in next 5 sts; rep from * across, ss to the top of beg ch-3. (140)
Rnd 11: Ss in next 2 sts, ch 3, 1 dc in next 3 sts, (2 dc, 1 tr, 2 dc) in next st, 1 dc in next 4 sts, dc5tog in next 5 sts.
* 1 dc in next 4 sts, (2 dc, 1 tr, 2 dc) in next st, 1 dc in next 4 sts, dc5tog in next 5 sts; rep from * across, ss to the top of beg ch-3, ss to next st. (140)
** Working the lower stripes
With color B
Rnd 12: Ch 1 (counts as 1BLsc), 1 BLsc in next 4 sts, (1 BLSc, 1 BLhdc, 1 BLsc) in next st, 1 BLsc in next 5 sts, BLsc3tog in next 3 sts.
* 1 BLsc in next 5 sts, (1 BLsc, 1 BLhdc, 1 BLsc) in next st, 1 BLsc in next 5 sts, BLsc3tog in next 3 sts; rep from * across, BLss to the top of beg ch-1, ss to next st. (140)
With color A
Rnd 13: Repeat rnd 12.
With color C
Rnd 14: Repeat rnd 12.
With color A
Rnd 15: Repeat rnd 12.
With color B
Rnd 16: Repeat rnd 12.
With color A
Rnd 17: Repeat rnd 12.
With color C
Rnd 18: Repeat rnd 12.
With color A
Rnd 19: Repeat rnd 12.
This is getting long, isn’t it..? Get the premium, ad free, printable PDF version on Ravelry or Etsy
With color B
Rnd 20: Ch 1, 1 BLsc in next 4 sts, (1 BLSc, 1 BLhdc, 1 BLsc) in next st, 1 BLsc in next 5 sts, BLsc3tog in next 3 sts.
* 1 BLsc in next 5 sts, (1 BLsc, 1 BLhdc, 1 BLsc) in next st, 1 BLsc in next 5 sts, BLsc3tog in next 3 sts; rep from * across, BLsl st to the top of beg ch-1, sl st in next 2 sts. (140)
** Back to solid chevron pattern
With color A
Rnd 21: Ch 3, 1 BLdc in next 3 sts, (2 BLdc, 1 BLtr, 2 BLdc) in next st, 1 BLdc in next 2 sts, BLdc2tog in next 2 sts, BLdc5tog in next 5 sts.
* BLdc2tog in next 2 sts, 1 BLdc in next 2 sts, (2 BLdc, 1 BLtr, 2 BLdc) in next st, 1 BLdc in next 2 sts, BLdc2tog in next 2 sts, BLdc5tog in next 5 sts; rep from * across, ss to the top of 1st BLdc (not beg ch-2). (120)
Rnds 22-24: Ss in next 2 sts, ch 3, 1 dc in next 2 sts, (2 dc, 1 tr, 2 dc) in next st, 1 dc in next 3 sts, dc5tog in next 5 sts.
* 1 dc in next 3 sts, (2 dc, 1 tr, 2 dc) in next st, 1 dc in next 3 sts, dc5tog in next 5 sts; rep from * across, ss to the top of beg ch-3. (120)
Rnd 25: Ss in next 2 sts, ch 3, 1 dc in next 2 sts, (2 dc, 1 tr, 2 dc) in next st, 1 dc in next 3 sts, dc5tog in next 5 sts.
* 1 dc in next 3 sts, (2 dc, 1 tr, 2 dc) in next st, 1 dc in next 3 sts, dc5tog in next 5 sts; rep from * across, ss to the top of beg ch-3, sl st to next st. (120)
** Working the upper stripes
With color B
Rnd 26: Ch 1 (counts as 1BLsc), 1 BLsc in next 3 sts, (1 BLSc, 1 BLhdc, 1 BLsc) in next st, 1 BLsc in next 4 sts, BLsc3tog in next 3 sts.
* 1 BLsc in next 4 sts, (1 BLsc, 1 BLhdc, 1 BLsc) in next st, 1 BLsc in next 4 sts, BLsc3tog in next 3 sts; rep from * across, BLss to the top of beg ch-1, ss to next st. (120)
With color A
Rnd 27: Repeat rnd 26.
With color C
Rnd 28: Repeat rnd 26.
With color A (making eyelets)
Rnd 29: Ch 1, 1 BLsc in next 3 sts, (1 BLSc, 1 BLhdc, 1 BLsc) in next st, 1 BLsc in next 4 sts, ch1, skip next 3 sts (making the eyelet).
* 1 BLsc in next 4 sts, (1 BLsc, 1 BLhdc, 1 BLsc) in next st, 1 BLsc in next 4 sts, ch1, skip next 3 sts; rep from * across, BLss to the top of beg ch-1, ss to next st. (120)
With color B
Rnd 30: Ch 1 (counts as 1BLsc), 1 BLsc in next 3 sts, (1 BLSc, 1 BLhdc, 1 BLsc) in next st, 1 BLsc in next 4 sts, BLsc3tog in next 3 sts.
* 1 BLsc in next 4 sts, (1 BLsc, 1 BLhdc, 1 BLsc) in next st, 1 BLsc in next 4 sts, BLsc3tog in next 3 sts; rep from * across, BLsl st to the top of beg ch-1, sl st to next st, sl st in next 2 sts. (120)
With color A (edging and making loops for the clips)
Rnd 31: Ch 3, 1 BLdc in next 2 sts, (2 BLdc, 1 BLtr, picot, 2 BLdc) in next st, 1 BLdc in next st, BLdc2tog in next 2 sts, BLdc5tog in next 5 sts.
* BLdc2tog in next 2 sts, 1 BLdc in next st, (2 BLdc, 1 BLtr, 1 picot, 2 BLdc) in next st, 1 BLdc in next st, BLdc2tog in next 2 sts, BLdc5tog in next 5 sts; rep from * twice more, BLdc2tog in next 2 sts.
Making a loop:
ch3, turn work to WS, ss to top of previous BLdc2tog, ss to top of BLdc, ch1, turn work to RS, 1 ss in next 3 ch of ch-3. 1BLdc in next st, (2 BLdc, 1 BLtr, 1 picot, 2 BLdc) in next st, 1 BLdc in next st, BLdc2tog in next 2 sts, BLdc5tog in next 5 sts.
* BLdc2tog in next 2 sts, 1 BLdc in next st, (2 BLdc, 1 BLtr, picot, 2 BLdc) in next st, 1 BLdc in next st, BLdc2tog in next 2 sts, BLdc5tog in next 5 sts; rep from * three more times, BLdc2tog in next 2 sts.
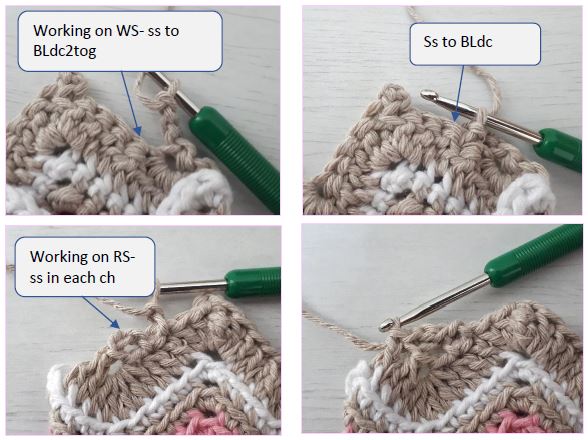
Make another loop like instructed above.
1BLdc in next st, (2 BLdc, 1 BLtr, 1 picot, 2 BLdc) in next st, 1 BLdc in next st, BLdc2tog in next 2 sts, BLdc5tog in next 5 sts, ss to the top of 1st BLdc (not beg ch-2). (100)
Fasten off and weave in the ends.
Make Drawstring
With color A, cut 3 pieces measures 43’’. Hold the 3 pieces of yarn together, make a knot at the top and make a braid, make another knot at the end of the braid.
Assembly
Attach the strap clips to the loops at the top of the bag.
Lay the bag flat with the strap clips on both sides, weave in the drawstring in the front center, starting from the outside, weave in and out through all 10 eyelets, the last one should exit the bag so that both ends of the drawstring are outside the bag and can meet in the center.
Did you try this out? Share your project!
– Let me know how it went and leave a comment below.
– Tag me on Instagram @madebygootie
– Join and share in our FB Community
Want to save this post for later? Go ahead and PIN it!
I would like to see the video of how to crochet the Chevron Bag, please?
Hi Kathleen, I don’t have a video for this pattern, only written instructions.
hi I’d also love to see a video for both of your bag patterns. I know Kathleen had asked if YOU WOULD MAKE ONE for this pattern. she didn’t get a reply to that.. so I thought I’d ask as well. 😃 maybe seeing there’s a big desire for it/ them you’ll consider doing a video????
Hi Kathleen (assuming you are a different Kathleen) 😊
Unfortunately, I still don’t have a video tutorial for this bag.
I do work on adding video tutorials to my patterns, as much as my time and resources are allowing me.
I will definitely put this pattern higher on the list, seeing more people are interested in that.
Thank you for taking the time to let me know!
Agat
Hi, I am struggling with Round 31 and “Making a loop” round.
If there is no video, could you at least post photos?
Hi Val,
I’m sorry you are struggling with this round.
Most of my patterns that are free on my blog don’t have photo tutorials, but the PDF patterns that are available for a small fee do have photo tutorials 🙂
But since I got quite a lot of questions about this part of the pattern, I have added the photo tutorial for this part.
Happy crocheting,
Agat
In the posted picture of the bag in progress the gap doesn’t look like stitches done together. It looks like a chain one. Is there a reason for this?
Hi Tauna,
I’m not completely sure which gaps you are referring to, I’m assuming you are referring to the first photo in the post with the pink color work in progress?
If so, this is a photo of row 29 where you make the eyelets for the drawstring, that’s why you see the ch-1 gap in the lower part of the chevron.
I hope it helps!
Is the “slip stitch in next two stitches” correct for round 30? I’m exactly two stitches short for round 31 following the instructions for round 30, or are you supposed to BLDC into the next round?
Hi Diana,
At the end of round 30 you slip stitch in 3 sts total, than start with a ch 3 (was written ch 2 by mistake) that counts as a dc, and continue with the pattern and working BLdc in next 2 sts.
Did you have 120 sts in round 30?
hi! Can you please tell me how I could make this with book- bag type straps, instead of the purse- type straps written in the pattern??
I am currently on Rnd 29, making the eyelets & loops, so I need to know if I should move the loops any or leave them how it’s written,,, and also how would I attach the bottom part of the straps??
any help/ suggestions/ guidance would be greatly appreciated!
tysm!
~♡~
Hi Nicole!
I’m not really sure what “book bag straps” are (I guess it’s because I’m not a native English speaker). But can you please specify how the straps are supposed to be attached to the bag? Then I can help you more farther with this.
You can also email me a photo of the straps if you want [email protected]
A lovely pattern to follow, I made mine with orange and yellow stripes and it looks so summery. Thank you for the straightforward easy to follow free pattern. I really enjoyed making it and look forward to trying more of your patterns!