Small Crochet Pumpkin Pattern (Free)
Last Updated on July 11, 2024
With Fall is almost here (I’m ready! I had enough of this hot weather!), I think it’s time to start making some Fall decor.
This small crochet pumpkin pattern is a great project to get you into the Fall atmosphere.
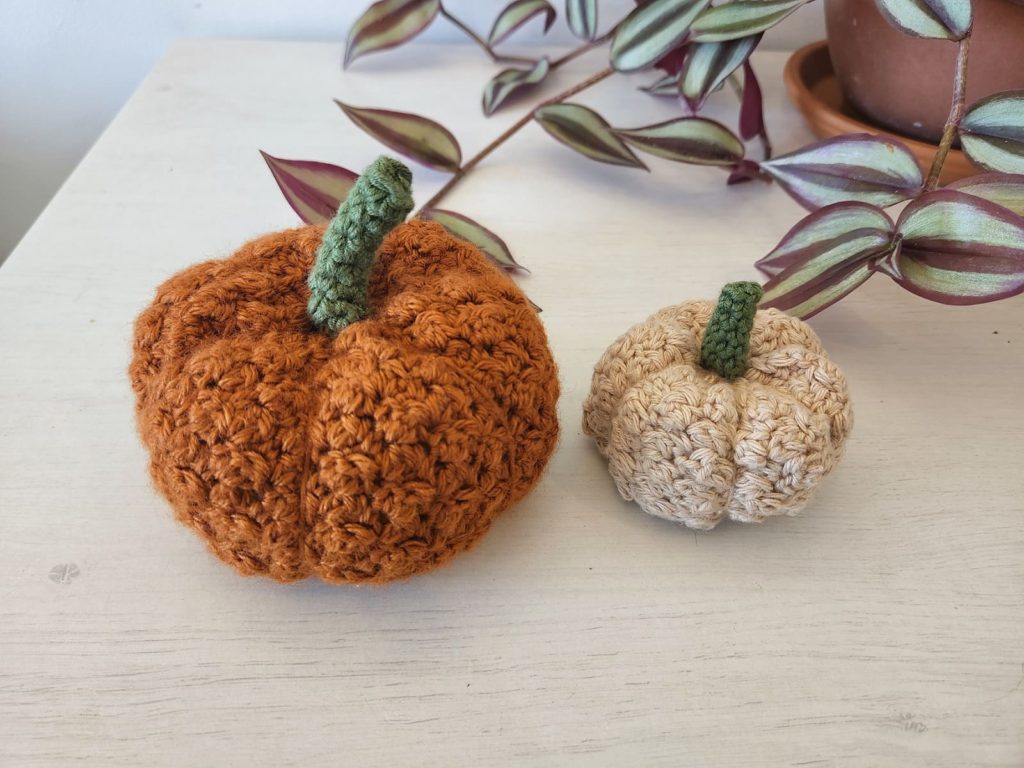
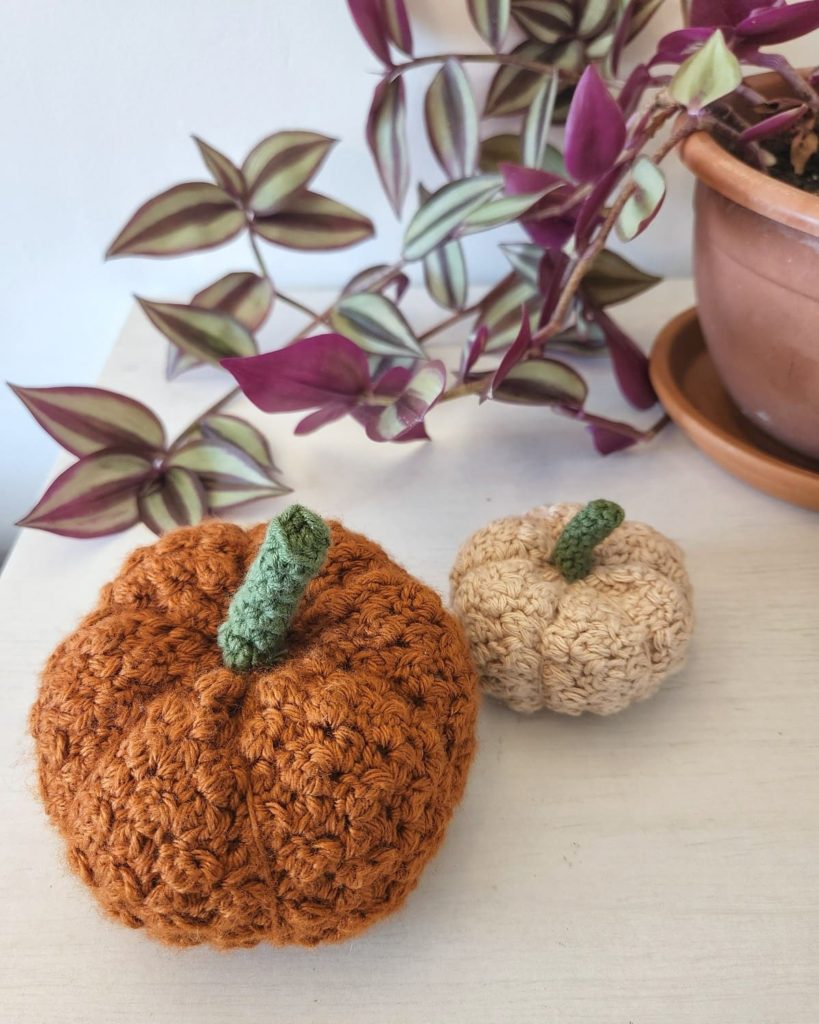
These beautifully textured crochet pumpkins are made using the Cluster stitch and are so easy to make!
** Some of the links in this post may include affiliate links. Making a purchase through one of these links pays me a small referral fee at no added cost to you. View our disclosure and privacy policy for more information.
Crocheting a pumpkin is very easy, there are two ways to crochet a pumpkin.
The first way is crocheting a rectangle, sewing it up to create a tube, and then sewing it at the bottom. The second way is working in the round, increasing to make the round shape.
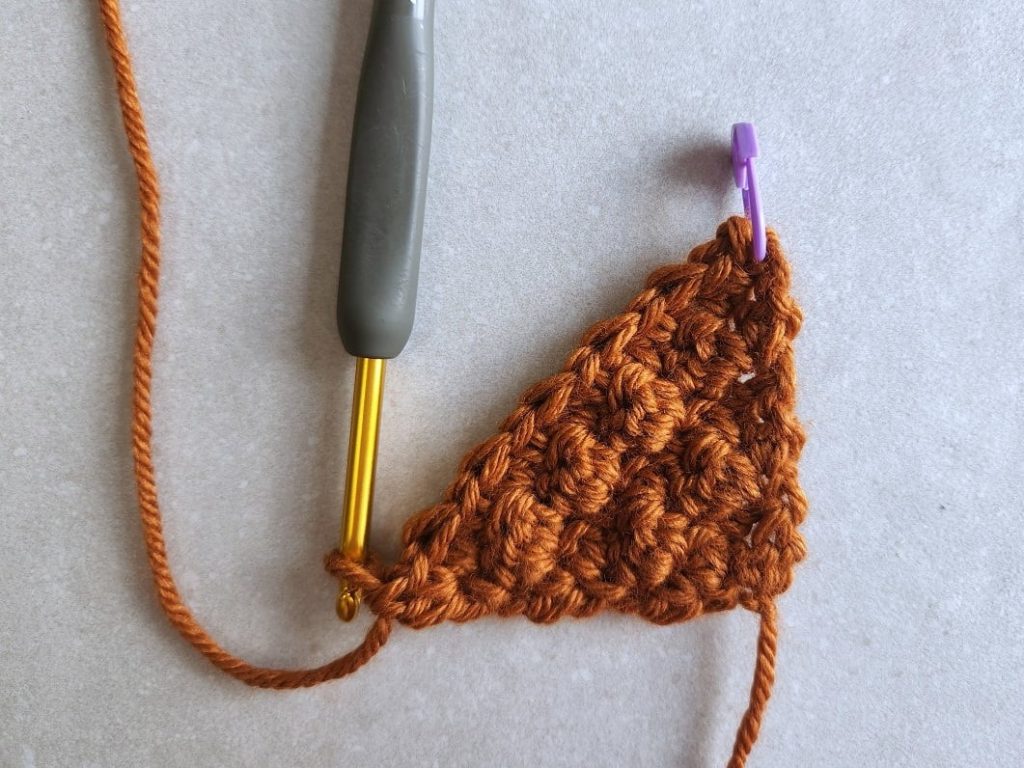
For our small crochet pumpkin pattern, we will make a C2C rectangle using the C2C Cluster stitch. Working in the corner to corner method will allow you to easily create any pumpkin size you want, while the Cluster stitch creates a unique textured crochet pumpkin pattern.
Want to save this post for later? Go ahead and PIN it!

Small Crochet Pumpkin Pattern
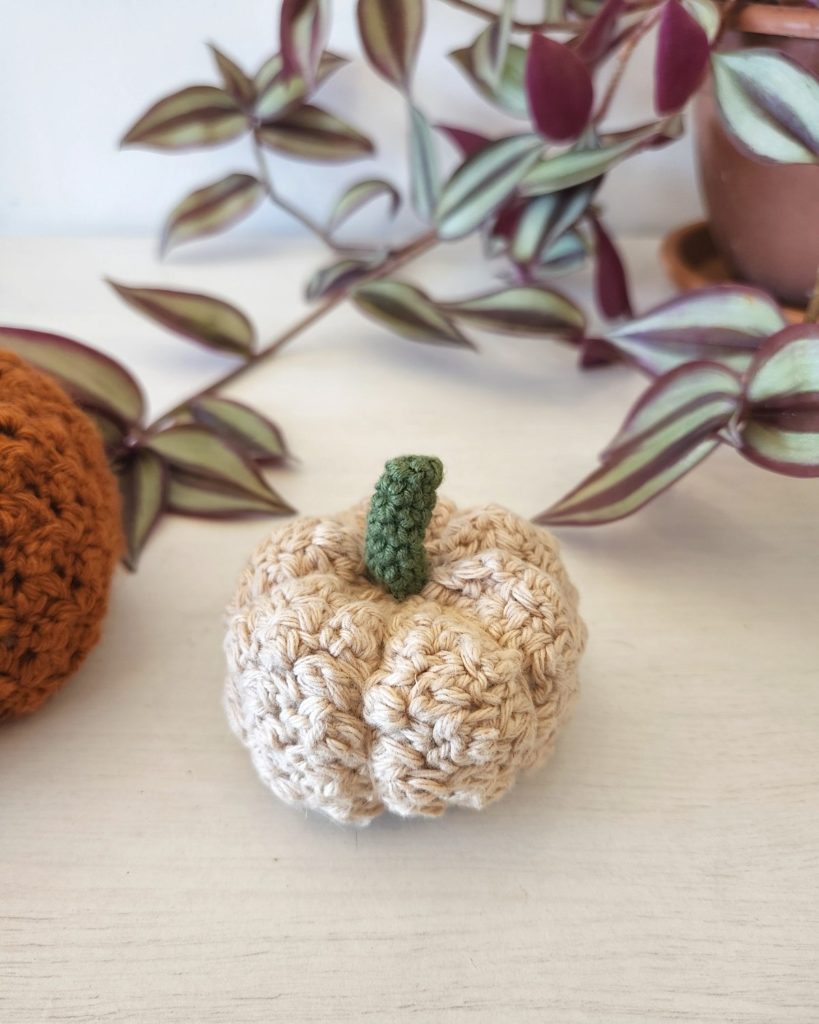
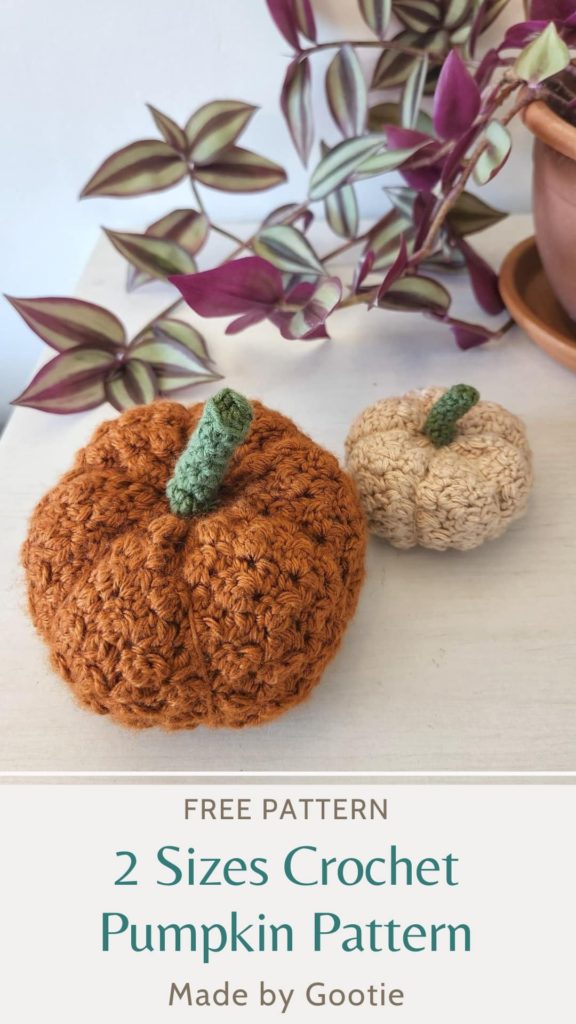
These cute crochet pumpkins are made in 2 sizes; small crochet pumpkin and mini crochet pumpkin.
Because we are working in the C2C technique it’s very easy to adjust the size of your crochet pumpkin!
A very rough guide for how to determine your pumpkin’s final size: when you work your rectangle, keep in mind that the pumpkin width will be approximately half of the rectangle width (wider part), and the pumpkin height will be approximately half of the rectangle height (shorter part).
This is a rough estimation and depends on how much stuffing you use, and whether you create ridges, or not.
What Yarn is Best for Crocheting a Pumpkin?
The fun thing about crocheting a pumpkin, is that it’s a great stash-busting pattern. Especially this small crochet pumpkin pattern!
Because we are using the corner to corner method, the gauge is not crucial (here, I said it!). You can use any type of yarn with suitable hook size, I do recommend using Sport (#2), DK (#3) or Worsted (#4) weight yarns for best looking pumpkins because of the stitch’ texture.
Another thing to keep in mind is to keep your stitches tighter than usual, to avoid the fiberfill from poking out of your pumpkin.
For my crochet pumpkins, I used 2 different yarn types, both were DK (#3) weight yarns.
For the small pumpkin I used Knit Picks – Gloss DK, the yarn is soft and has the perfect pumpkin color, but a bit more halo than I would like.
For my mini crochet pumpkin, I used Knit Picks – CotLin yarn. Because this yarn is made of a blend of cotton and linen, I actually liked it better for this application. It has a better stitch definition and it emphasizes the clusters more.
Crochet Pumpkin PDF Pattern
You can find the ad-free PDF pattern with the full photo-tutorial at one of my shops below:


More Free Crochet Home Decor Patterns to Love
Free Crochet Pumpkin Pattern
* Want to save this post for later? Go ahead and PIN it!
* Add this pattern to your Ravelry queue HERE!
Skill Level – Easy
Materials
– 3.5 mm / E crochet hook (I like this hook)
– DK (#3) weight yarn (I used Knit Picks – Gloss DK for the small pumpkin and Knit Picks – CotLin for the mini pumpkin).
Total amount of yarn needed:
Small Pumpkin
Pumpkin color – 50gr/112m/123yds
Stem color – 5gr/11m/12yds
Mini Pumpkin
Pumpkin color – 25gr/56m/62yds
Stem color – 5gr/11m/12yds
– Fiberfill for stuffing
– Tapestry needle
Abbreviations (US)
PM – place marker
ch – chain
yo – yarn over
sc – single crochet
sc2tog – single crochet 2 together
dc – double crochet
dc2tog – double crochet 2 together
dc-cl – dc cluster stitch: yo, insert hook into indicated st, yo and pull up a loop, yo and pull yarn through 2 loops. yo, insert hook into same st, yo and pull up a loop, yo and pull yarn through 2 loops. Pull yarn through 3 loops.
* This st is basically dc2tog where the 2 dc are worked into the same st.
Finished size
Small pumpkin: 4.5” (11.4cm) wide, 3’’ (7.6cm) tall.
Mini Pumpkin: 2.8” (7cm) wide, 2’’ (5cm) tall.
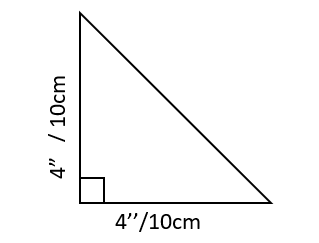
Gauge – Working rows 1-15 with 3.5 mm / E hook will result in 4’’ (10 cm) triangle sides.
Notes
- To make it easier to find the ch3 / ch2 spaces at the end of the row, place a stitch marker when you ch3/ch2 at the beginning of each row.
- The gauge is not crucial since you work from corner to corner, you can just work until you reach the desired size.
- To create the small size pumpkin, work a 5.5×9.5’’ (14x24cm) rectangle.
- To create the mini size pumpkin, work a 4×6.5’’ (10×16.5cm) rectangle.
- The pumpkin is made using the C2C Cluster Stitch, you can find a photo-tutorial HERE.
C2C Cluster Stitch Crochet Pumpkin Free Pattern
C2C Increase – You can find the photo-tutorial for the C2C Cluster stitch HERE
Ch4
Row 1: [1sc, 1dc-cl] in 4th ch from hook, turn.
Row 2: ch3-PM, 1sc in 1st dc-cl, 1dc-cl in next sc, [1sc, 1dc] in ch-3, turn.
Row 3: ch3-PM, 1sc in 1st dc, 1dc-cl in next sc.
* 1sc in next dc-cl, 1dc-cl in next sc; repeat from * to ch-3, [1sc, 1dc] in ch-3, turn.
Repeat row 3 until the side of the triangle measures 5.5” (14cm) for small size, or 4” (10cm) for mini size. Then start decreasing on one side.
Do you prefer a full-photo tutorial? Get the premium, ad-free, full photo-tutorial, printable PDF version onRavelry or Etsy!
C2C Decrease on one side
Row 4: ch2-PM, skip next dc & sc.
* 1sc in next dc-cl, 1dc-cl in next sc; repeat from * to ch-3, [1sc, 1dc] in ch-3, turn.
Row 5: ch3-PM, 1sc in 1st dc.
* 1dc-cl in next sc, 1sc in next dc-cl; repeat from * to last sc, dc2tog in last sc & ch-2, turn.
Row 6: ch2-PM, skip next dc2tog & sc.
* 1sc in next dc-cl, 1dc-cl in next sc; repeat from * to ch-3, [1sc, 1dc] in ch-3, turn.
Repeat rows 5-6 until the long side of your piece measures 9.5” (24cm) for small size, or 6.5” (16.5cm) for mini size, finishing with row 6. Then continue decreasing on both sides.
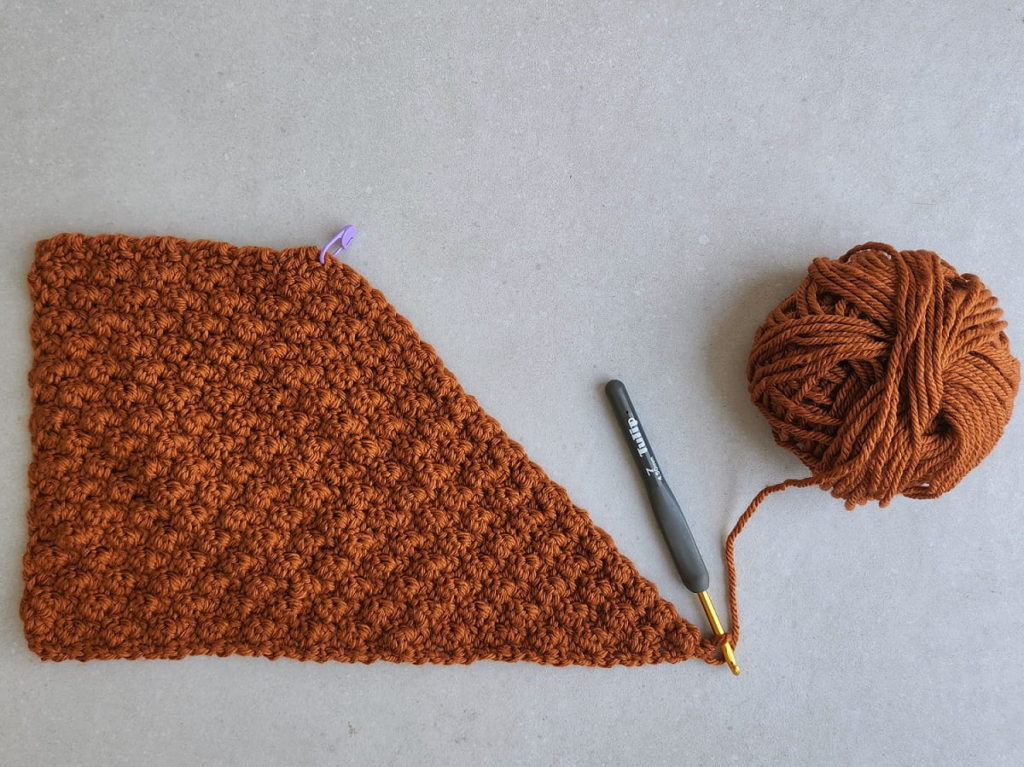
C2C Decrease on both sides
Row 7: ch2-PM, skip next dc & sc, 1sc in next dc-cl.
* 1dc-cl in next sc, 1sc in next dc-cl; repeat from * to last sc, dc2tog in last sc & ch-2, turn.
Row 8: ch2-PM, skip next dc2tog & sc, 1sc in next dc-cl.
* 1dc-cl in next sc, 1sc in next dc-cl; repeat from * to last sc, dc2tog in last sc & ch-2, turn.
Continue working row 8 until you have only 1 cluster stitch in your row (total of 4 sts + ch2).
Row 9: ch2-PM, skip next dc2tog & sc, 1sc in next dc-cl, dc2tog in last sc & ch-2, turn.
Row 10: ch1, skip next dc2tog, sc2tog in next sc & ch-2.
Don’t fasten off.

Making the stem
Working in continuous rounds, with the stem color.
Ch2, work 5sc into the 1st ch from hook, pull the yarn tight to close the ring, don’t ss.
1sc in each sc around, until the stem measures 3’’ (7.6cm) for small size, or 1” (2.5cm) for mini size, ss to close and fasten off.
Assembly
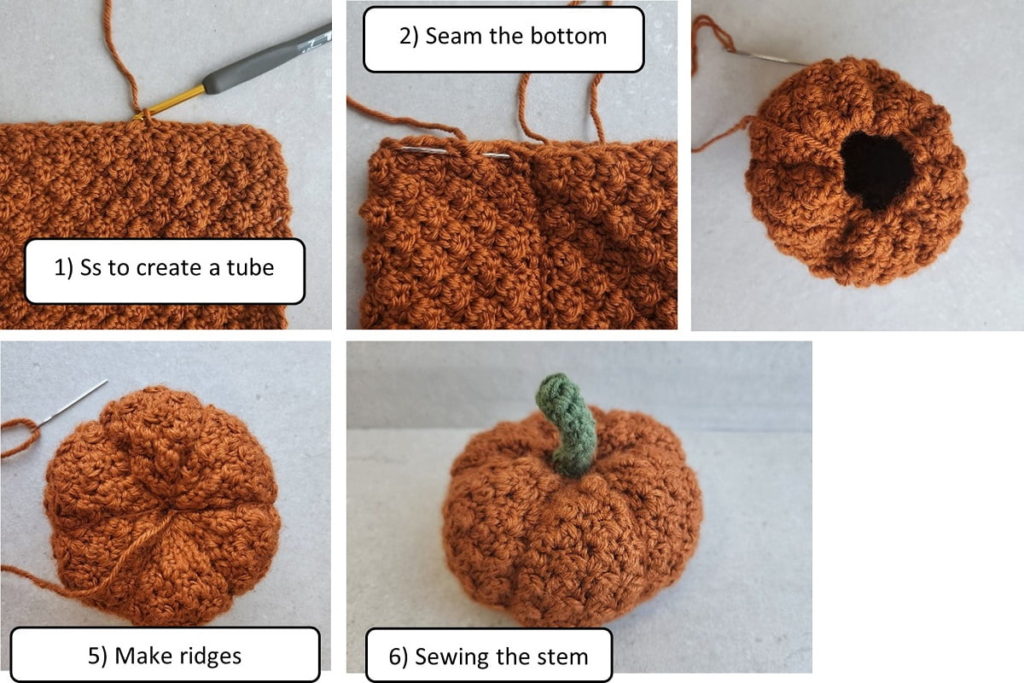
- Seaming the pumpkin with the same yarn as the pumpkin – Create a tube by bringing the 2 short sides together and slip stitch along them (you can also whip stitch), turn the tube inside out, so the seam will be inside (don’t worry, the fabric is reversible), leave a long enough tail to seam the bottom.
- With a tapestry needle and the yarn tail you just used, use a running stitch around the bottom and pull the yarn tight to close, secure with a knot and fasten off.
- Turn the pumpkin with the closed side down, fill the pumpkin with fiberfill, don’t over stuff it.
- With a tapestry needle and a long thread (pumpkin color), use a running stitch to close the top, secure with a knot and don’t cut the yarn.
- Making the pumpkin ridges – to create the pumpkin shape, with a pumpkin color yarn thread the needle from the middle top straight down to the bottom through the fiberfill, pull the yarn and wrap it around the pumpkin and secure it with a knot at the top. Repeat 5 more times (total of 6 ridges), cut the yarn and weave in the end.
- With a stem color yarn, sew the stem to the top of the pumpkin.
Did you try this out? Share your project!
– Let me know how it went and leave a comment below.
– Tag me on Instagram @madebygootie
– Join and share in our FB Community
Want to save this post for later? Go ahead and PIN it!