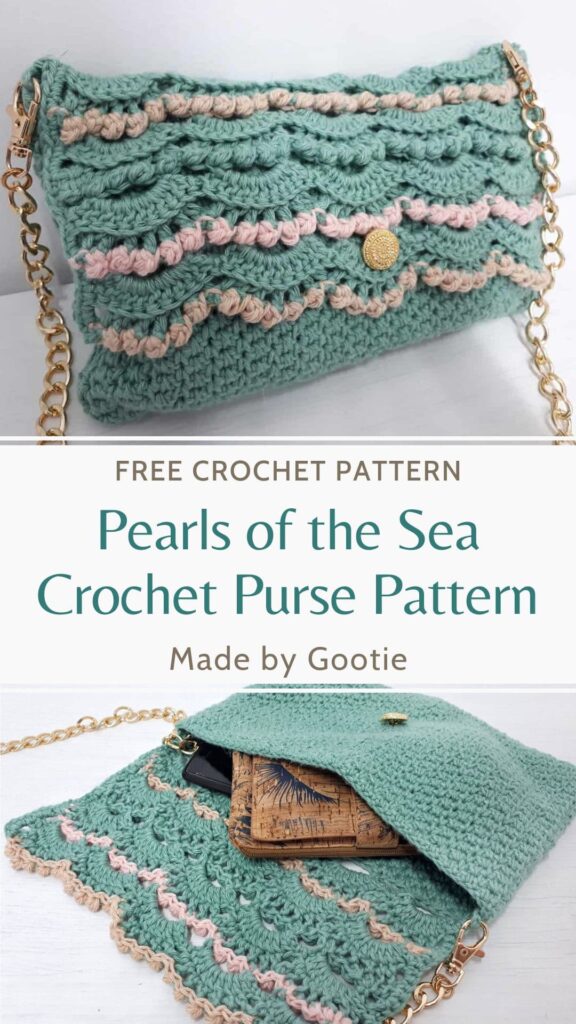
Pearls of the Sea Crochet Purse Pattern
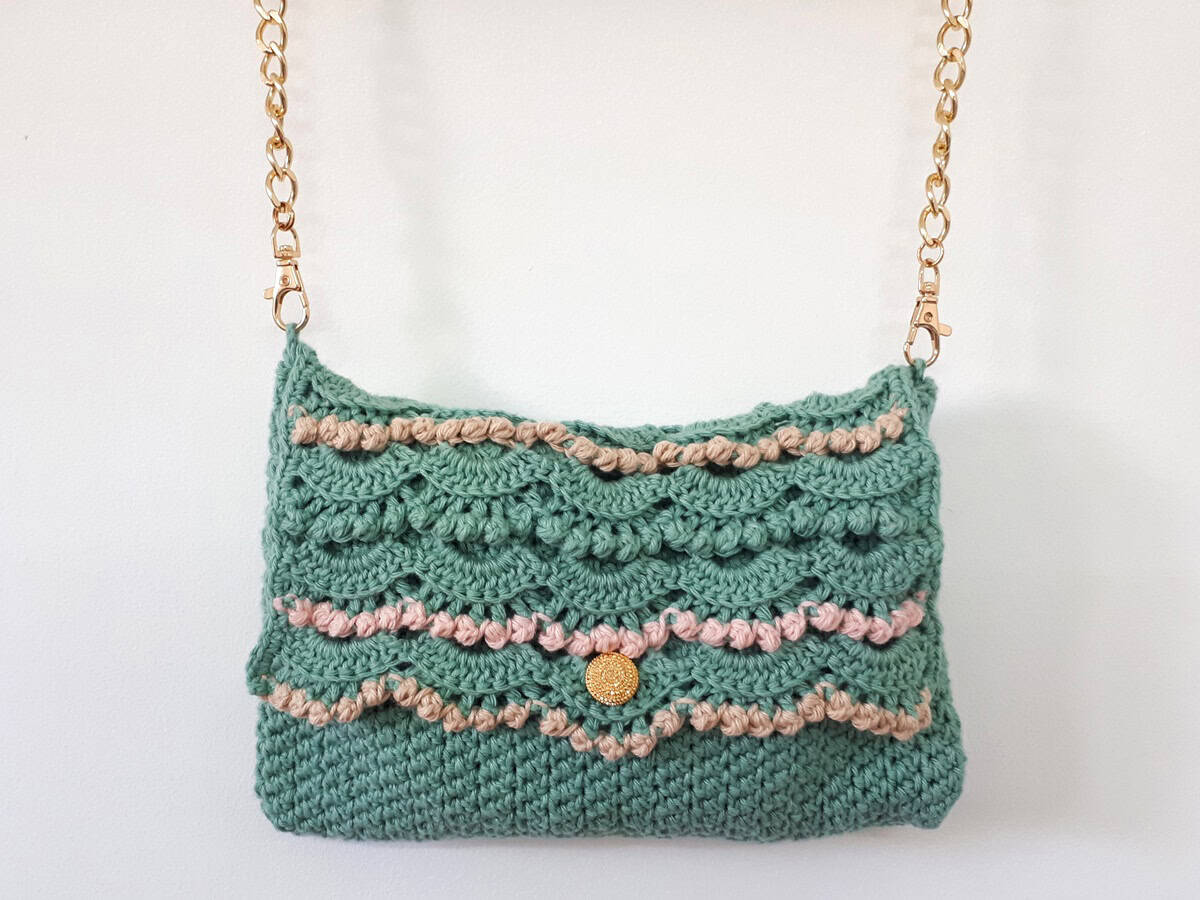
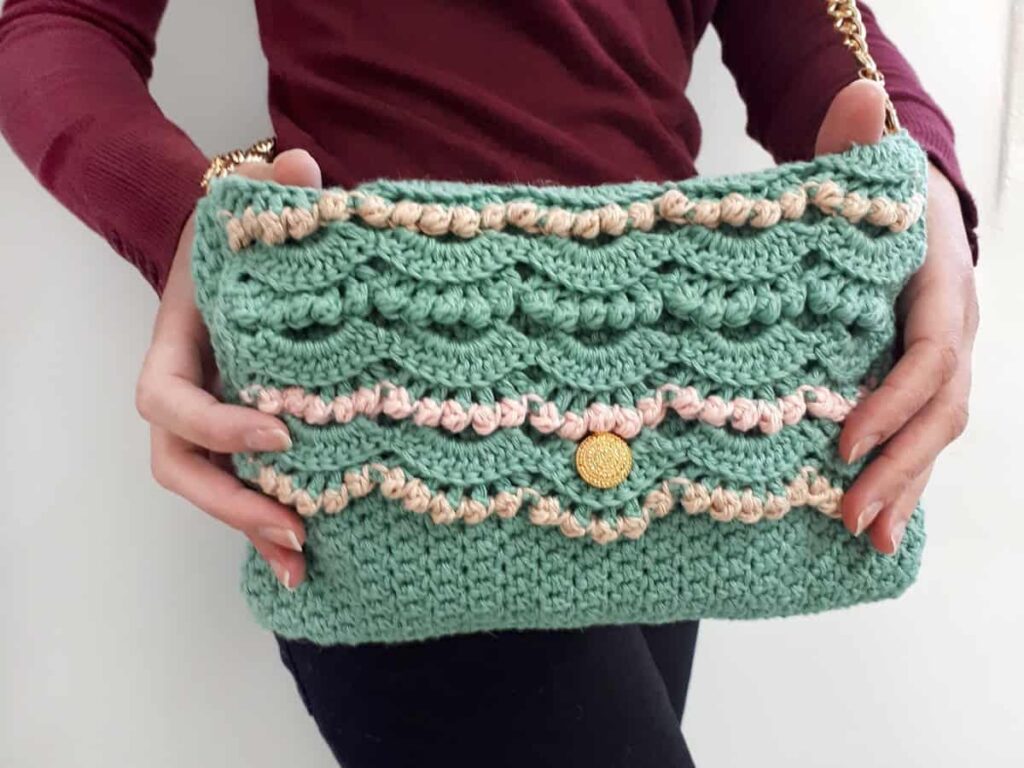
I love an elegant and functional bag that is beautiful and can hold all my essentials. The Pearls of the Sea crochet purse pattern will keep all your belongings in style!
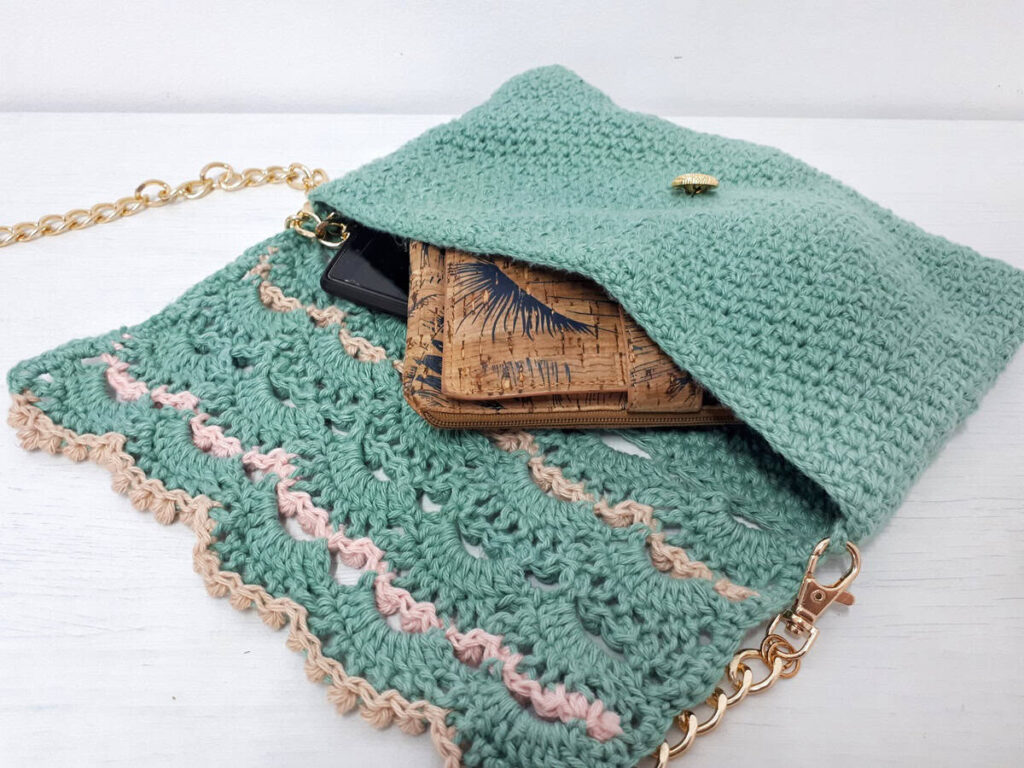
This crochet bag is worked in one piece, and then sewn on the sides to create the bag pocket.
Scroll down to the written instructions!
** Some of the links in this post may include affiliate links. Making a purchase through one of these links pays me a small referral fee at no added cost to you. These small fees add up and help me keep the blog running. View our disclosure and privacy policy for more information.
When I designed the Pearls of the Sea crochet clutch pattern, I first designed the cover. I loved the lacy shells, but wanted to add some kind of “bobbles” at the edge of the shells. After some trial and error, I decided to use the Berry stitch at the edge of the shells, which creates a little round bobble, and was so happy with the result!
I chose to use different colors for the Berry rows, but you can also use the same color for the shells, and the cover will still be beautiful.
For the bag body, I used the Alternating single crochet stitch, which creates a thick fabric that is solid enough for the bag. That’s why I chose not to add a liner to the body of the bag, but you can add a liner if you want to.
Want to save this post for later? Go ahead and PIN it!
The Yarn I Used for My Purse Crochet Pattern
For the crochet purse you see in the photos, I used Knit Picks – CotLin. This is one of my favorite yarns, it’s a DK (#3) weight yarn that consists of 70% Tanguis Cotton, 30% Linen.
This fiber blend creates a soft but sturdy yarn that comes in many lovely colors. It’s perfect both for accessories such as bags, and also for scarves and shawls.
100% cotton yarn will also be a good choice for this bag. Overall, I recommend using sturdy natural fiber rather than acrylic yarn, which has less durability over time.
Pearls of the Sea Crochet Purse PDF Pattern
You can find the ad-free PDF pattern with the full photo-tutorial at one of my shops below:


Materials
– Crochet hook 4.0 mm / G (I love the Etimo Hooks).
– DK (#3) weight yarn – I used Knit Picks – CotLin
Total amount of yarn needed:
Color A (Sagebrush) – 150 gr (336m/369yds)
Color B (Linen) – 10 gr (22m/25yds)
Color C (Flamingo) – 10 gr (22m/25yds)
– 2 stitch markers
– 40 in / 100 cm metal / fabric strap with clips
– 8 in / 2 cm button – I bought mine in Japan, but there are beautiful button options here
Finished Size – 10×6.5 in (26×17 cm)
Gauge (in Alternating Spike St) – 17 sts and 25 rows = 4 in/10 cm with 4.0mm / G hook.
Abbreviations (US)
RS – right side
WS – wrong side
ch – chain
st – stitch
ss – slip stitch
sc – single crochet
SPsc – spike single crochet: work sc into 2 rows below (instead of 1 row below as in regular sc)
hdc – half double crochet
dc – double crochet
BLO – back loop only
yo – yarn over
Berry – yo, insert hook into next st, yo and pull through, yo and pull through 1 loop, yo, insert hook into same st and pull yarn through all 5 loops.
PM – place marker
Notes
- Make sure you have 45 sts in the body’s part.
- When making the purse’s body, place a marker at the 1st ch1, so you know where to crochet the last stitch at the next row.
- Changing colors: one row before the color change, at the last st- pick up the new color while you slip stitch into the stitch.
- You can also crochet a strap (skip the loops at the assembly part): ch 4 and work the alternating spike stitch to your desired length and attach the strap to the sides of the clutch.
Pearls of the Sea Crochet Clutch Pattern
With color A
Body (alternating spike stitch – see detailed photo tutorial HERE)
Ch 46
Row 1: 1 sc in 2nd ch from hook, 1 sc in next 44 ch, turn. (45 sc)
Row 2: Ch 1- PM (counts as 1 sc), skip 1st sc.
* 1 sc in next sc, 1 SPsc in next ch from foundation row; repeat from * to end, turn. (1 ch, 22 sc, 22 SPsc)
Row 3: Ch 1- PM (counts as 1 sc), skip 1st SPsc.
* 1 SPsc in next sc, 1 sc in next SPsc; repeat from * to end (last sc will be in ch-1 from prev. row), turn. (1 ch, 22 sc, 22 SPsc)
Row 4: Ch 1- PM (counts as 1 sc), skip 1st sc.
* 1 sc in next SPsc, 1 SPsc in next sc; repeat from * to end (last SPsc will be in ch-1 from prev. row), turn. (1 ch, 22 sc, 22 SPsc)
Keep working rows 3-4 until your work measures 13 in / 34 cm (don’t fasten off, continue to work the cover with the same color).
Do you prefer a detailed photo tutorial? Get the premium, ad-free, full photo-tutorial, with a diagram for the cover part, printable PDF version onRavelry or Etsy!
Cover
Row 1 (RS): Ch 4, skip 2 sts, 1 sc in next st.
* Ch 5, skip 3 sts, 1 sc in next st, ch 5, skip 4 sts, 1 sc in next st; repeat from * to last 6 sts.
Ch 5, skip 3 sts, 1 sc in next st, ch 2, skip next st, 1 dc in last st, turn. (51 ch, 10 sc, 1 dc)
Row 2 (WS): Ch 1, 1 sc in 1st dc, skip ch-2 space.
* 9 dc in next ch-5 space, 1 sc in next ch-5 space; repeat from * 3 more times.
9 dc in next ch-5 space, 1 sc in ch-4 space, turn. (6 sc, 45 dc)
** When repeating row 2 in rows 6, 10 & 14 last sc will be in ch-5 space.
Row 3 (RS): Ch 2, skip next sc and dc.
* (1 hdc BLO in next dc, ch 1 (don’t skip st)) x 6 times, 1 hdc BLO in next dc, skip next 3 sts; repeat from * 3 more times.
(1 hdc BLO in next dc, ch 1 (don’t skip st)) x 6 times, 1 hdc BLO in next dc, skip next dc, 1 hdc in last sc, turn. (30 ch, 36 hdc)
With color B – You will find a photo tutorial for working the Berry Stitch HERE
Row 4 (WS): Ch 1, skip 1st hdc, 1 sc in next hdc.
* (1 ss in next ch-1 space, 1 berry in next hdc) x 5 times, 1 ss in next ch-1 space, skip 2 hdc; repeat from * 3 more times.
(1 ss in next ch-1 space, 1 berry in next hdc) x 5 times, 1 ss in next ch-1 space, skip next hdc, 1 sc in top of beginning ch-2 from prev. row, turn. (25 berries, 2 sc, 1 ch, 30 ss)
With color A
Row 5 (RS): Ch 5, skip 1st berry, 1 ss in next ss.
* Ch 5, skip next 3 berries, 1 ss in next ss, ch 5, skip next 2 berries, 1 ss in next ss; repeat from * 3 more times.
Ch 5, skip next 3 berries, 1 ss in next ss, ch 2, skip last berry, 1 dc in next sc, turn. (52 ch, 1 dc)
Rows 6-9: repeat rows 2-5
** Do not change color in row 4.
Rows 10-11: repeat rows 2-3.
With color C
Row 12: repeat row 4.
With color A
Row 13: repeat row 5.
Rows 14-15: repeat rows 2-3.
With color B
Row 16: repeat row 4.
Fasten off and weave in the ends.
Assembly
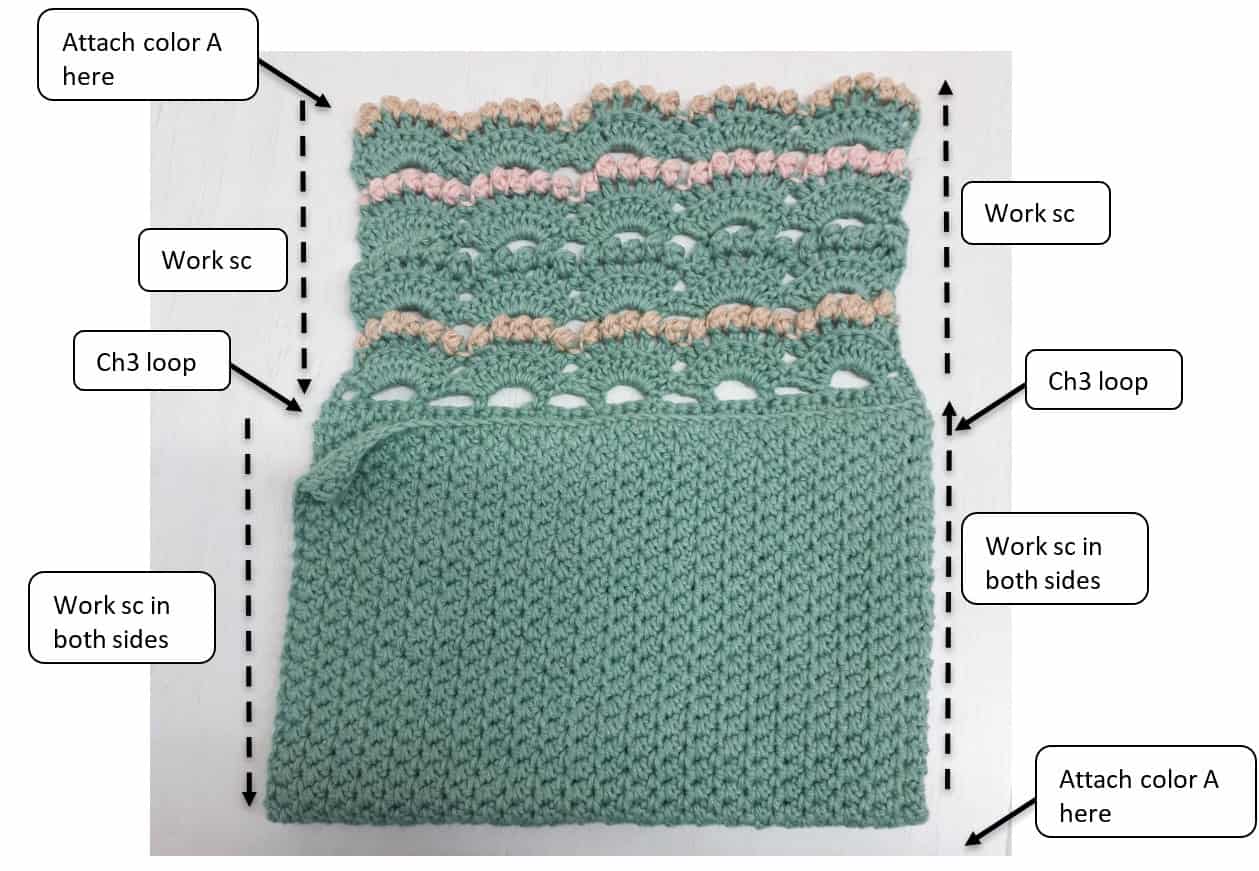
Lay the piece with the outer side facing you (the berries facing up), fold the body in half.
Right side: Using color A, attach the yarn at the bottom right corner (see photo) and work sc along both sides of the body together.
At the top of the body ch3 and ss into the same sc to make a loop for the strap.
Continue working sc along the cover side, fasten off.
Left side: Attach the yarn at the top of the left side (cover), work sc along the cover side.
1Sc into both sides of the body, ch3 and ss into 1st sc to make a loop, continue sc into both sides of the body.
Fasten off and weave in the ends.
Turn the bag back into the right side and sew the button at the middle.
Looking for More Crochet Bag Patterns?
Did you try this out? Share your project!
– Let me know how it went and leave a comment below.
– Tag me on Instagram @madebygootie
– Join and share in our FB Community
Want to save this post for later? Go ahead and PIN it!
I made this bag last year for my daughter. It is beautiful and is one of my all time favorite pieces to crochet
Thank you for sharing, Christine! I’m so happy you loved making this bag, your daughter is so lucky to get such a beautiful gift 🙂
This is a really beautiful bag!! Thanks for showing us how to!
My pleasure, I’m glad you like it!