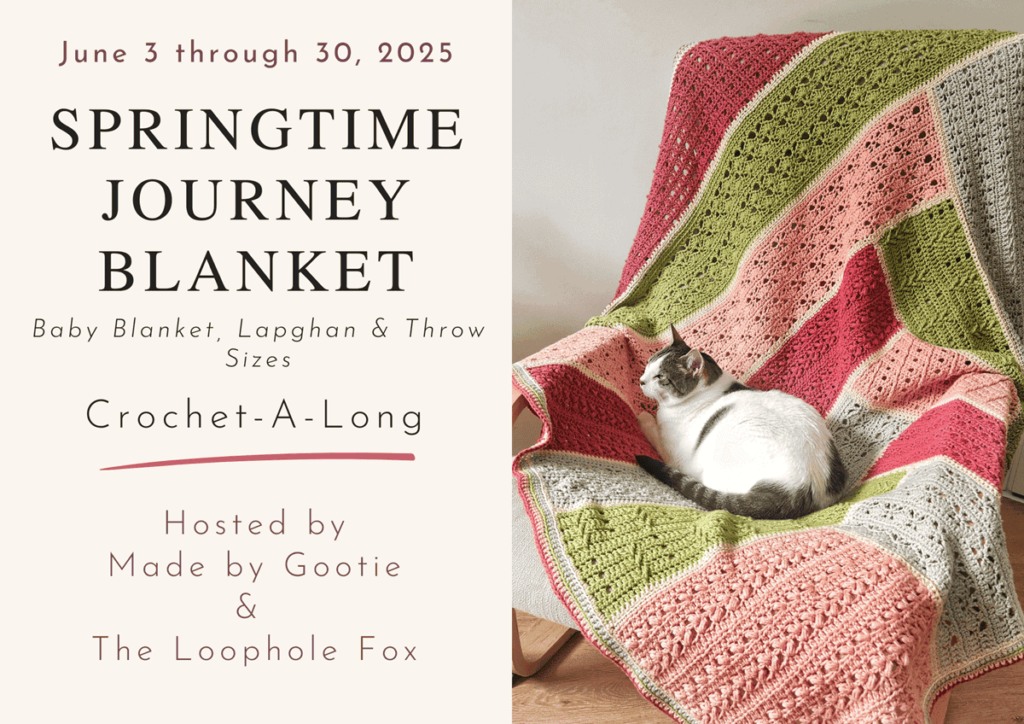
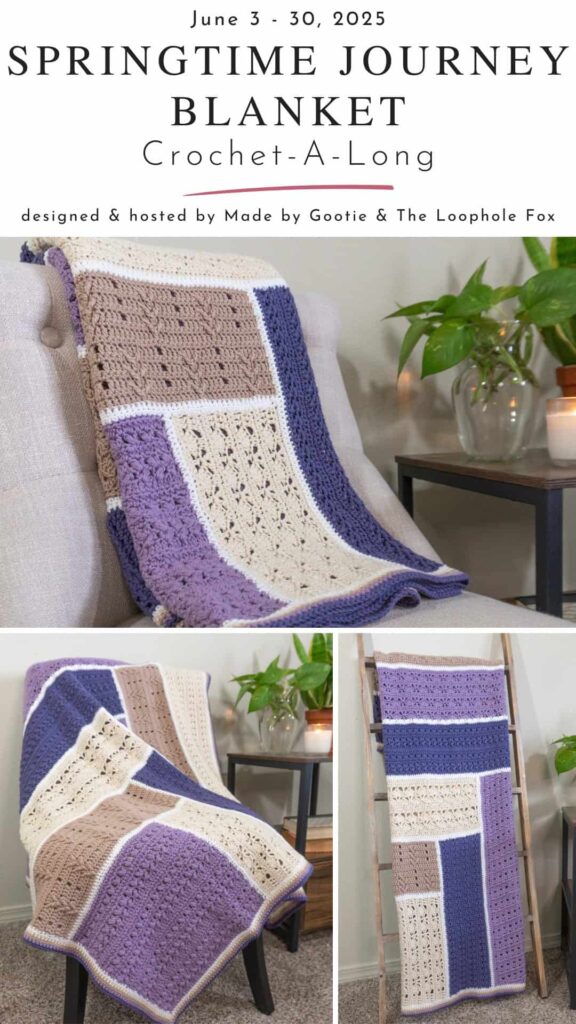
Color Block Crochet Blanket – Springtime Journey Blanket
Last Updated on June 28, 2025
I’m excited to share the Springtime Journey Color Block Crochet Blanket! This is the fourth annual free blanket crochet along that I’m co-hosting with my friend Shannon from The Loophole Fox. This year, we designed a lacy crochet blanket stitch with patterns inspired by spring.
The Springtime Journey Blanket has a unique construction with 12 sections that are worked on top of each other (no joining!) in a Mitered Log-Cabin method.
The blanket comes in 3 sizes – baby blanket, lapghan, and throw sizes. All 3 pattern sizes are available for free.
** Some of the links in this post may include affiliate links. Making a purchase through one of these links pays me a small referral fee at no added cost to you. View our disclosure and privacy policy for more information.
Want to save this post for later? Go ahead and PIN it!
- How Will The Springtime Journey Blanket Crochet Along Work?
- The Springtime Journey Blanket eBook
- Construction of the Springtime Journey – Color Block Crochet Blanket Pattern
- Skill Level and Materials
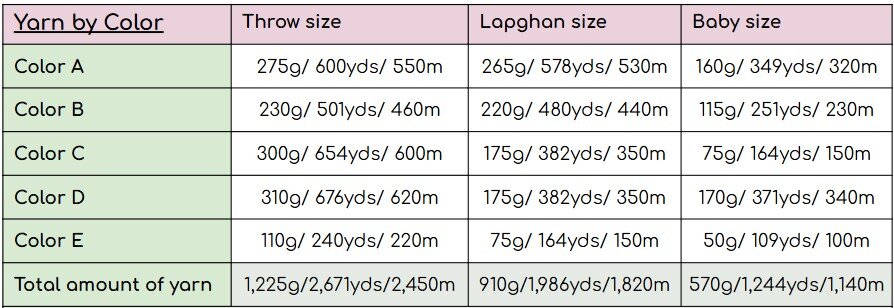
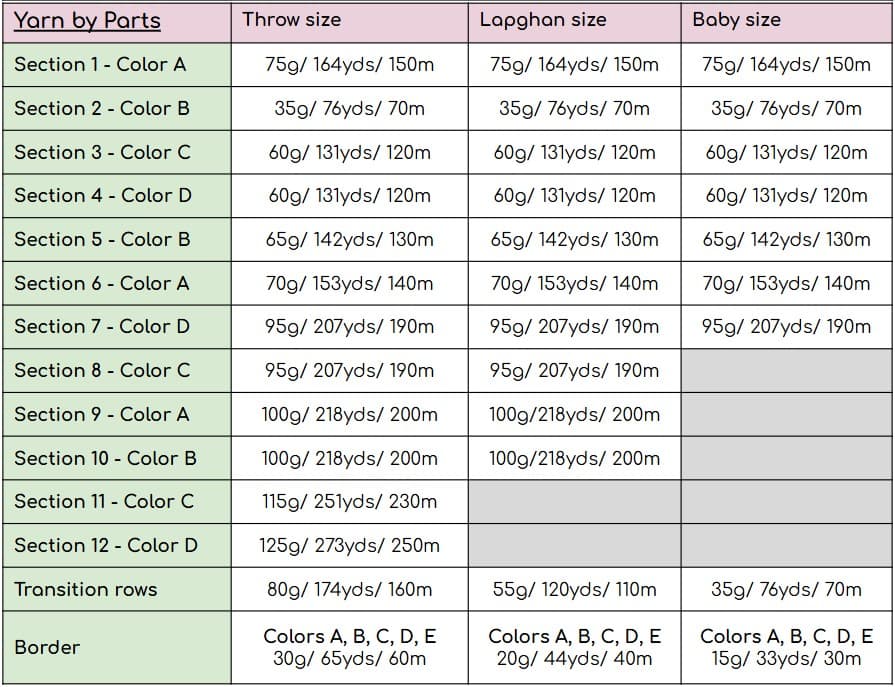
- Total Amount of Yarn Needed for Each Color and Blanket Part
- Springtime Journey Blanket Schedule – Free Crochet Along Blanket Pattern
- Blocking Your Blanket – Don't Skip That Step!
How Will The Springtime Journey Blanket Crochet Along Work?
This is a free crochet along (CAL), similar to the previous Harmony, Serenity, and Tranquility blanket patterns, all the different parts will be available on the blogs. Even after the event ends, you will still be able to find all the links to the free crochet blanket pattern right here.
This was a free crochet along blanket that was hosted from June 3rd-30th, 2025. The pattern is still free to view on the designers’ blogs.
Sign Up and Join The Crochet Along!
Sign up for my newsletter to make sure you won’t miss out on this CAL!
I would also love you to join us both in the Made by Gootie FB Community group The Fox Den Crochet Community group, where you can share your progress with our wonderful crocheters community, ask questions and get some help with the pattern!
More ways to share your progress:
1) Use hashtag #SringtimeJourneyCAL and tag me @madebygootie and Shannon @theloopholefoxcrochet, and the relevant designer.
2) Add your project to Ravelry.
Join the Made by Gootie Facebook Community
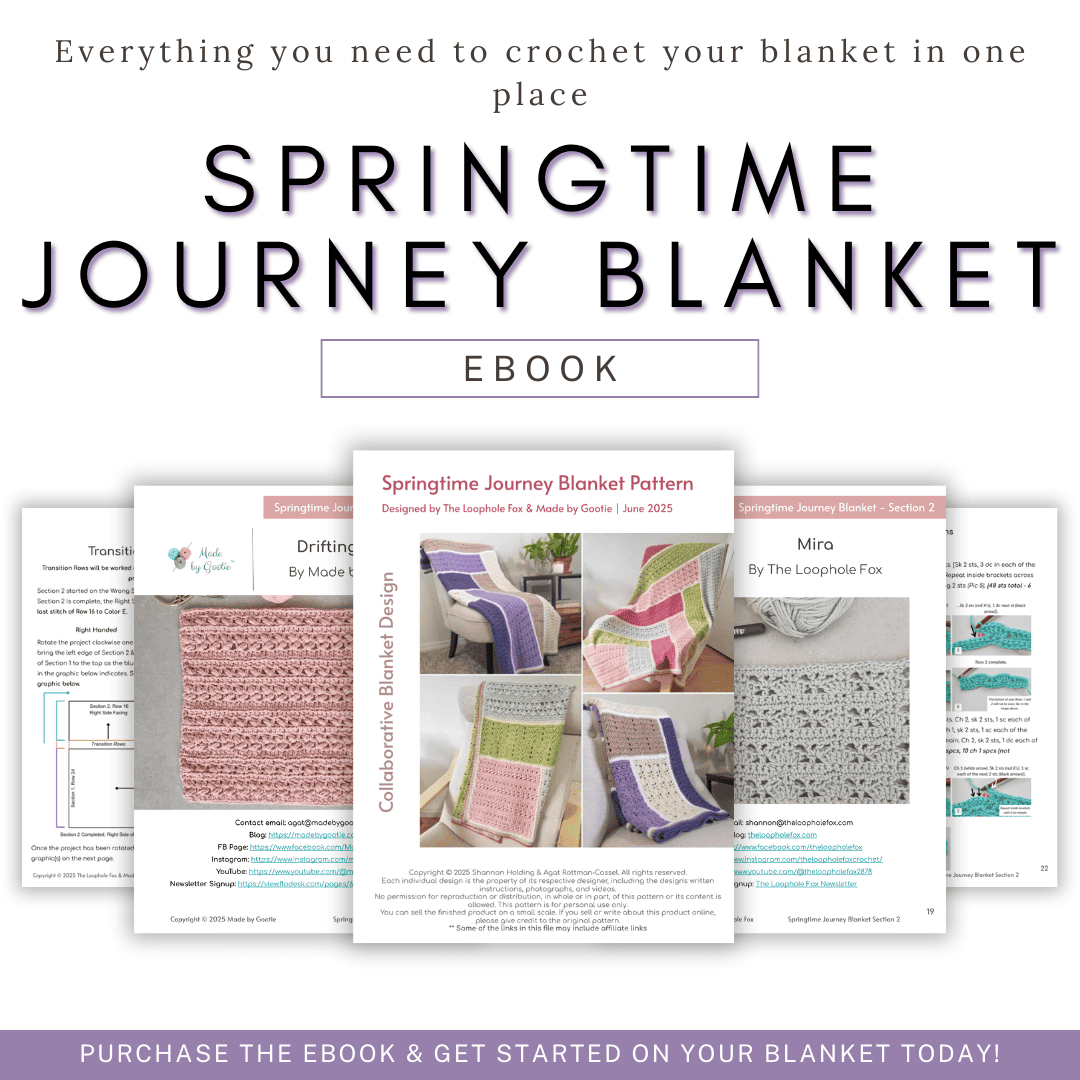
The Springtime Journey Blanket eBook
We know not everyone likes to jump from one page to another, or prefers to have their patterns without the ads.
We have put together a cohesive eBook for the Springtime Journey Blanket that gathers all 12 different parts of the blanket, including the transition rows and full border instructions.
This eBook is perfect for you if you…
- Prefer to work from one document, where all patterns and information are consistently formatted.
- Would rather download and print a PDF instead of relying on ad-supported free-to-view patterns on our blogs.
- Don’t like to jump from one blog post to another for each section.
- Appreciate having photo tutorials to support patterns
- Enjoy having diagrams to clarify stitch placement.
Click here to purchase the ad-free eBook!
Construction of the Springtime Journey – Color Block Crochet Blanket Pattern
This blanket pattern was designed as one piece, which means that there is no joining of pieces in this blanket.
This is a modular crochet blanket, worked in a Mitered Log-Cabin shape, that spares you the long starting chain. We start with a small square at the corner of the blanket, then we work on 2 sides of the square to grow the blanket outward and upward. Each section is worked on the side and top of the previous section.
Two transition rows break up each part and emphasize the next part’s different texture. The transition rows are accompanied by a thorough video tutorial to help you work that unique construction!
Each section is worked on one side of the square, and so
Each odd-numbered section starts with the Right side and ends with the Wrong side.
Each even-numbered section starts with the Wrong side and ends with the Right side.
After the last part, we will place a border, and these transition rows will not be needed.
The pattern offers 3 sizes for the blanket:
Baby Blanket (made by crocheting sections 1-7): Approx. 31×34 in (79×86 cm)
Lapghan (made by crocheting sections 1-10): Approx. 40×42 in (102×107 cm)
Throw (made by crocheting sections 1-12): Approx. 45×55 in (114×140 cm)
Skill Level and Materials
Skill Level – The skill level for this blanket is intermediate, because we are working on the side stitches of the sections. Only the transition rows have video tutorials, the blanket sections don’t have video tutorials, they have detailed photo tutorials.
Terminology – All designs included in this pattern US Crochet Terminology.
Materials
– 4.5 mm crochet hook (I like this hook).
– Worsted (#4) weight yarn (see detailed amount of yarn below)
For our blanket, we used Knit Picks – Comfy Worsted, which We Crochet generously contributed. This yarn is perfect for a Spring and Summer blanket! It’s super soft and pretty light, consists of 75% Pima cotton and 25% acrylic.
Please note, Worsted Weight is the thinner of the two Medium (4) weights of yarn. If you use an Aran (or heavier Medium 4), your blanket will be larger than stated.
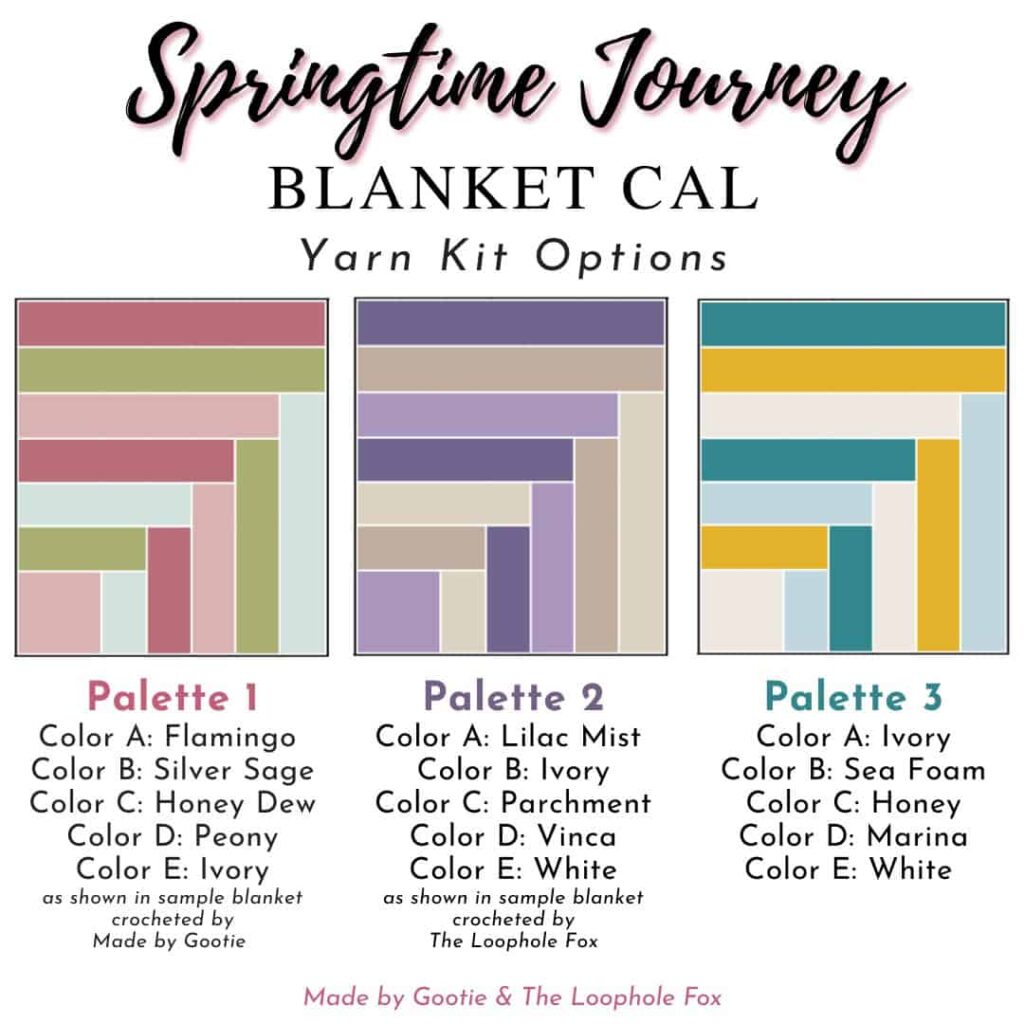
We also chose to use 5 different colors (4 for the different parts and 1 for the transition rows and border, I will lay out both the amount needed for each color if you use 5 different colors, and both amounts used for each different section (scroll down for each part), if you want to plan your colors differently.
This time, we put together yarn kits with 3 different beautiful color options!
To help you with color planning, we created 3 beautiful palettes you can buy as a kit! It spares you the effort of color planning, and you can see right here how you’re blanket will turn out.
You can find the yarn and kits here.
Total Amount of Yarn Needed for Each Color and Blanket Part
Pattern Notes
- Each part is separated by 2 transition rows.
- There are video tutorials for the transition rows for sections 1-6 – linked at the top of the section’s page.
- Always finish the last stitch of the part you are working on with the transition row color to work your transition rows, and make sure to finish the last stitch of the second transition row with the color you’ve chosen for the next part.
- You don’t have to decide which size of blanket you’d prefer to make prior to starting this pattern! You can decide as you go.
Springtime Journey Blanket Schedule – Free Crochet Along Blanket Pattern
Here you can find the release schedule of all the blanket parts. Each part will be linked to the pattern when it is released.
June 3rd
Section 1 – Drifting Puffs & Transition rows for Section 1
Section 2 – Mira & Transition rows for Section 2
June 6th
Section 3 – Alternating Fishbone & Transition rows for Section 3
Section 4 – Wildflower Meadow & Transition rows for Section 4
June 10th
Section 5 – Whispering Shells & Transition rows for Section 5
Section 6 – Looking Glass & Transition rows for Section 6
June 13th
Section 7 – Drifting Puffs & Transition rows for Section 7
Border for Baby Blanket
Section 8 – Alternating Fishbone & Transition rows for Section 8
June 17th – Section 9 – Mira & Transition rows for Section 9
June 20th
Section 10 – Wildflower Meadow & Transition rows for Section 10
Border for Lapghan Blanket
June 24th – Section 11 – Whispering Shells & Transition rows for Section 11
June 27th
Section 12 – Looking Glass & Transition rows for Section 12
Border for Throw Blanket
Blocking Your Blanket – Don’t Skip That Step!
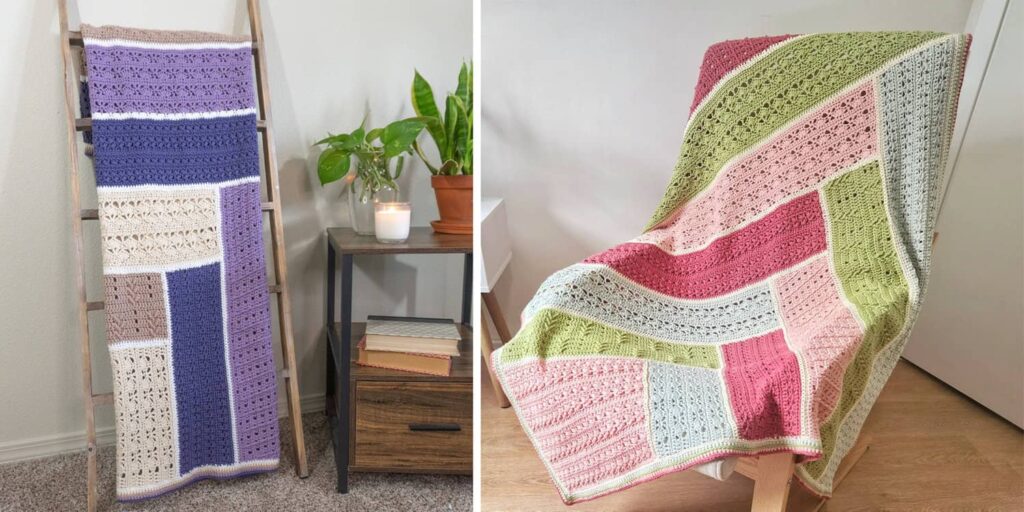
Because of the nature of the mitered technique, the blanket might not be a perfect rectangle when you finish the last section.
It’s important to block your blanket to bring it to the final rectangle dimensions and create straight sides.
You can see in the photos below how my blanket is after completing Section 12 before placing the border and blocking, and the border is finished, and how it looks when it is blocked.
I block my projects on an old foam puzzle board with sewing pins and then spray it with water. You can use dedicated blocking boards, or even block it on a big bed, and also use a steamer.

Can’t wait to start the new project on June 3rd.
I’m glad you are joining us, Joanie!
Ooooo cant wait!!!!
Me too! I’m happy you’ll be crocheting with us 🙂
The yarn is in, the hard part is to wait until after work on Tuesday to start.
Yayy! I’m so excited for you!
Just found out about this CAL from Sunflower Cottage newsletter today. Gathered my yarn and getting started this afternoon. I’m so excited!
I’m happy you are joining us!
I wouldve love to buy the pattern but it seem not available in Greece. This is PDF I believe
I’m Really sorry about it. We wish we could, too, and we find it frustrating on our end that we can’t. The EU changed laws in December 2024 for product safety that we’re still waiting for clarification on to ensure that our products meet the standards. It frustrates us to not be able to offer it at the moment but because the laws are unclear for our type of product (PDF pattern), we have to do the best we can to follow the laws and, until further clarification is made, that means we cannot sell to the EU. We hope this changes soon!
Hi, I’m having trouble accessing Section 4 – Wildflower Meadow. The transition rows for this section are fine, but the Wildflower Meadow section doesn’t load. Can you help me please. Thank you
I updated the link ahead of time because the time different between me and Shannon, it will go live tomorrow 🙂
Hi there. I’m having trouble accessing the links for sections 7 and 8. Can you help?
I’m absolutely loving this CAL. I’m doing 2 in different color palettes. I love your designs!!
I’m so glad you’re enjoying the CAL, Debbie!
I’m sorry, for some reason the links to these sections didn’t work. It is all linked to the Sections now.
Thank you for bringing this to my attention!
On the transitions for sections 7 and 8, the directions are missing instructions for row 2.
Hi Sara,
I just looked and for both sections the second row is showing – a row of sc BLO for section 7, and a row of sc FLO for section 8.
It’s written just below the Transition Row 1 instructions.