Crochet Doorstop Free Pattern
Last Updated on June 24, 2025
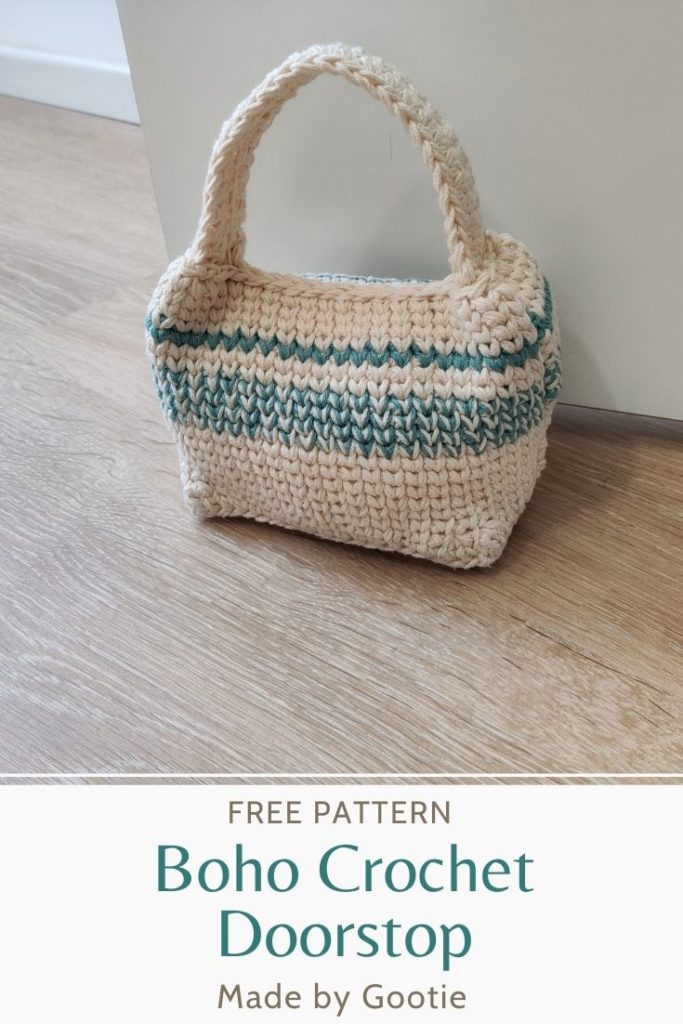
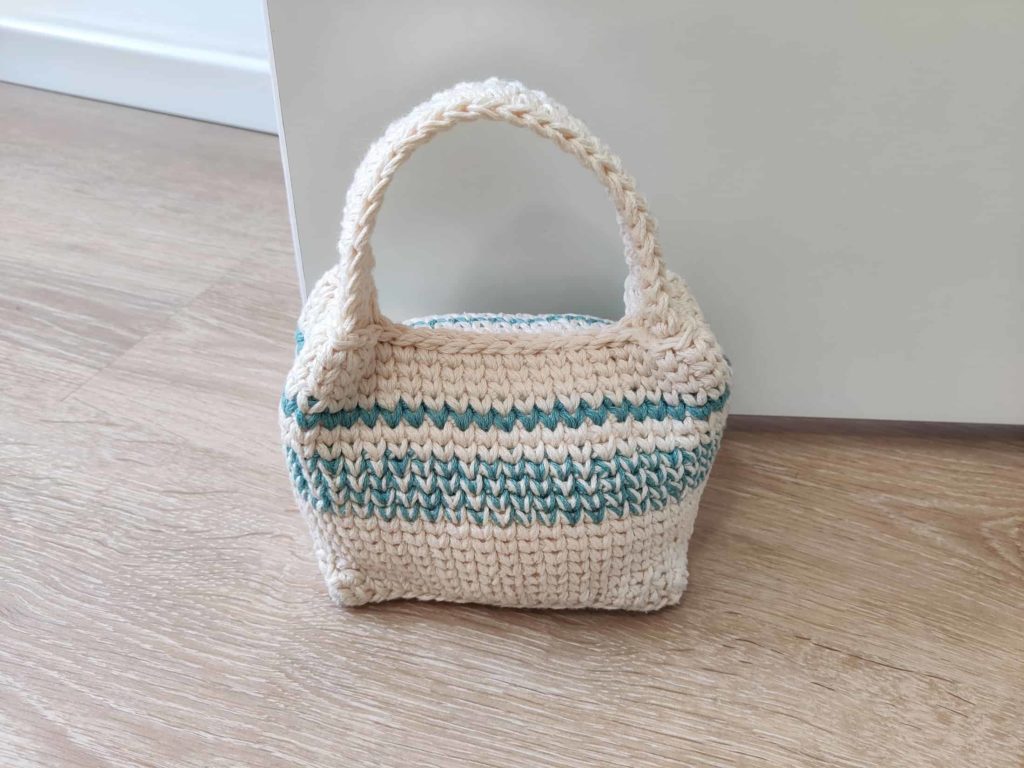
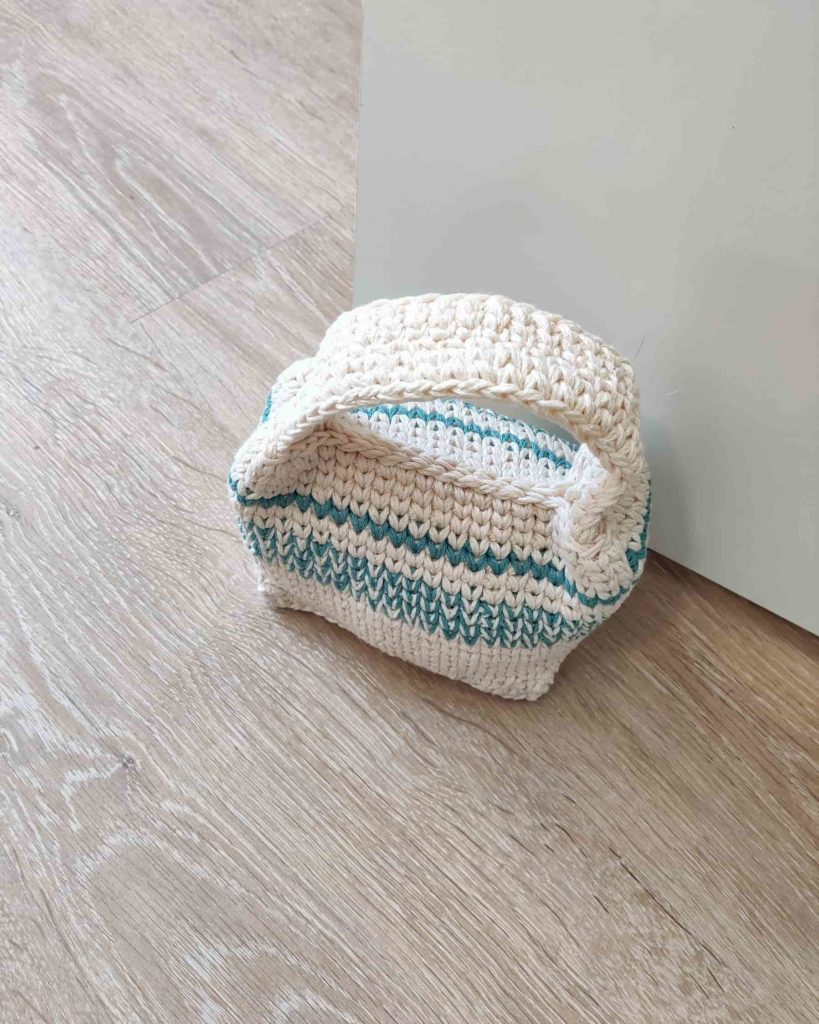
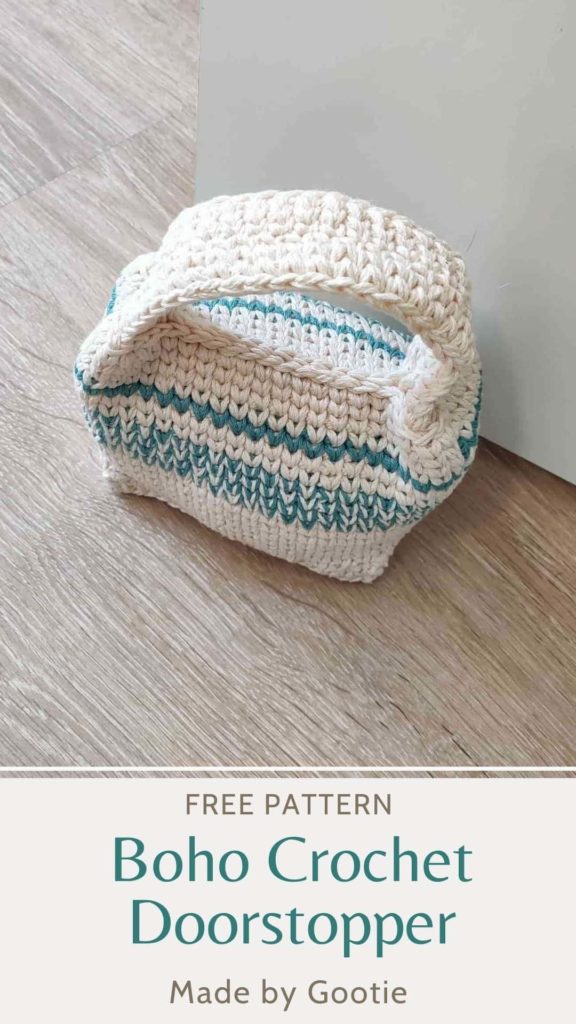
I’m happy to share with you the Boho Crochet Doorstop pattern.
This crochet doorstopper is a fun project and works up super quickly!
I made this cute doorstop for my daughter’s room and I liked it so much, that I made another one for my office room.
** Some of the links in this post may include affiliate links. Making a purchase through one of these links pays me a small referral fee at no added cost to you. These small fees add up and help me keep the blog running. View our disclosure and privacy policy for more information.
Want to save this post for later? Go ahead and PIN it!
The main idea behind making a doorstop is to create a container with a flat base and fill it with heavy material, then seam it at the top.
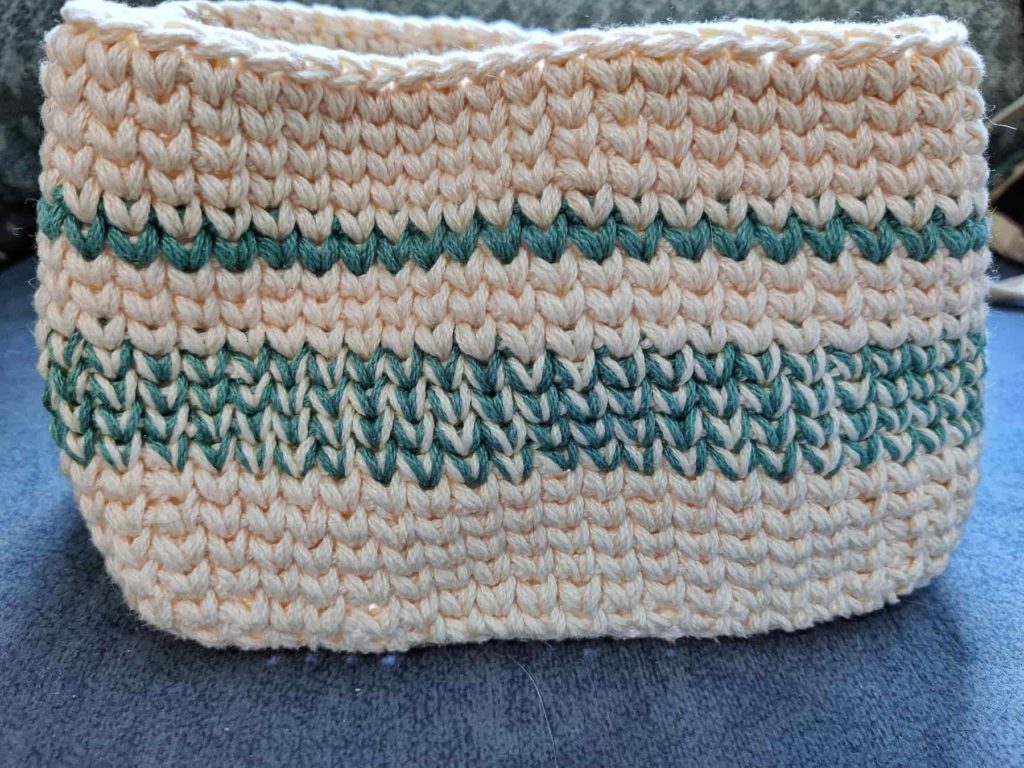
For this crochet door stopper pattern, I created a rectangle base and worked the body with the Knit stitch (AKA Waistcoat st). I used 2 colors of yarn and added a handle for easy transfer.
The Knit stitch creates a beautiful fabric, and is easier when worked in the round, I also used it in my Knit-Look Beer Cozies.
What Do You Fill a Doorstop With?
A crochet doorstop is usually filled with a bottom layer of heavy material such as beans, small stones, rice, and fiberfill for stuffing the rest of the door stop.
For the first doorstopper, I used small stones and fiberfill.
For the second doorstopper, I thought it would be nice to use up leftover yarn and old socks instead of the fiberfill. It worked out great and was also more environmentally friendly!

About the Yarn I Used For My Crochet Doorstop
I like using cotton yarn for homeware crochet patterns, but you can also use acrylic yarn.
For this pattern, I used the Lion Brand – 24/7 Cotton yarn. It’s a Worsted (#4) 100% cotton yarn, it’s a bit soft yet very sturdy and great for home decor patterns, and comes in a big variety of colors!
The door stopper is crocheted with 2 strands held together, and the middle section is worked with one strand of each color for a beautiful texture.
More great yarn options for this pattern:
Knit Picks – Dishie
Premier – Home Cotton Blend
Lily Sugar n Cream
You can find the ad-free PDF pattern with the full photo-tutorial at one of my shops below:

Boho Doorstop Free Crochet Pattern
Skill level – easy
Materials
– Crochet hook 6.0 mm / J (I love the Etimo and Clover Hooks).
– Worsted (#4) weight yarn – I used Lion Brand – 24/7 Cotton.
Total amount of yarn needed:
Color A (Ecru) – 180gr/306m/335yds
Color B (Jade) – 20gr/34m/37yds
** The pattern is worked with 2 strands held together
– Fiberfill for stuffing (or yarn scraps, old socks)
– Something heavy to put at the bottom (beans, small stones)
– Pantyhose for stuffing (optional)
– 4 stitch markers
* Add this pattern to your Ravelry queue HERE!
Finished Size – Base: 6×4” (15.2x10cm); Height (without the handle): 4.8” (12cm)
Abbreviations (US)
ch – chain
blo – through back loop only
st – stitch
sc – single crochet
hdc – half double crochet
knit st – (also known as waistcoat stitch: see the full tutorial HERE) – work sc into the V part of the st, instead of the top of the st.
PM – place marker
Gauge – Working Rounds 1-6 will result a 6×4” (15.2x10cm) rectangle.
Notes
- Ch1 at the beginning of the round counts as 1 sc.
- To avoid holes in the starting chains: start by working into the back middle loop of the chains, then when working on the other side of the chains, work into the front loop of the chains.
- I like to use pantyhose for stuffing the fiberfill inside them, instead of straight into my crochet project. That helps prevent the stuffing from poking out of your work.
- Eco-friendly tip: mix your fiberfill with your yarn leftovers (or old socks) instead of throwing them away!
When changing color: at the last stitch of the round, before changing color, start the stitch as normal, when you pull the yarn through the loop to finish the stitch, wrap the new color around the hook and pull through.
- I would love to see your project! You can upload your project to Ravelry HERE.
- How to crochet Knit stitch (Waistcoat stitch):
Insert hook into the V part of the sc (instead of the top of the sc), continue working as single crochet.
You can find a photo tutorial of the Knit stitch on my HERE.
Crochet Doorstop Pattern
Body
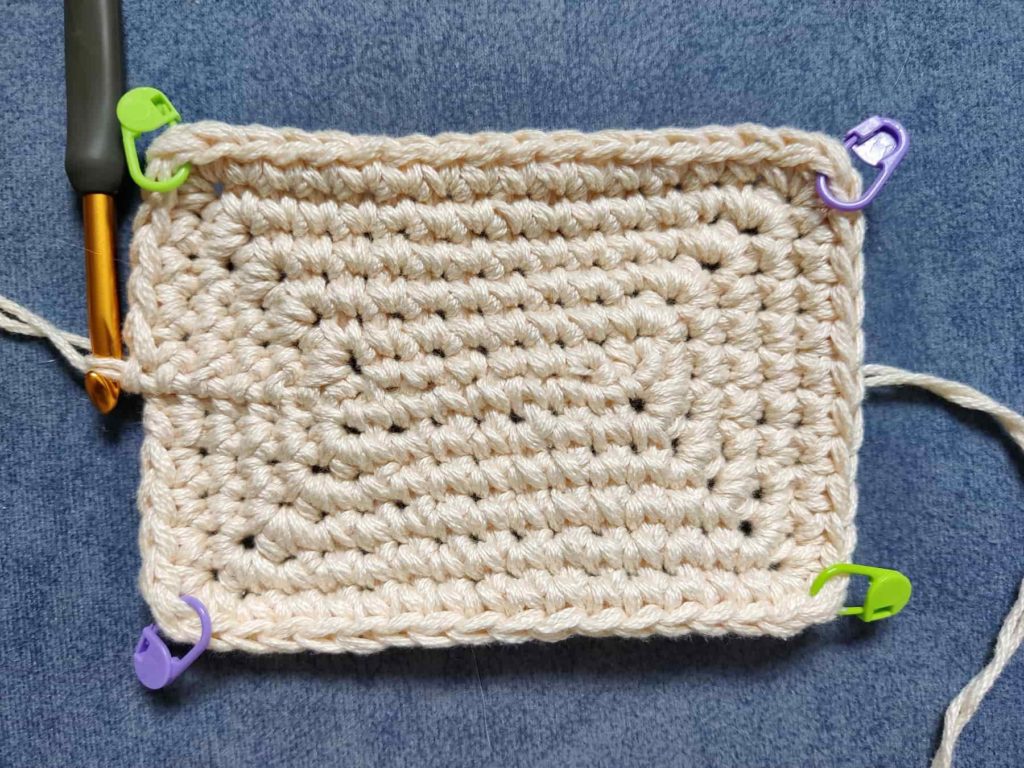
With color A: Ch 9 with 2 strands held together
* You can find a photo tutorial of the base rectangle HERE.
** I like to work into the back-middle loop of the chain to avoid holes in the middle of the fabric. Then, when working on the other side of the chains, work into the front loop of the chains.
Round 1: 1sc in 2nd ch from hook- PM (ch1 counts as 1sc), 1sc in next 6 ch, [1sc-PM, 1sc, 1sc-PM] in last ch.
Now you will be working on the opposite side of the chains: 1sc in next 6 ch, 1sc-PM in last ch, ss to beginning ch-1. (18 sc)
Round 2: ch1 (counts as 1sc here and throughout), [1sc, 1hdc-PM, 1sc] in next sc (marker), 1sc in next 6 sc, [1sc, 1hdc-PM, 1sc] in next sc (marker), 1sc in next sc, [1sc, 1hdc-PM, 1sc] in next sc (marker), 1sc in next 6 sc, [1sc, 1hdc-PM, 1sc] in next sc (marker), ss to beginning ch-1. (22 sc, 4 hdc)
Round 3: ch1, * 1sc in each sc until marker, [1sc, 1hdc-PM, 1sc] in next hdc (marker); Repeat from * 3 more times, 1sc in each sc to end of the round, ss to beginning ch-1. (30 sc, 4 hdc)
Rounds 4-6: repeat round 3. Finishing round 6 with (54 sc, 4hdc).
Rounds 7: ch1, 1sc blo in each st around (58 sc blo).
Rounds 8-12: ch1, 1knit st in each sc around (58 knit st).
With 1 strand of color A and 1 strand of color B
Rounds 13-16: ch1, 1knit st in each sc around (58 knit st).
With 2 strands of color A
Rounds 17-19: ch1, 1knit st in each sc around (58 knit st).
Do you prefer photo tutorials? Get the premium, ad-free, full photo-tutorial, printable PDF version onRavelry or Etsy!
With 2 strands of color B
Round 20: ch1, 1knit st in each sc around (58 knit st).
With 2 strands of color A
Rounds 21-25: ch1, 1knit st in each sc around (58 knit st).
Fasten off.
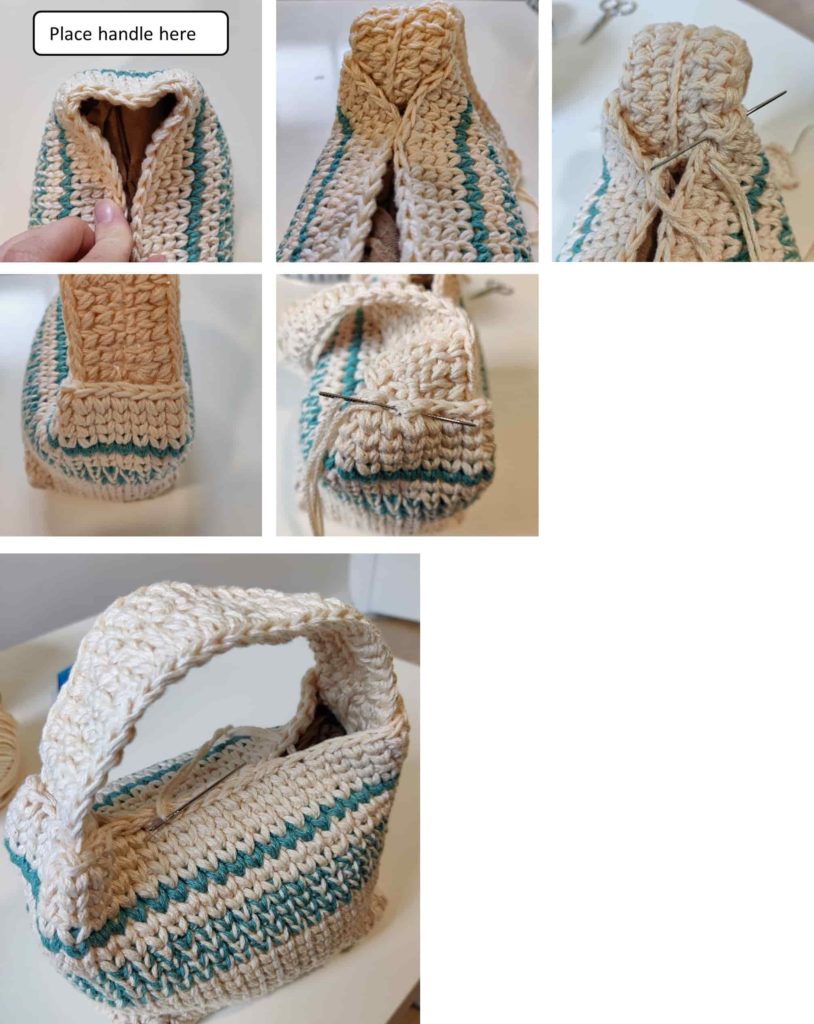
Handle
The handle is also worked as a rectangle, but from round 2, you will be working the knit st instead of single crochet in each of the single crochet stitches, besides the corners.
With color A: Ch 27 with 2 strands held together
Round 1: 1sc in 2nd ch from hook- PM (ch1 counts as 1sc), 1sc in next 24 ch, [1sc-PM, 1sc, 1sc-PM] in last ch.
Now you will be working on the opposite side of the chains: 1sc in next 24 ch, 1sc-PM in last ch, ss to beginning ch-1. (54 sc)
Round 2: ch1 (counts as 1knit st), [1sc, 1hdc-PM, 1sc] in next sc (marker), 1knit st in next 24 sc, [1sc, 1hdc-PM, 1sc] in next sc (marker), 1knit st in next sc, [1sc, 1hdc-PM, 1sc] in next sc (marker), 1knit st in next 24 sc, [1sc, 1hdc-PM, 1sc] in next sc (marker), ss to beginning ch-1. (50 knit st, 8 sc, 4 hdc)
Round 3: ch1, * 1knit st in each sc until marker, [1sc, 1hdc-PM, 1sc] in next hdc (marker); Repeat from * 3 more times, 1knit st in each sc to end of the round, ss to beginning ch-1. (58 knit st, 8 sc, 4 hdc)
Assembling the doorstopper
Stuff the body, starting with your weighted material, if you are using pantyhose fill them out with the weighted material and then continue with the fiberfill.
The body needs to be filled out just to keep its shape, you don’t need to overstuff it.
Sewing the handle
Place the handle on both sides of the body as shown in the photos.
With a tapestry needle, sew around the handle starting at the inner middle side, continue sewing across the doorstopper body to the other handle and sew around the handle.
Weave in the ends. Your doorstopper is done!
Looking for More Home Decor Crochet Patterns? Check out the other free patterns on the blog:
1) Diamonds Doily
2) 10 Crochet Potholder Patterns
3) Small (2 sizes) Pumpkin Pattern
4) Tree Branch Hot Pad
Did you try this out? Share your project!
– Let me know how it went and leave a comment below.
– Tag me on Instagram @madebygootie
– Join and share in our FB Community
Want to save this post for later? Go ahead and PIN it!
Good morning! I love the new Boho doorstop. It looks like a handbag, which makes it the perfect accent for a more feminine room. Great for teen and tween girls! Great work, again! 👍🏼
Hi Dee!
I’m so glad you love this doorstop 🙂
I wasn’t thinking of a handbag when I designed it, but it really looks a bit like a purse, and I also like it!
What a cool idea for a doorstop. Would look good in a girl’s room. To darn cute❤
It does have some sort of a feminine look to it 🙂
So glad you like it, Donna!
I too, think it would make a cute Boho Purse/Bag!! In fact that’s how I’ll use it if/when I get around to making :)) Hang some tassels, beads, etc from it or put a pin-back flower(s) on, the imagination goes wild, lol – thank you for sharing this & all items :))
Beads and tassels will be so cute on this!
I got so many comments about how this doorstop looks like a bag, and I haven’t even noticed it before.
The funny thing is my toddler daughter also likes to walk around the house with this doorstop hanging on her wrist like a bag!
The door stop is cute; it looks like a purse. Thanks for sharing.
I’m so glad you like it!
It really does have kind of a purse look 🙂