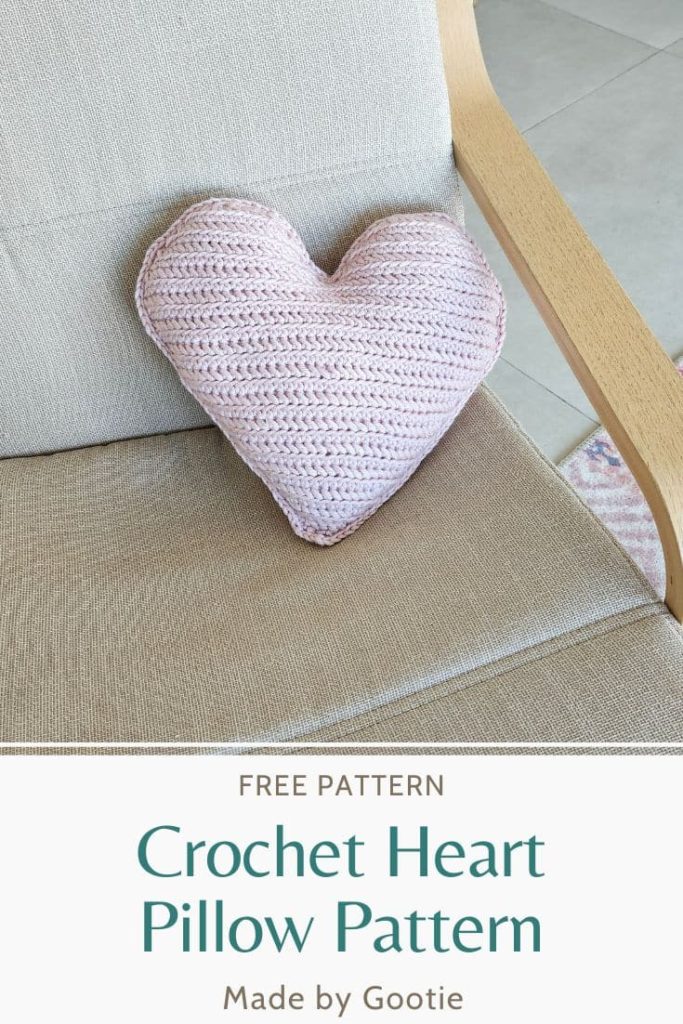
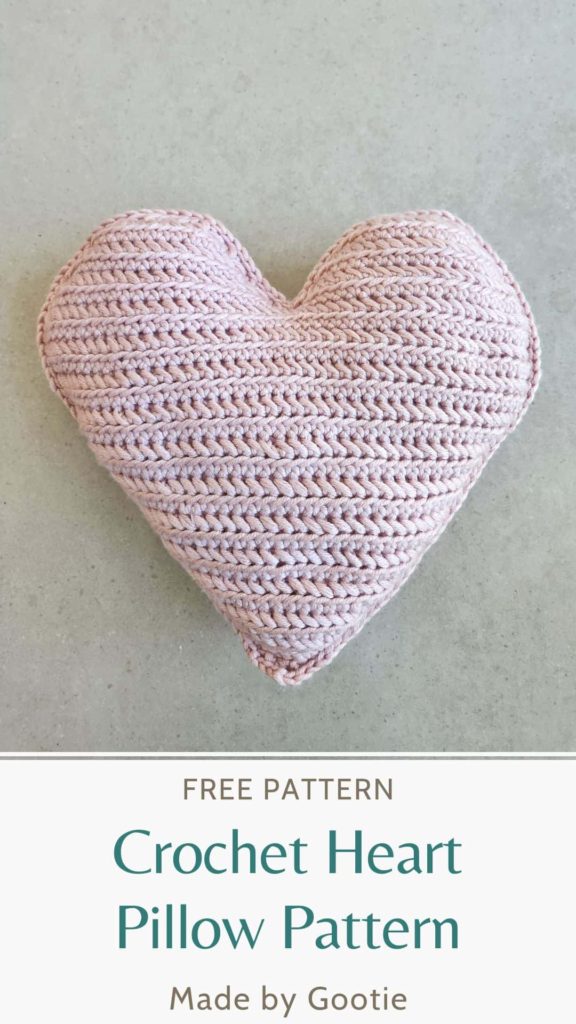
Textured Crochet Heart Pillow Pattern (Free)
Last Updated on December 19, 2024
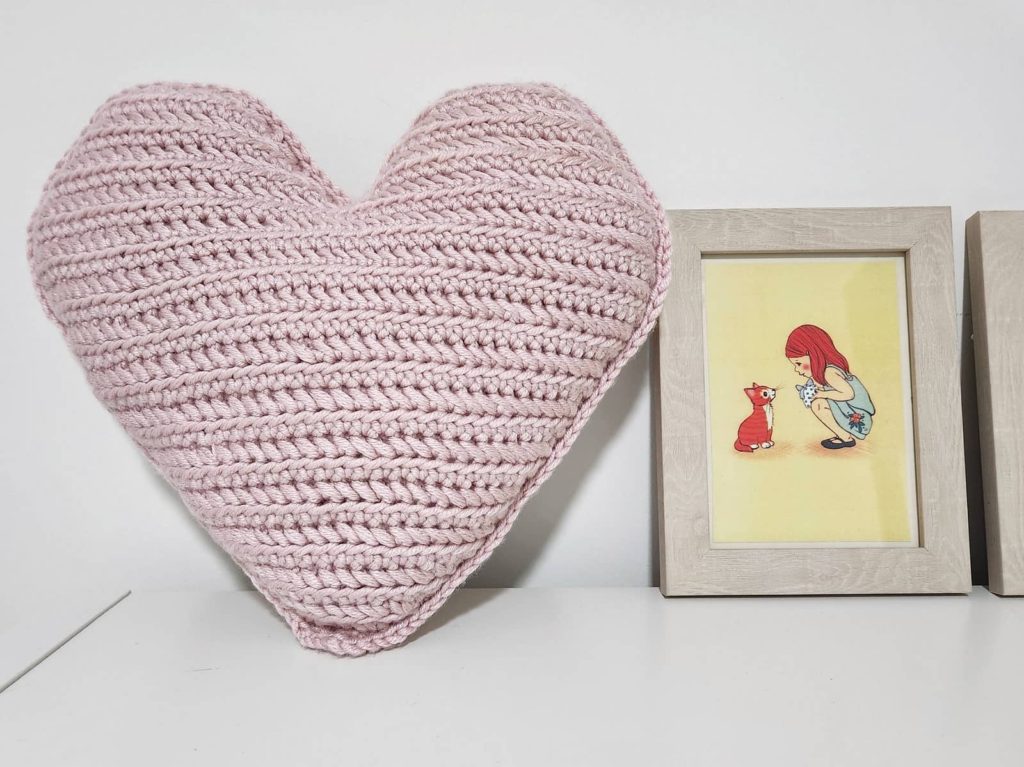
This Textured Crochet Heart Pillow pattern is the perfect gift to make for your loved ones this upcoming Valentine’s Day.
If you are looking for a quick gift, this heart crochet pattern works up quickly, using a super bulky yarn, and the result is a soft and squishy pillow.
Scroll down for the full written instructions.
** Some of the links in this post may include affiliate links. Making a purchase through one of these links pays me a small referral fee at no added cost to you. View our disclosure and privacy policy for more information.
I love making handmade gifts for the people I care about, and this pillow I made for my daughter.
This crochet heart pillow pattern has a beautiful texture, made using the Herringbone crochet stitch only on one side (we are not working with the reverse Herringbone stitch).
And the size of the pillow is big enough that it’s fun to hug, and can also be used as a decoration on a bed.
If you are looking for more Valentine crochet patterns, check out the 26 Free Crochet Valentine’s Gift Patterns, and 8 Quick Crochet Valentine’s Day Round Up.
Want to save this post for later? Go ahead and PIN it!
Crocheting a Heart Pillow with Super Bulky Yarn
Since I wanted to make this pattern work up quickly, I decided to use Super Bulky (#6) weight yarn, which emphasizes the beautiful texture of the Herringbone stitch.
You can use any super bulky yarn you have, I used Himalaya Everyday Big yarn. This is a soft anti-pilling acrylic yarn, and it comes in a beautiful variety of colors.
If you are looking for more yarn options, you can also use these yarns:
Lion Brand – Wool-Ease Thick & Quick
Bernat – Softee Chunky
Mary Maxim – Starlette Chunky
If you want more crochet pillow patterns, check out my removable Cornerstone Pillow Case Pattern, and this crochet pillows round up post!
Crochet Heart Pillow PDF Pattern
You can find the ad-free PDF pattern with the full photo-tutorial & a chart at one of my shops below:


Heart Pillow Free Crochet Pattern
* Want to save this post for later? Go ahead and PIN it!
* Add this pattern to your Ravelry queue HERE!
Skill Level – Intermediate
Materials
– 7 mm crochet hook, or hook to obtain gauge (I like this hook).
– Super Bulky (#6) weight yarn (I used Himalaya Everyday Big yarn)
Total amount of yarn needed:
300 grams/240m/261yds
– Fiberfill for stuffing
– Fabric for lining (optional)
– Fabric glue (optional) (I used Gutermann HT2 Glue)
Gauge (in pattern) – Working rows 1-8 will result in a triangle with an approx. 4” (10 cm) side.

Finished Size – 14’’ wide x 13” tall (35.5×33 cm)
Abbreviations (US)
ch – chain
hdc – half double crochet
hdc2tog – half double crochet 2 together: yo, insert hook into next st, yo and pull up a loop, yo, insert hook into next st, yo and pull up a loop, yo and pull through all 5 loops on hook.
Hsc – Herringbone Stitch: Insert your hook into the left “leg” of the Hsc stitch, keeping the loop on the hook, insert the hook into the next st, yo and pull up the yarn, yo and pull the yarn through all 3 loops.
sc – single crochet
ss – slip stitch
st – stitch
yo – yarn over
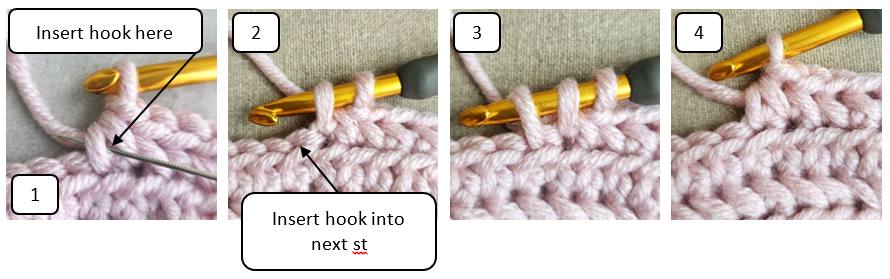
How to crochet the [1hdc, 1Hsc] in same stitch – increasing at the beginning of the row:
Work 1hdc in the 1st stitch, then work Hsc in the same 1st stitch you worked the hdc as follows:
Insert your hook into the front left “leg” of the hdc you just worked (pic 1), keeping the loop on the hook (pic 2), then insert the hook into the same st where we made the hdc, yo and pull up the yarn up to the same height as the loop on your hook (pic 3), yo and pull the yarn through all 3 loops (pic 4).

How to crochet the Single Crochet Herringbone stitch:
Insert your hook into the front left “leg” of the last Hsc you made (or hdc, if worked right after a hdc st) – pic 1, keeping the loop on the hook, insert the hook into the next st (pic 2), yo and pull up the yarn up to the same height as the loop on your hook (pic 3), yo and pull the yarn through all 3 loops (pic 4).
Pattern Notes
- Ch1 at the beginning of the row doesn’t count as a stitch.
- The pattern is worked with the Herringbone stitch, worked only on its “right side” without working the Reverse Herringbone stitch.
- […] – crochet the instructions within brackets into the same indicated stitch.
- Optional – I have lined each panel of the pillow with fabric, to help prevent the stuffing from popping out of the pillow. This is an optional step, and you can choose to skip it.

Textured Crochet Heart Pillow Pattern
Heart Panel – Make 2
Bottom
Make a magic ring
Row 1: ch1 (doesn’t count as a st here and throughout), working 2sc into the ring, pull the ring tight, turn. (2 sc)
Row 2: ch1, 2sc in each sc, turn. (4 sc)
Row 3: ch1, [1hdc, 1Hsc] in 1st sc, 1Hsc in next 2 sc, [1Hsc, 1hdc] in last sc, turn.
(2 hdc, 4 Hsc)
Row 4: ch1, [1hdc, 1Hsc] in 1st hdc, 1Hsc in next 4 Hsc, [1Hsc, 1hdc] in last hdc, turn.
(2 hdc, 6 Hsc)
Row 5: ch1, [1hdc, 1Hsc] in 1st hdc, 2Hsc in next Hsc, 1Hsc in next 4 Hsc, 2Hsc in next Hsc, [1Hsc, 1hdc] in last hdc, turn. (2 hdc, 10 Hsc)
Row 6: ch1, [1hdc, 1Hsc] in 1st hdc, 1Hsc in next 10 Hsc, [1Hsc, 1hdc] in last hdc, turn.
(2 hdc, 12 Hsc)
Row 7: ch1, [1hdc, 1Hsc] in 1st hdc, 2Hsc in next Hsc, 1Hsc in next 10 Hsc, 2Hsc in next Hsc, [1Hsc, 1hdc] in last hdc, turn.
(2 hdc, 16 Hsc)
Do you prefer a full photo-tutorial? Get the premium, ad-free, printable PDF version onRavelry or Etsy!
Row 8: ch1, [1hdc, 1Hsc] in 1st hdc, 1Hsc in next 16 Hsc, [1Hsc, 1hdc] in last hdc, turn.
(2 hdc, 18 Hsc)
Row 9: ch1, [1hdc, 1Hsc] in 1st hdc, 1Hsc in next 18 Hsc, [1Hsc, 1hdc] in last hdc, turn.
(2 hdc, 20 Hsc)
Row 10: ch1, [1hdc, 1Hsc] in 1st hdc, 1Hsc in next 20 Hsc, [1Hsc, 1hdc] in last hdc, turn.
(2 hdc, 22 Hsc)
Row 11: ch1, [1hdc, 1Hsc] in 1st hdc, 1Hsc in next 22 Hsc, [1Hsc, 1hdc] in last hdc, turn.
(2 hdc, 24 Hsc)
Row 12: ch1, [1hdc, 1Hsc] in 1st hdc, 1Hsc in next 24 Hsc, [1Hsc, 1hdc] in last hdc, turn.
(2 hdc, 26 Hsc)
Row 13: ch1, [1hdc, 1Hsc] in 1st hdc, 1Hsc in next 26 Hsc, [1Hsc, 1hdc] in last hdc, turn.
(2 hdc, 28 Hsc)
Row 14: ch1, [1hdc, 1Hsc] in 1st hdc, 1Hsc in next 28 Hsc, [1Hsc, 1hdc] in last hdc, turn.
(2 hdc, 30 Hsc)
Row 15: ch1, [1hdc, 1Hsc] in 1st hdc, 1Hsc in next 30 Hsc, [1Hsc, 1hdc] in last hdc, turn.
(2 hdc, 32 Hsc)
Row 16: ch1, [1hdc, 1Hsc] in 1st hdc, 1Hsc in next 32 Hsc, [1Hsc, 1hdc] in last hdc, turn.
(2 hdc, 34 Hsc)
Row 17: ch1, [1hdc, 1Hsc] in 1st hdc, 1Hsc in next 34 Hsc, [1Hsc, 1hdc] in last hdc, turn.
(2 hdc, 36 Hsc)
Row 18: ch1, [1hdc, 1Hsc] in 1st hdc, 1Hsc in next 36 Hsc, [1Hsc, 1hdc] in last hdc, turn.
(2 hdc, 38 Hsc)
Row 19: ch1, [1hdc, 1Hsc] in 1st hdc, 1Hsc in next 38 Hsc, [1Hsc, 1hdc] in last hdc, turn.
(2 hdc, 40 Hsc)
Row 20: ch1, [1hdc, 1Hsc] in 1st hdc, 1Hsc in next 40 Hsc, [1Hsc, 1hdc] in last hdc, turn.
(2 hdc, 42 Hsc)
Row 21: ch1, [1hdc, 1Hsc] in 1st hdc, 1Hsc in next 42 Hsc, [1Hsc, 1hdc] in last hdc, turn.
(2 hdc, 44 Hsc)

Rows 22-24: ch1, 1hdc in 1st hdc, 1Hsc in next 44 Hsc, 1hdc in last hdc, turn.
(2 hdc, 44 Hsc)
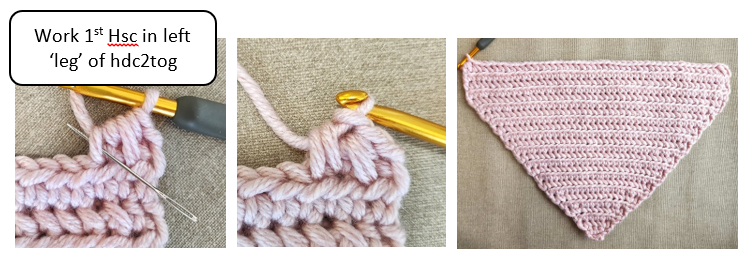
** Work your first Hsc stitch after the hdc the same way you did when increasing, just work the Hsc into the next stitch.
Row 25: ch1, 1hdc2tog in first 2 sts, 1Hsc in next 42 Hsc, 1Hdc2tog in last 2 sts, turn.
(2 hdc2tog, 42 Hsc)
** Work your first Hsc stitch after the hdc2tog into the left “leg”of the hdct2tog
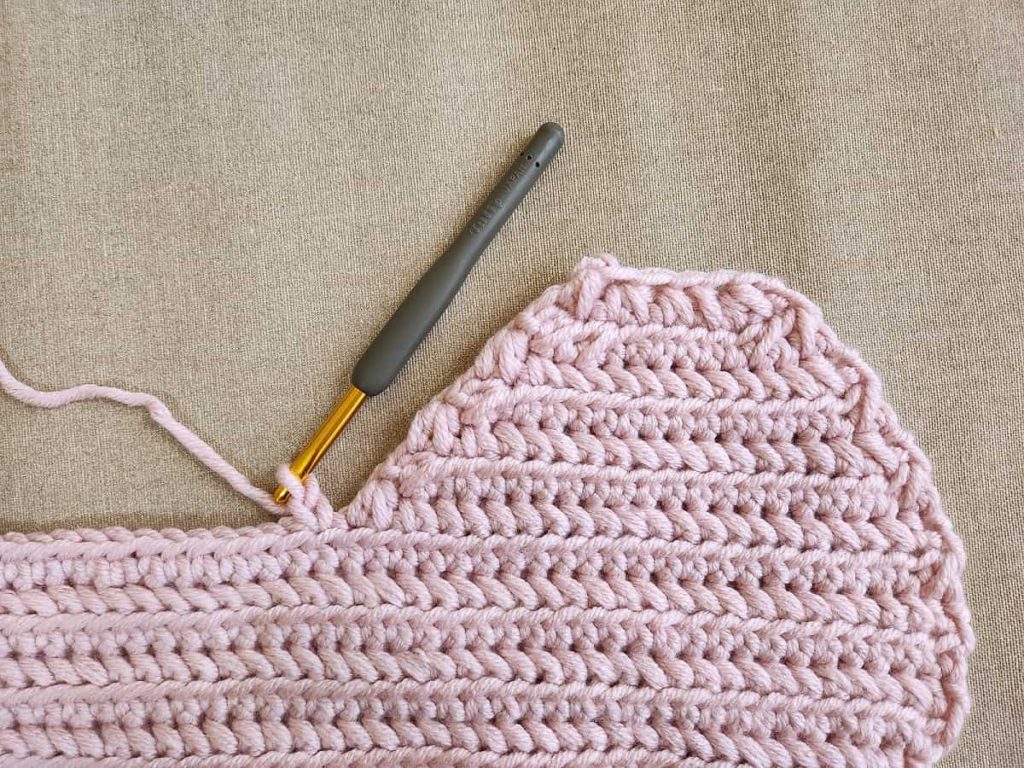
Don’t fasten off, continue working the right side of the top of the heart panel, by working up to the middle of the piece.
Top – Right Side
Row 1: ch1, 1hdc in 1st hdc, 1Hsc in next 19 Hsc, 1Hdc2tog in next 2 hdc, turn.
(1 hdc2tog, 1 hdc, 19 Hsc)

Row 2: ch1, 1hdc2tog in first 2 hdc, 1Hsc in next 17 Hsc, 1Hdc2tog in last 2 hdc, turn.
(2 hdc2tog, 17 Hsc)
Row 3: ch1, 1hdc2tog in first 2 hdc, 1Hsc in next 15 Hsc, 1Hdc2tog in last 2 hdc, turn.
(2 hdc2tog, 15 Hsc)
Row 4: ch1, 1hdc2tog in first 2 hdc, 1Hsc in next 13 Hsc, 1Hdc2tog in last 2 hdc, turn.
(2 hdc2tog, 13 Hsc)
Row 5: ch1, 1hdc2tog in first 2 hdc, 1Hsc in next 11 Hsc, 1Hdc2tog in last 2 hdc, turn.
(2 hdc2tog, 11 Hsc)
Row 6: ch1, work hdc2tog twice over the next 4 sts (work hdc2tog twice), 1Hsc in next 5 Hsc, work hdc2tog twice over the next 4 sts (work hdc2tog twice), turn. (4 hdc2tog, 5 Hsc)
Row 7: ch1, work hdc2tog twice over the next 4 sts (work hdc2tog twice), 1Hsc in next Hsc, work hdc2tog twice over the next 4 sts (work hdc2tog twice), fasten off. (4 hdc2tog, 1 Hsc)
Top – Left Side
Attach the yarn in the 23rd stitch (the 1st unworked stitch).
Row 1: ch1, 1Hdc2tog in first 2 hdc, 1Hsc in next 19 Hsc, 1hdc in last hdc2tog, turn.
(1 hdc2tog, 1 hdc, 19 Hsc)
Row 2: ch1, 1hdc2tog in first 2 hdc, 1Hsc in next 17 Hsc, 1Hdc2tog in last 2 hdc, turn.
(2 hdc2tog, 17 Hsc)
Row 3: ch1, 1hdc2tog in first 2 hdc, 1Hsc in next 15 Hsc, 1Hdc2tog in last 2 hdc, turn.
(2 hdc2tog, 15 Hsc)
Row 4: ch1, 1hdc2tog, 1Hsc in next 13 Hsc, 1Hdc2tog in last 2 hdc, turn.
(2 hdc2tog, 13 Hsc)
Row 5: ch1, 1hdc2tog, 1Hsc in next 11 Hsc, 1Hdc2tog in last 2 hdc, turn.
(2 hdc2tog, 11 Hsc)
Row 6: ch1, work hdc2tog twice over the next 4 sts (work hdc2tog twice), 1Hsc in next 5 Hsc, work hdc2tog twice over the next 4 sts (work hdc2tog twice), turn. (4 hdc2tog, 5 Hsc)
Row 7: ch1, work hdc2tog twice over the next 4 sts (work hdc2tog twice), 1Hsc in next Hsc, work hdc2tog twice over the next 4 sts (work hdc2tog twice), fasten off. (4 hdc2tog, 1 Hsc)
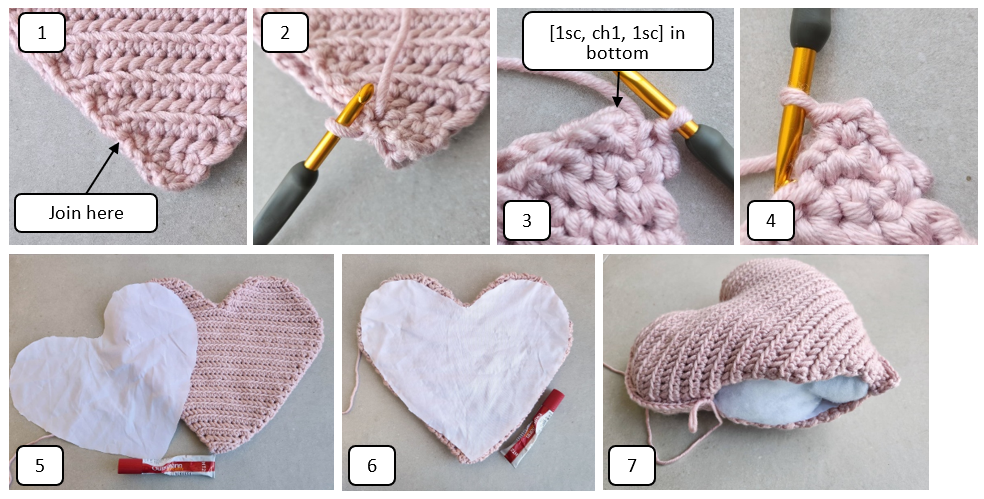
Assembly
Lay both panels on top of each other, start by joining the yarn at the side above the bottom in the side of the second row, and work single crochet to join both panels as follows.
- Ch1 and work 1sc in the same place you joined the yarn. (See pics 1&2)
- 1sc across towards the bottom, work the bottom: [1sc, ch1, 1sc] in the bottom (magic ring). (See pics 3&4)
- Continue working sc around, leaving a 10” (25.4 cm) gap.
- Optional – this is a lining step to help prevent the stuffing from popping out of the pillow: turn your piece inside out, cut 2 heart shapes from fabric in the size of your pillow. Using a fabric glue, attach fabric to each side and let dry according to the instructions of the glue you are using. (See pics 5&6)
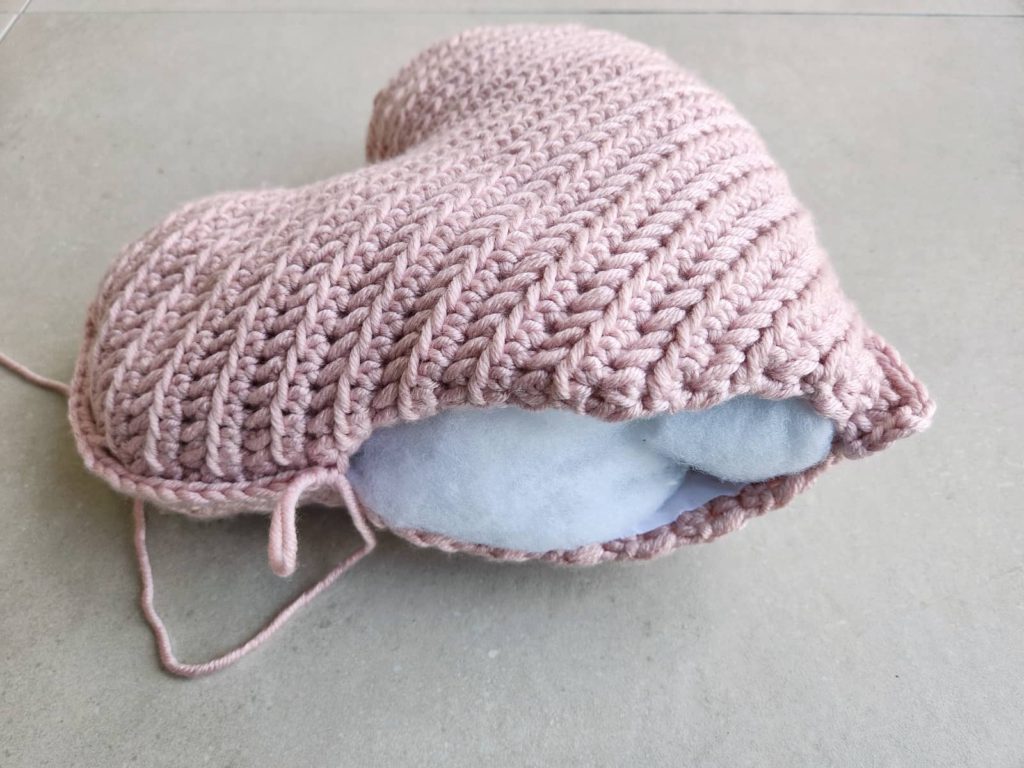
- Turn your piece back so the outside is facing out, continue working 1sc around, and leave a 7” (17.8 cm) gap. Fill your pillow with fiberfill.
- Once you have finished stuffing your pillow, continue working sc. Ss to the 1st sc and fasten off, weave in the ends.
More Free Crochet Gift Ideas
Did you try this out? Share your project!
– Let me know how it went and leave a comment below.
– Tag me on Instagram @madebygootie
– Join and share in our FB Community
Want to save this post for later? Go ahead and PIN it!