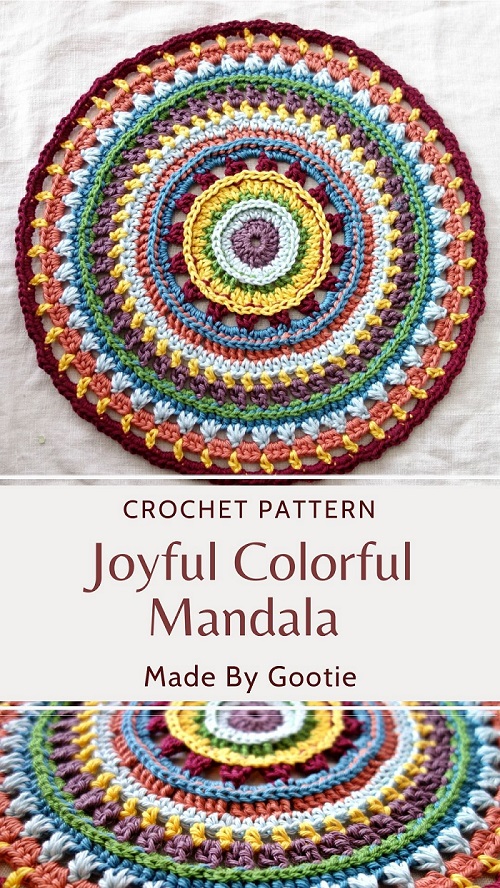
Colorful Crochet Mandala Free Pattern
Last Updated on December 17, 2025
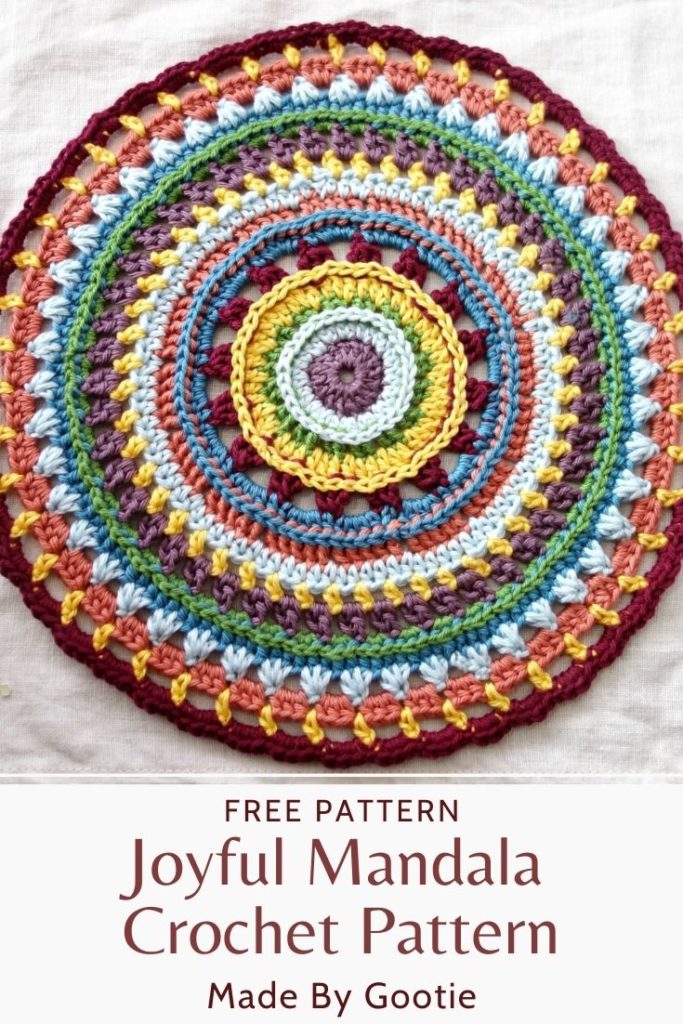
The Joyful Mandala is a colorful crochet mandala pattern, it’s a quick and fun project using various of different crochet stitches.
If you are looking for more ideas and tips of how to make and use a crochet mandala (and want to find more mandala patterns), make sure to visit my Free Crochet Mandala Patterns Round-Up.
Some of the links in this post may include affiliate links. Making a purchase through one of these links pays me a small referral fee at no added cost to you. These small fees add up and help me keep the blog running. View our disclosure and privacy policy for more information.
About the Joyful Mandala Crochet Pattern
This free crochet mandala pattern has a very important meaning for me, it’s the first pattern I designed from scratch.
Previously I relied on existing patterns and adapted them to my needs. Going through the design process for the first time made me realize the joys (and occasional sorrows) of creating something new. It took me a lot of iterations until I was finally happy with what I made.
Even though this crochet mandala was my first design, I decided to submit it to I Like Crochet magazine, and they featured it in their Christmas issue of 2018, this was very exciting for me and boosted my motivation to keep designing.
Want to save this post for later? Go ahead and PIN it!
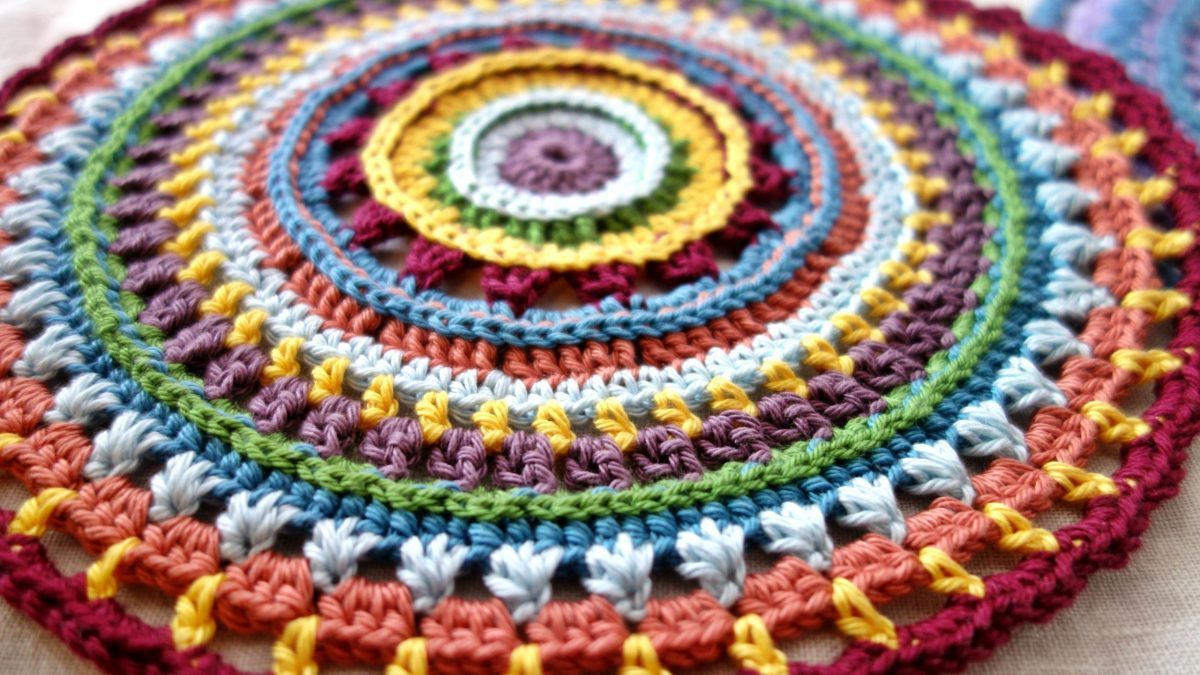
How to Choose Colors For a Colorful Crochet Mandala
When making a colorful crochet mandala, the easiest way (and what I did with this design) is just go through your stash and use all the yarn scraps.
But if you are looking for more subtle and elegant looking mandala, I would have start with 2 complementary colors and add one more similar shade to one of the colors.
Another fun way is using color palletes, just write “color palletes” on Pinterest, and you will get a lot of beautiful color combinations.
What Do You Do With a Crochet Mandala?
Since the crochet mandala is made to lay down flat, you can use as a table center piece, or a trivet.
Another fun option, is to use the mandalas as coasters or a hot pad.
My favorite option is to sew the mandala to a wooden hoop and turn it into a beautiful and full of chicc wall hanging decor.
* If you prefer the ad-free, complete photo-tutorial, ready-to-print PDF pattern, you can purchase it at one of my shops:
Looking for More Crochet Inspiration? Check out these other free patterns on the blog:
Joyful Mandala: Colorful Crochet Mandala Free Pattern
Materials For the Joyful Crochet Mandala
– Suggested hook: E / 3.5 mm (I love the Etimo and Clover hooks)
– I used 100% cotton Sport (#2) weight yarn.
Total amount needed: 50gr/125m/136yds (estimated- depends on type of yarn and hook you’re using).
Great yarn options for this project are:
Knit Picks – Shine Sport
Schachenmayr – Catania Trend
Lion Brand – Oh Baby Yarn
– Tapestry needle
– Scissors
* Pin this pattern for later HERE
Skill level – intermediate
Finished Size – Suggested yarn and hook will result a 23cm / 9” diameter mandala.
Abbreviations (US)
ch– Chain
st– Stitch
yo– Yarn over
ss– Slip stitch
hdc– Half double crochet
dc– Double crochet
Special Stitches
BPdc (Back post double crochet)– yarn over, insert the hook through the back side of the work, across the front of the indicated stitch all the way to the back side of the work, yarn over and then pull the hook the same way back to the back side of your work again, continue as dc.
BPhdc (Back post half double crochet)– yarn over, insert the hook through the back side of the work, across the front of the indicated stitch all the way to the back side of the work, yarn over and then pull the hook the same way back through your work and through the 2 loops on the hook.
BPdc3tog (Back post double crochet 3 together)– *yo, insert hook through the back side of the work, across the front of the indicated stitch all the way to the back side of the work, yo and Pull the hook the same way back through your work again. Now you have 3 loops on hook, pull through 2 of the loop; Repeat from * in the next 2 stitches, ending up with 4 loops on hook, yo and pull through all 4 loops.
Hdc3tog– Half double crochet 3 together: *yo, insert hook into st and pull yarn back over (leave loops on the hook); repeat from * twice more (in next 2 sts). Now you have 7 loops on the hook, pull yarn through all 7 loops.
Notes
- You can use whatever hook is suitable for the yarn you use, the finished size will vary accordingly.
- This is a perfect project for all your yarn scraps!
- Each round starts with a change of color with ss to attach the new yarn, If you use only one color, don’t fasten off where instructed just in the end.
- Each round starts with a chain which counts as first stitch.
- At the end of each round, make sure that your stitch counting is correct.
Crochet Mandala Written Pattern
Round 1: ch5, and form a ring with ss into the first ch.
Round 2: ch3, 15 dc into the ring, ss to the top of the initial ch2, fasten off. (16 dc)
** From now on, change of color will be in every round.
** Every time you change a color, fasten off the yarn and leave about 5″ (16 cm) tail to weave in. I think it’s easier to weave in the ends in every color change, instead of making them all together in the end.
Round 3: Attach new color in any dc with ss, ch2 (counts as first hdc). 1hdc in the same dc as the ch2.
2hdc in each dc all around, ss to the top of the initial ch2, fasten off. (32 hdc)
Round 4: Attach new color in any hdc through back post (counts as first BPdc): insert hook from the back side of your work between the first and second hdc (pic. 8), then in front of the second hdc (also called post) and into the back side of the work (pic. 9). Yo and go back the same way to the back side of your work, ch3.
BPdc (yo, continue the same way as you attached the yarn, but instead of making ch3, continue as dc), ch1.
* BPdc in next 2 sts, ch1 (don’t skip st); repeat from * to end of round. ss to the top of the initial ch3, fasten off. (32 BPdc + 16 ch)
Prefer a detailed step-by-step photo tutorial?
Get the premium, ad free, printable PDF version on Ravelryor Etsy!
Round 5: Attach new color in any BPdc, Ch3 (counts as first dc), dc in each BPdc and each gap all around. ss to the top of initial ch3, fasten off. (48 dc)
** You need to dc in the gap and in the stitch right after it which belongs to first BPdc.
Round 6: Attach new color in any dc through back post (same as round 4) Ch2, *yo, insert hook through back post of next dc, pull yarn through to the back side of the work, pull yarn through only 2 loops and leave it on the hook; repeat from * once more (in next dc). Now you have 3 loops on the hook, yo, pull yarn through all 3 loops, and pull the yarn through again, Ch4.
* BPdc3tog, ch4; repeat from * to end of round. ss to the top of the first BPdc3tog, fasten off. (16 BPdc3tog + 64 ch)
Round 7: Attach new color in top of any cluster (BPdc3tog), ch2 (counts as first hdc), 4hdc in gap.
* hdc in top of cluster, 4hdc in gap; repeat from * to end of round. ss to the top of initial ch2, fasten off. (80 hdc) ** Try not to make the hdc too tight.
Round 8: Attach new color in any hdc through back post, ch3 (counts as first BPdc), BPdc in next 4 sts, ch1.
* BPdc in next 5 sts, ch1; repeat from * to end of round. ss to the top of initial ch3, fasten off. (80 BPdc + 16 ch)
Round 9: Attach new color in any BPdc, ch2 (counts as first hdc). Hdc in each BPdc includes the ch1 (gap). ss to the top of initial ch2, fasten off. (96 hdc)
** Don’t forget the stitch right after the gap (same as in row 5).
Round 10: Attach new color in any hdc, ch2 (counts as first hdc). ch2 again (counts as gap), *skip st and hdc in the next st, ch2; repeat from * to end of round. ss to the top of initial ch2, fasten off. (48 hdc + 96 ch)
Round 11: Attach new color in any gap, ch3 (counts as first dc), dc again in the same gap, ch1.
* 2dc in gap, ch1; repeat from * to end of round. ss to the top of initial ch3, fasten off. (96dc + 48ch)
Round 12: Attach new color in any gap, ch1 (counts as first sc), 2 sc in same gap.
* 3sc in same gap; repeat from * to end of round. Ss to top of ch1. (144 sc)
** The mandala might feel a bit tight at this point and will want to fold into the center but don’t worry it will get flattened in the next rounds.
This is getting long, isn’t it?
Get the ad-free, printable premium PDF version! Get it onRavelry or Etsy!
Round 13: Attach new color in any sc through back post (same as round 4), ch1 (counts as first BPhdc). BPhdc all around. ss to the top of initial ch1, fasten off. (144 BPhdc)
Round 14: Attach new color in any BPhdc. ch2, * yo, insert hook into next st and pull yarn back over (leave loops on the hook); repeat from * in the next st (second from the begging ch2). Now you have 5 loops on the hook, pull yarn through all 5 loops, ch2.
* Hdc3tog, ch2; repeat from * to end of round. ss to the top of initial hdc3tog, fasten off. (48 hdc3tog + 48 ch2)
** Work hdc3tog a bit loose, to get a nice puff.
** If the mandala feels too tight, ch3 after the hdc3tog instead of ch2.
Round 15: Attach new color in any gap, ch2 (counts as first hdc), 2hdc in same gap as ch1, ch1.
* 3hdc in same gap, ch1; repeat from * to end of round. ss to the top of initial ch2, fasten off. (48 3hdc + 48 ch1)
Round 16: Attach new color in any gap, ch2 (counts as first hdc), ch3 (counts as gap).
* hdc in gap, ch3; repeat from * to end of round. ss to the top of initial ch2 (second ch from where the yarn is attached), fasten off. (48 hdc + 48 ch3)
Round 17: Attach new color in any gap, ch1 (counts as first sc), 3sc in same gap.
* 4sc in same gap; repeat from * to end of round. ss to the top of initial ch2. (48 * 4sc)
Yay! you’re done! Soak and block if needed.
Did you try this out? Share your project!
– Let me know how it went and leave a comment below
– Tag me @madebygootie
– Join and share in our FB Community
Want to save this post for later? Go ahead and PIN it!
So beautiful. You are very talented. Thanks for taking the time to write out the step by step directions.
Thank you Joanna! I would love to see how your mandala turned out!
Thank you for sharing. Your work is beautiful. I hope to make this in the near future.
Loved making this. I am going to try to continue it to make it larger
Wow, I would love to see that! Please tag #madebygootie so I can see your mandala if you post it on Instagram!
This is very pretty but once complete, how does one use a mandala? Forgive my ignorance but is it used like a doily?
That’s a legitimate question 🙂 You can use it like a doily, I use it as a hot pad.
I use sugar and cream 100% cotton and use them to wash dishes.
Thank you for gifting us with your creativity and pattern. Have a great Holiday.
Thank you Valerie! Happy holiday!
Porque si ofrecen los patrones gratis, debemos de pagar el 50% como en el mandala?
Gracias de antemano.
Hi Gladys,
The Mandala is available for free on the blog, and as part of the Spring Into Spring blog hop, the PDF pattern is available for 50% off discount.
I have a question about round 14………
ch2, * yo, insert hook into next st and pull yarn back over (leave loops on the hook); repeat from * in the next st (second from the begging ch2). Now you have 5 loops on the hook, pull yarn through all 5 loops, ch2.
* Hdc3tog, ch2;
How is that Hdc3tog when you’ve only incorporated 2 stitches?
I think I got it, sorry
This mandala would also look good on the back of a chair, or made a little larger to go on a sofa. Thanks so much for sharing it with us.