Moss Stitch Border – Simple Crochet Border for Blankets
Last Updated on November 25, 2024
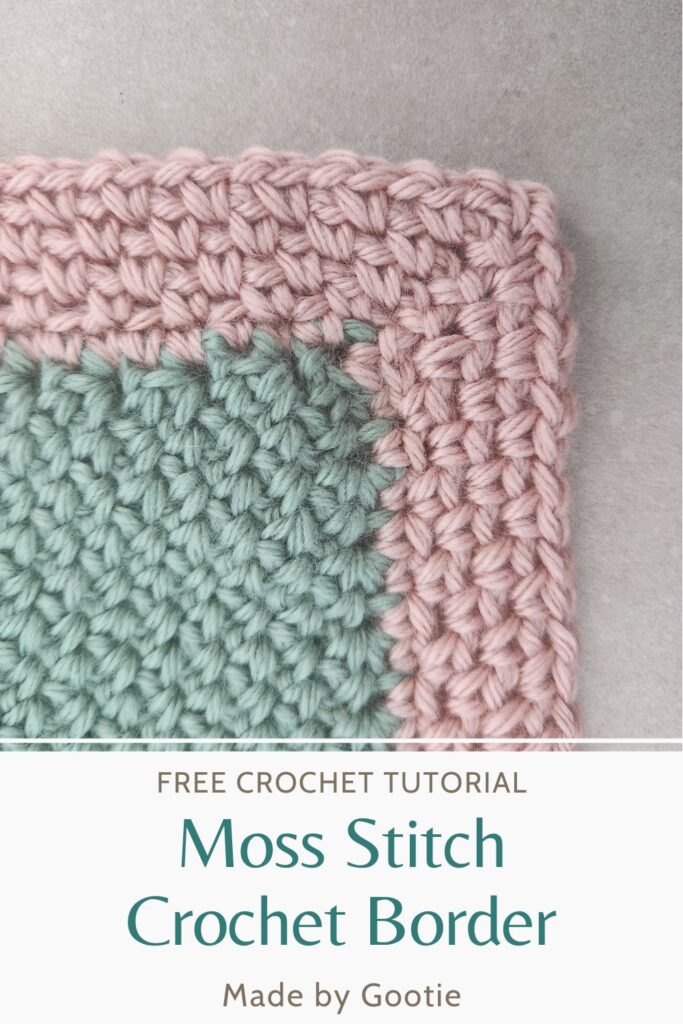
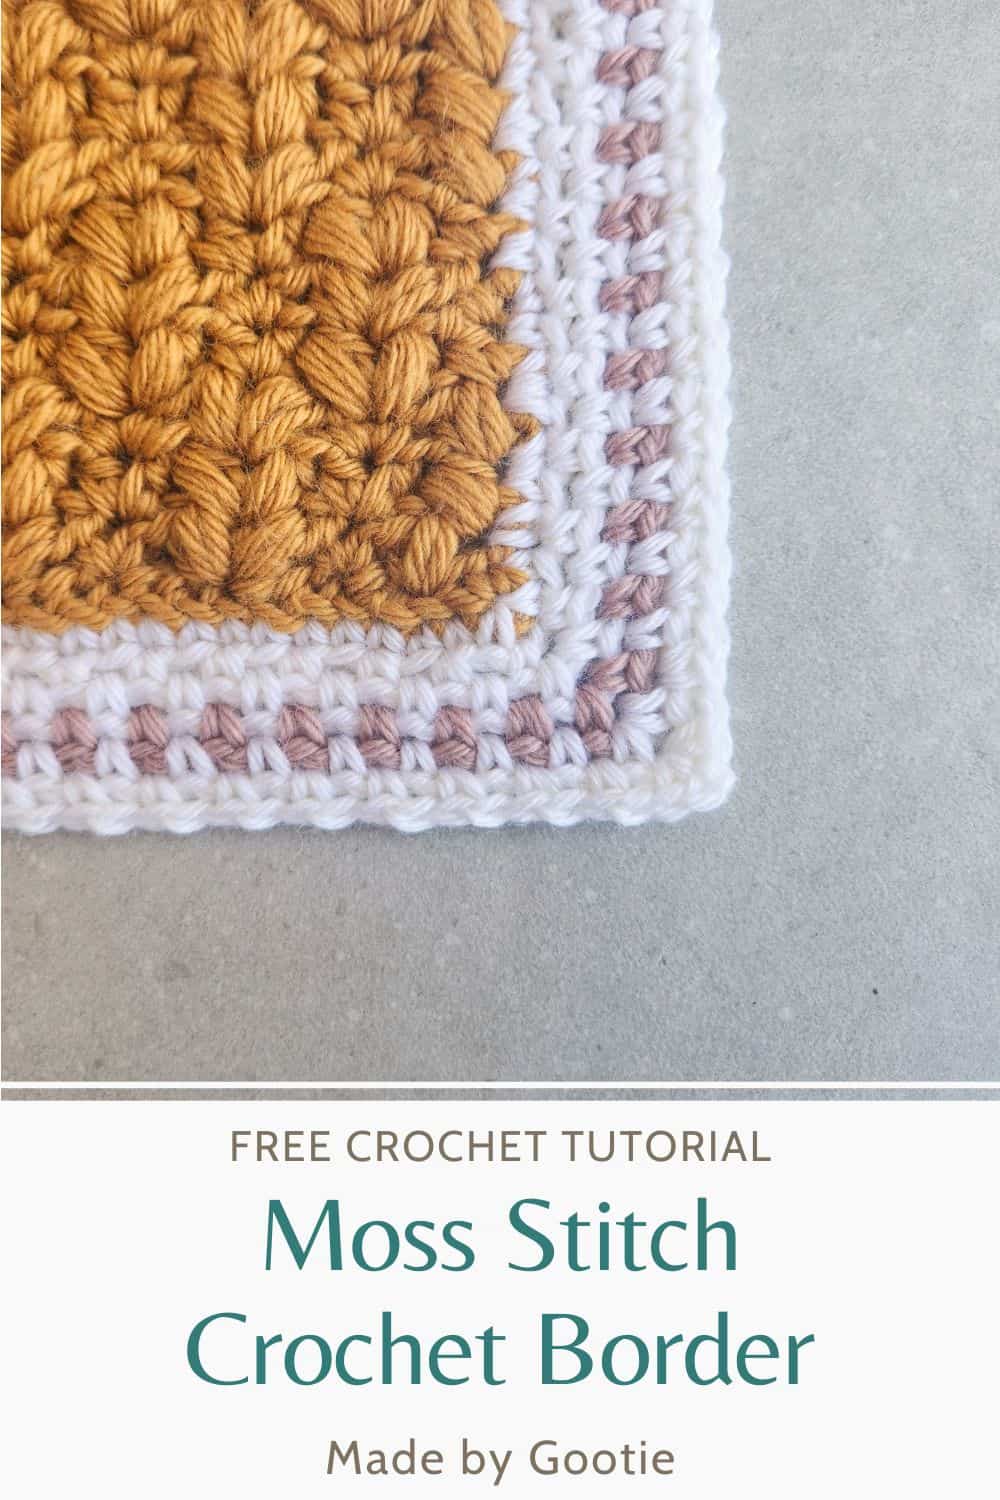
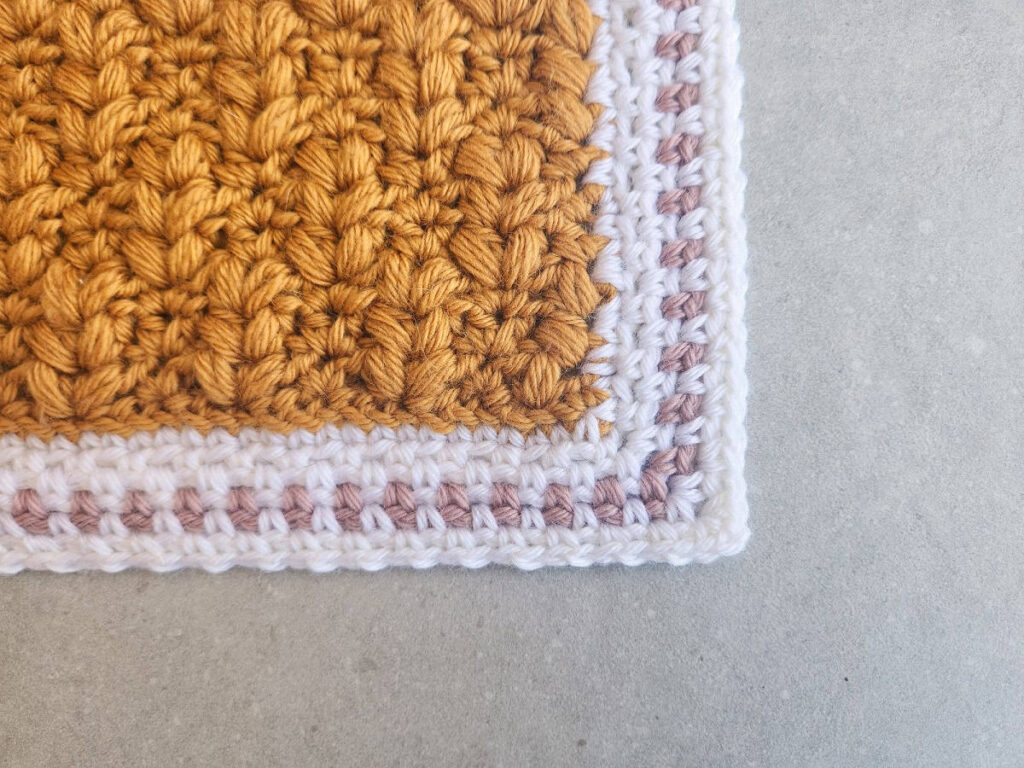
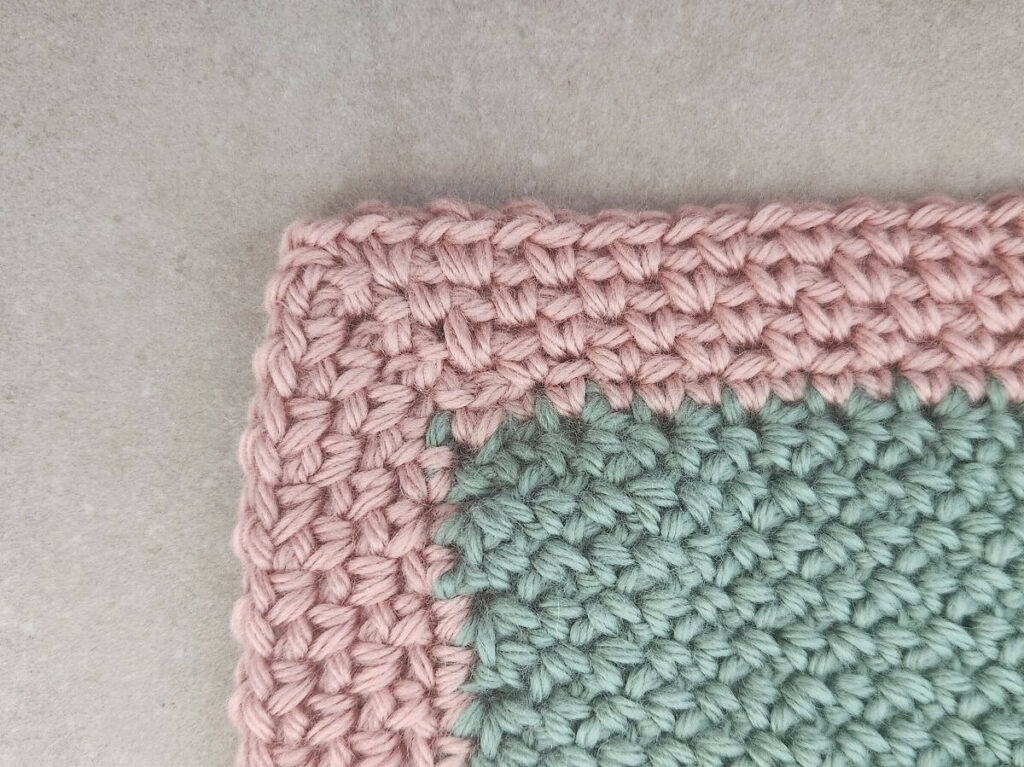
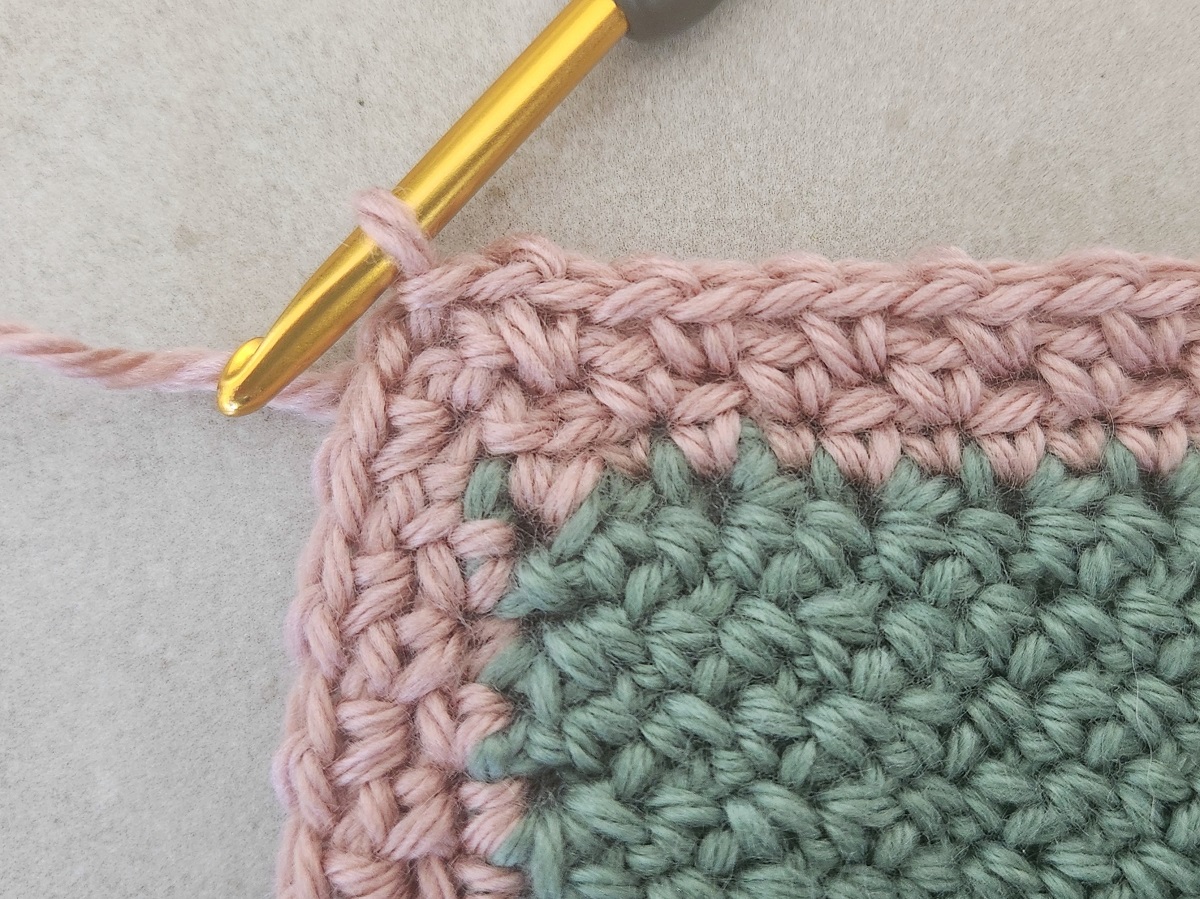
A Moss Stitch border is an easy and elegant border for crochet blankets.
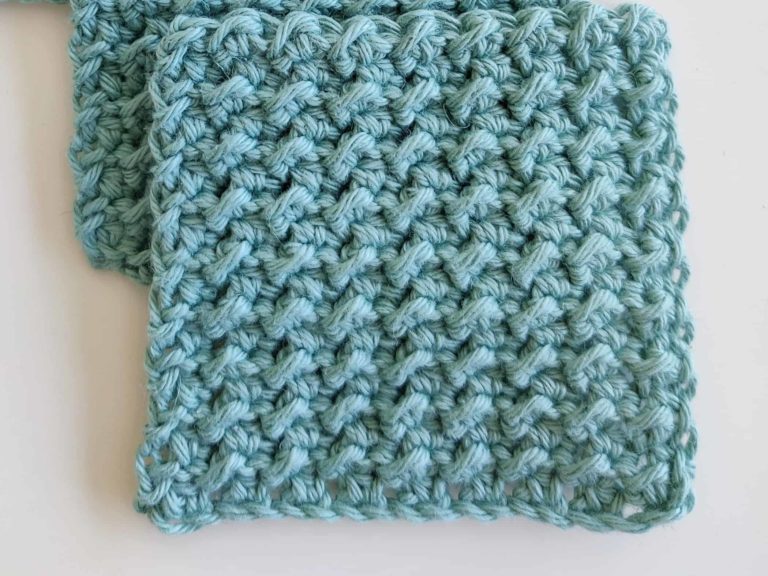
Since the crochet Moss Stitch uses only single crochet and chain, it makes a super simple crochet border for blankets and is perfect for beginners.
The written instructions have an easy to follow step-by-step photo tutorial to help you make this beautiful border!
** Some of the links in this post may include affiliate links. Making a purchase through one of these links pays me a small referral fee at no added cost to you. These small fees add up and help me keep the blog running. View our disclosure and privacy policy for more information.
Moss stitch is my go-to stitch, I love working it also from corner to corner and from the middle out. There’s something so relaxing in alternating single crochet stitches and chains.
The Moss stitch border is an easy crochet border pattern that creates an elegant edging. It will suit most crochet blankets since the texture is very delicate and doesn’t over come the blanket’s texture.
Want to save this post for later? Go ahead and PIN it!
The Tranquility Blanket
This pattern is the 7th part of the Tranquility Blanket Crochet-Along. This is a 12-part blanket crochet pattern.
The Tranquility crochet blanket is a collaborative blanket design, that can be made either as a lapghan or a throw. The crochet along will run for 6 weeks starting on October 14th 2024, all the patterns are available for free on the blogs.
You can also purchase the full blanket PDF pattern for a discounted price until December 1st.

Materials
– Crochet hook 5.0 mm / H (I love the Etimo Hooks).
– Worsted (#4) weight yarn – I used Sirdar Country Classic Worsted. – You can use this pattern to make a border with a different yarn weight and a suitable hook size.
Total amount of yarn needed for the border of the Tranquility Blanket:
Throw size: Color D (White): 170 gr / 371 yds / 340 m
Color B (Oyster): 30 gr / 65 yds / 60 m
Lapghan size: Color D (White): 136 gr / 296 yds / 272 m
Color B (Oyster): 24 gr / 52 yds / 48 m
Abbreviations (US)
ch – chain
dc – double crochet
hdc – half double crochet
sc – single crochet
ss – slip stitch
How to Crochet the Moss Stitch Border
Round 1 (sc round):
Attach the yarn in the top right corner of the blanket, with the right side facing upward.
Work a corner in the top of the first stitch: [1 sc, ch 2, 1sc], then and place 1 sc in each st across, follow this guideline:
- 1 sc in side of each sc.
- 1 sc in side of each hdc UNLESS:
There are several hdc rows. In this case, alternate between placing 1 sc in the side of the hdc, and 2 sc in the side of the next hdc. This helps to evenly spread out the stitches so that the border doesn’t warp the blanket. - 2 sc in side of each dc.
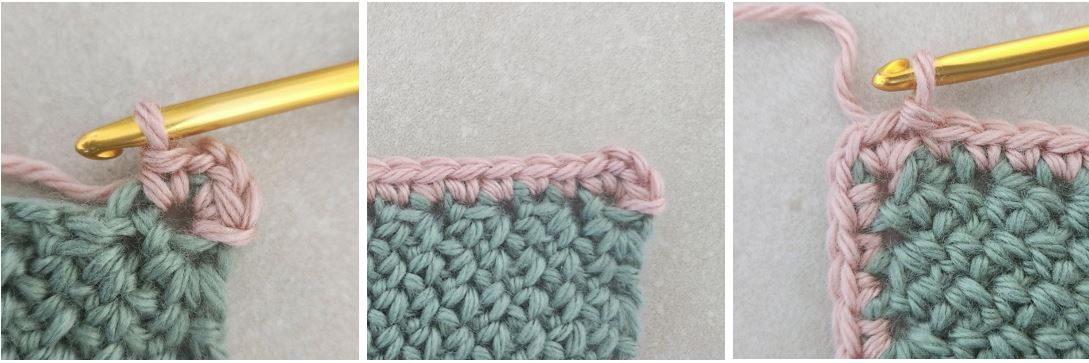
The following rounds will be worked in the Moss stitch.
Note: If the side that you are working on has an even number of stitches, you will finish with sc
before the ch-2 corner. If you have an odd number of stitches, you will finish with ch-1 before the
ch-2 corner.
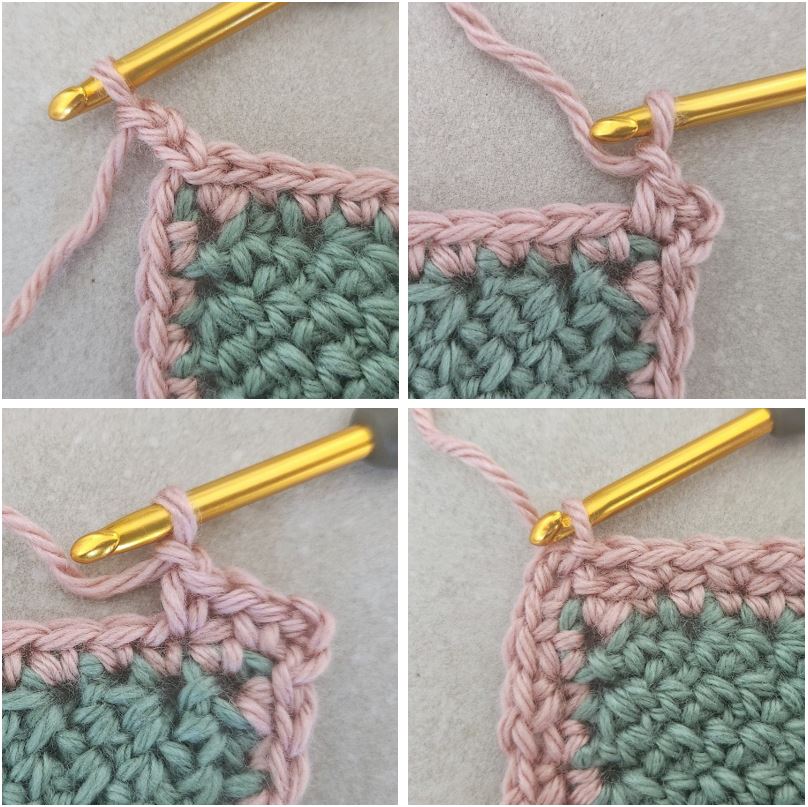
Round 2: Slip stitch into ch-2 corner, ch 1 (counts as sc), ch 2, 1 sc in same ch-2 corner, ch 1, skip next sc.
* 1 sc in next sc, ch 1, skip next sc; Repeat from * to ch-2 corner.
([1 sc, ch 2, 1 sc] in ch-2 corner, ch 1, skip next sc. * 1 sc in next sc, , ch 1, skip next sc; Repeat from * to ch-2 corner repeat) repeat (…) to the end of the round, slip stitch to ch-2 corner.
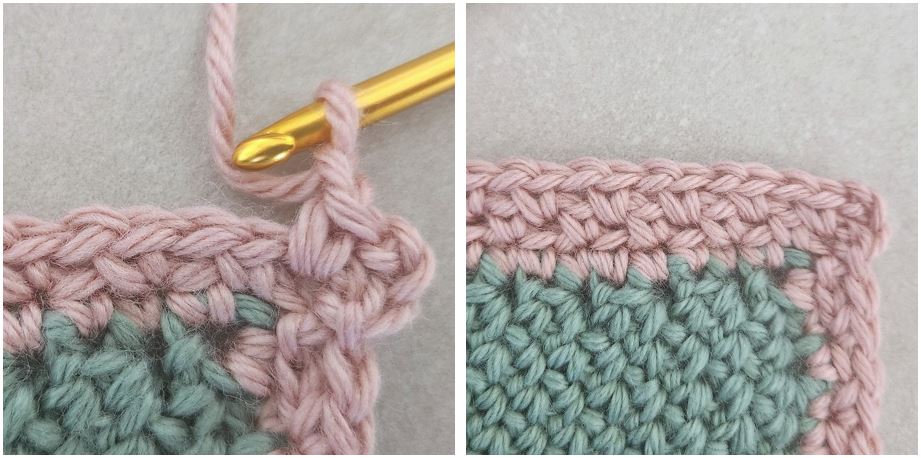
Round 3: Ch 1 (counts as sc), ch 2, 1 sc in same ch-2 corner, ch 1, skip next sc.
* 1 sc in next sc, ch 1, skip next sc; Repeat from * to ch-2 corner.
([1 sc, ch 2, 1 sc] in ch-2 corner. * ch 1, skip next sc, 1 sc in next sc; Repeat from * to ch-2 corner repeat) repeat (…) to the end of the round, slip stitch to ch-2 corner.
Repeat round 3.
Border Instructions for the Tranquility Blanket
Border Pattern (Simple)
Confident crocheters who don’t need to follow a specific pattern to work a border on the blanket
can: Finish the last st of Part 12 with their Transition Rows Color.
Round 1: Ch 1, turn (the right side should be facing) work a corner in the top of the first sc: [1 sc,
ch 2, 1sc], then and place 1 sc in each st across. At the end, ch 2 and rotate to work along the long,
raw edge. Along this edge, follow this guideline:
- 1 sc in side of each sc.
- 1 sc in side of each hdc UNLESS:
There are several hdc rows. In this case, alternate between placing 1 sc in the side of the hdc, and 2 sc in the side of the next hdc. This helps to evenly spread out the stitches so that the border doesn’t warp the blanket. - 2 sc in side of each dc.
At the end of this side, chain 2 and rotate to work along the bottom of the chains. Place 1 sc in each st across. Chain 2 and rotate to work along the final long, raw edge. Follow the same guidelines as above. At the end, slip stitch to the first sc (of the first corner) to close.
For the Throw size, you should have an approximate total of 938 stitches and 4 chain 2 spaces (277 stitches on each long side, 192 stitches on top and bottom).
For the Lapghan size, you should have an approximate total of 772 stitches and 4 chain 2 spaces (230 stitches on each long side, 156 stitches on top and bottom).
NOTE: “Approximately” is used here because some parts you may have ended up working more or
less rows to accommodate the size requirements (5 inches) of each part. If your stitch count does
not match here, it doesn’t ruin the pattern. As long as the border lays flat and doesn’t pull or warp
the work, everything is fine.
The following rounds will be worked in the Moss stitch.
Note: If the side that you are working on has an even number of stitches, you will finish with sc
before the ch-2 corner. If you have an odd number of stitches, you will finish with ch-1 before the
ch-2 corner.
Round 2: Slip stitch into ch-2 corner, ch 1 (counts as sc), ch 2, 1 sc in same ch-2 corner.
* Ch 1, skip next sc, 1 sc in next sc; Repeat from * to ch-2 corner.
([1 sc, ch 2, 1 sc] in ch-2 corner. * ch 1, skip next sc, 1 sc in next sc; Repeat from * to ch-2 corner repeat) repeat (…) to the end of the round, slip stitch to ch-2 corner.
Round 3: Ch 1 (counts as sc), ch 2, 1 sc in same ch-2 corner.
* Ch 1, skip next sc, 1 sc in next sc; Repeat from * to ch-2 corner.
([1 sc, ch 2, 1 sc] in ch-2 corner. * ch 1, skip next sc, 1 sc in next sc; Repeat from * to ch-2 corner repeat) repeat (…) to the end of the round, slip stitch to ch-2 corner.
Change to color B – Round 4: Repeat row 3.
Change to color D – Rounds 5-6: – Repeat row 3.
Finish off, weave all ends.
Border Pattern (Step-by-step)
This is an extended version of the blanket border, which will walk you step-by-step through placing
the first round of the blanket border on the blanket. There are instructions for each Part as you work
down the length.
Keep in mind that this border is written to match how the sample blanket was crocheted. Some
Parts in the Sample Blanket needed extra rows to reach the height requirement due to the gauge of
the designer who made the sample. This means your stitch count may not match exactly as
written but that is not a problem. As long as the border lays flat and doesn’t pull or warp the
work, everything is fine.
If you made a lapghan size, use the instructions of the relevant parts you worked.
Each part will state the number of stitches.
For the Throw size, you should have an approximate total of 938 stitches and 4 chain 2 spaces
(277 stitches on each long side, 192 stitches on top and bottom).
For the Lapghan size, you should have an approximate total of 772 stitches and 4 chain 2 spaces
(230 stitches on each long side, 156 stitches on top and bottom).
NOTE: “Approximately” is used here because some parts you may have ended up working more or
less rows to accommodate the size requirements (5 inches) of each part.
Finish your last stitch of Part 12 with your Transition Row Color (Color D).
Pattern Round 1:
Ch 1, turn (the right side should be facing) and place 1 sc in each st across. [156 sts Lapghan (192 sts Throw)]
At the end, ch 2 and rotate to work along the long, raw edge.
Part 12 – [1 sc in side of sc, 1 sc in side of hdc, 2 sc in side of next 2 dc] Repeat 3x total, 1 sc in
side of sc, 2 sc in side of hdc. [21]
Transition Rows – 1 sc in side of next 2 sc. [2]
Part 11 – [1 sc in side of sc, 1 sc in side of hdc, 1 sc in side of sc, 2 sc in side of next hdc]. Repeat
4x total, 1 sc in side of sc, 1 sc in side of hdc. [22]
Note: The sample blanket has an additional row repeat for Part 11. Your stitch count may not match
but it’s nothing to worry about.
Transition Rows – 1 sc in side of next 2 sc. [2]
Part 10 – (1 sc in side of hdc, 2 sc in side of hdc)x 2, 1 sc in side of sc, 2 sc in side of hdc, (1 sc in
side of hdc, 2 sc in side of hdc)x 2, 1 sc in side of sc, 2 sc in side of hdc, 1 sc in side of hdc, 2 sc in
side of hdc. [21]
Note: The sample blanket has an additional row repeat for Part 10 Your stitch count may not match
but it’s nothing to worry about.
Transition Rows – 1 sc in side of next 2 sc. [2]
Part 9 – 1 sc in side of sc, [1 sc in side of hdc, 2 sc in side of hdc] Repeat inside brackets 5x total.
1 sc in side of hdc, 2 sc in side of dc, 1 sc in side of sc. [21]
Transition Rows – 1 sc in side of next 2 sc. [2]
Part 8 – [2 sc in side of hdc, 1 sc in side of hdc, 2 sc in side of hdc, 2 sc in side of next 3 dc].
Repeat inside brackets 2x total. [22]
Note: The sample blanket has an additional row repeat for Part 8. Your stitch count may not match
but it’s nothing to worry about.
Transition rows – 1 sc in side of next 2 sc. [2]
Part 7 – 2 sc in side of next 9 Ehdc, 1 sc in side of next sc. [19]
Transition Rows – 1 sc in side of next 2 sc. [2]
Part 6 – [1 sc in side of sc, 2 sc in side of next dc/FPtc] Repeat 7x total. [21]
Transition Rows – 1 sc in side of next 2 sc. [2]
Part 5 – 1 sc in side of first sc, [1 sc in side of next 3 sc, 1 sc in side of hdc] Repeat inside brackets
5x total, 1 sc in side of sc. [22]
Note: The sample blanket has an additional row repeat for Part 5. Your stitch count may not match
but it’s nothing to worry about.
Transition Rows – 1 sc in side of next 2 sc. [2]
Part 4 – [1 sc in side of hdc, 2 sc in side of hdc]. Repeat inside brackets 7x. [21]
Transition Rows – 1 sc in side of next 2 sc. [2]
Part 3 – [1 sc in side of hdc, 2 sc in side of dc, 2 sc in side of hdc, 2 sc in side of dc]. Repeat inside
brackets 2x total. 1 sc in side of hdc, 2 sc in side of dc. [17]
Transition Rows – 1 sc in side of next 2 sc. [2]
Part 2 – 1 sc in side of next 4 sc, [1 sc in side of hdc, 2 sc in side of hdc]. Repeat inside brackets
4x. 1 sc in side of sc, 2 sc in side of hdc, 1 sc in side of next 5 sc. [24]
Transition Rows – 1 sc in side of next 2 sc. [2]
Part 1 – 1 sc in side of sc, [2 sc in side of next 4 hdc, 1 sc in side of hdc, 2 sc in side of hdc].
Repeat inside brackets 2x. 1 sc in side of sc. [24]
Working Along Chains – At the end of Part 1, ch 2 and rotate to work along the bottom of the
chains. Place 1 sc in the bottom of each stitch across. [156 sts Lapghan (192 sts Throw)]
At the end of the row, ch 2 and rotate to work along the final long, raw edge.
Part 1 – 1 sc in side of sc, [2 sc in side of next 4 hdc, 1 sc in side of hdc, 2 sc in side of hdc].
Repeat inside brackets 2x. 1 sc in side of sc. [24]
Transition Rows – 1 sc in side of next 2 sc. [2]
Part 2 – 1 sc in side of next 5 sc, 2 sc in side of hdc, 1 sc in side of sc, [1 sc in side of hdc, 2 sc in
side of hdc]. Repeat inside brackets 4x. 1 sc in side of next 4 sc. [24]
Transition Rows – 1 sc in side of next 2 sc. [2]
Part 3 – 2 sc in side of dc, 1 sc in side of hdc, [2 sc in side of dc, 2 sc in side of hdc, 2 sc in side of
dc, 1 sc in side of hdc]. Repeat inside brackets 2x total. [17]
Transition Rows – 1 sc in side of next 2 sc. [2]
Part 4 – [2 sc in side of hdc, 1 sc in side of hdc]. Repeat inside brackets 7x. [21]
Transition Rows – 1 sc in side of next 2 sc. [2]
Part 5 – 1 sc in side of first sc, [1 sc in side of hdc, 1 sc in side of next 3 sc] Repeat inside brackets
5x total, 1 sc in side of sc. [22]
Note: The sample blanket has an additional row repeat for Part 5. Your stitch count may not match
but it’s nothing to worry about.
Transition rows – 1 sc in side of next 2 sc. [2]
Part 6 – [2 sc in side of next dc/FPtc, 1 sc in side of sc] Repeat 7x total. [21]
Transition Rows – 1 sc in side of next 2 sc. [2]
Part 7 – 1 sc in side of next sc, 2 sc in side of next 9 Ehdc. [19]
Transition Rows – 1 sc in side of next 2 sc. [2]
Part 8 – [2 sc in side of next 3 dc, 2 sc in side of hdc, 1 sc in side of hdc, 2 sc in side of hdc] Repeat
inside brackets 2x total. [22]
Note: The sample blanket has an additional row repeat for Part 8. Your stitch count may not match
but it’s nothing to worry about.
Transition Rows – 1 sc in side of next 2 sc. [2]
Part 9 – 1 sc in side of sc, 2 sc in side of dc, 1 sc in side of hdc, [1 sc in side of hdc, 2 sc in side of
hdc] Repeat inside brackets 5x total. 1 sc in side of sc. [21]
Transition Rows – 1 sc in side of next 2 sc. [2]
Part 10 – 2 sc in side of hdc, 1 sc in side of hdc, 2 sc in side of hdc, 1 sc in side of sc, (1 sc in side
of hdc, 2 sc in side of hdc)x 2, 2 sc in side of hdc, 1 sc in side of sc, (1 sc in side of hdc, 2 sc in side
of hdc)x 2. [21]
Note: The sample blanket has an additional row repeat for tPart 10. Your stitch count may not
match but it’s nothing to worry about.
Transition Rows – 1 sc in side of next 2 sc. [2]
Part 11 – 1 sc in side of hdc, 1 sc in side of sc, [2 sc in side of next hdc, 1 sc in side of sc, 1 sc in
side of hdc, 1 sc in side of sc]. Repeat 4x total. [22]
Note: The sample blanket has an additional row repeat for Part 11. Your stitch count may not match
but it’s nothing to worry about.
Transition Rows – 1 sc in side of next 2 sc. [2]
Part 12 – 2 sc in side of hdc, 1 sc in side of sc, [2 sc in side of next 2 dc, 1 sc in side of hdc, 1 sc in
side of sc] Repeat inside brackets 3x total. [21]
Closing Round 1 – At the end of Part 12, you will be at the end of Round 1 of the blanket border.
Ch 2 and slip stitch to the first stitch of the round to close.
The following rounds will be worked in the Moss stitch.
Note: If the side that you are working on has an even number of stitches, you will finish with sc
before the ch-2 corner. If you have an odd number of stitches, you will finish with ch-1 before the
ch-2 corner.
Round 2 – Slip stitch into ch-2 corner, ch 1 (counts as sc), ch 2, 1 sc in same ch-2 corner,
* Ch 1, skip next sc, 1 sc in next sc; Repeat from * to ch-2 corner.
([1 sc, ch 2, 1 sc] in ch-2 corner. * ch 1, skip next sc, 1 sc in next sc; Repeat from * to ch-2 corner
repeat) repeat (…) to the end of the round, slip stitch to ch-2 corner.
Round 3 – Ch 1 (counts as sc), ch 2, 1 sc in same ch-2 corner,
* Ch 1, skip next sc, 1 sc in next sc; Repeat from * to ch-2 corner.
([1 sc, ch 2, 1 sc] in ch-2 corner. * ch 1, skip next sc, 1 sc in next sc; Repeat from * to ch-2 corner
repeat) repeat (…) to the end of the round, slip stitch to ch-2 corner.
Change to color B – Round 4: Repeat row 3.
Change to color D – Rounds 5-6: – Repeat row 3.
Finish off, weave all ends.
Did you try this out? Share your project!
– Let me know how it went and leave a comment below.
– Tag me on Instagram @madebygootie
– Join and share in our FB Community
Want to save this post for later? Go ahead and PIN it!

