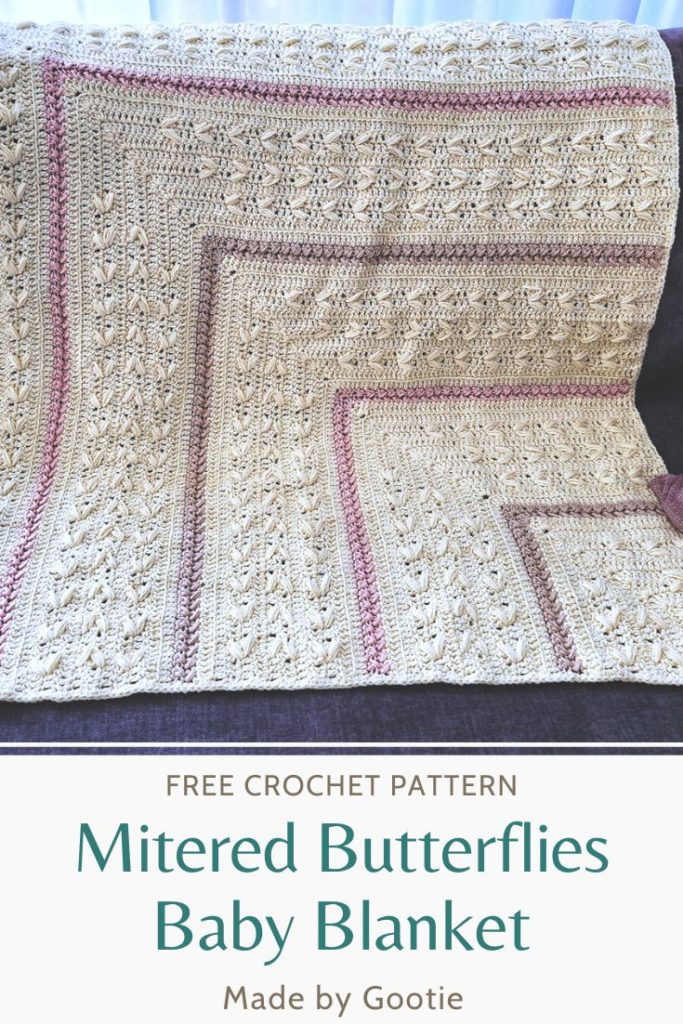
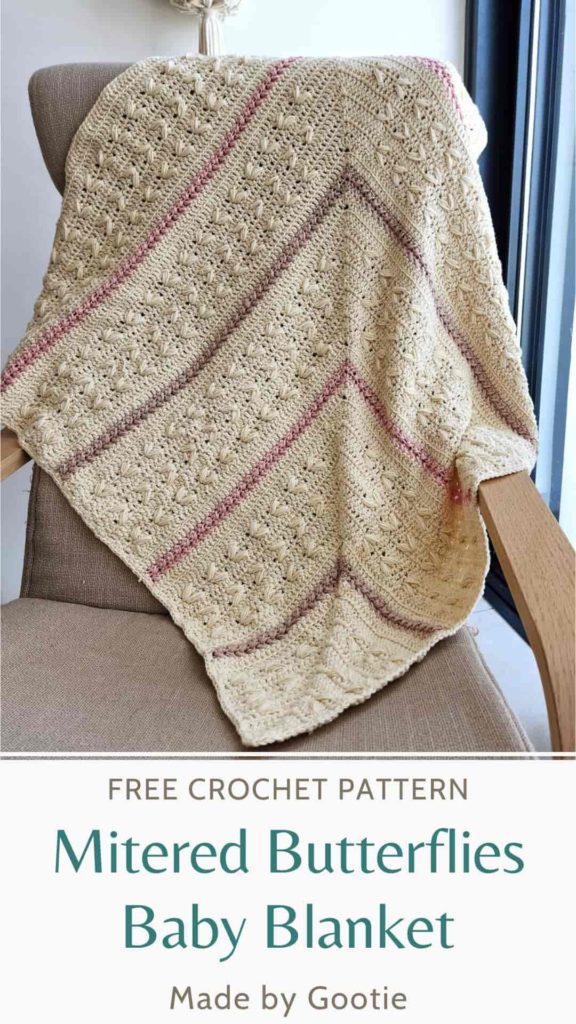
Mitered Butterflies Baby Blanket Crochet Pattern (Free)
Last Updated on April 21, 2026
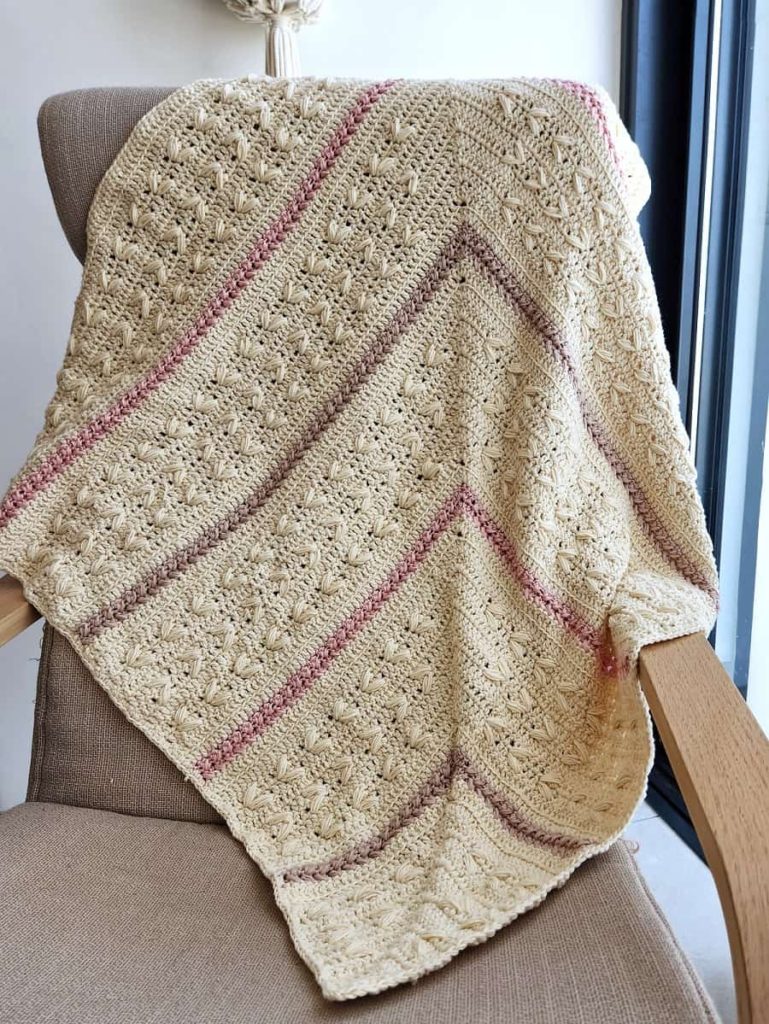
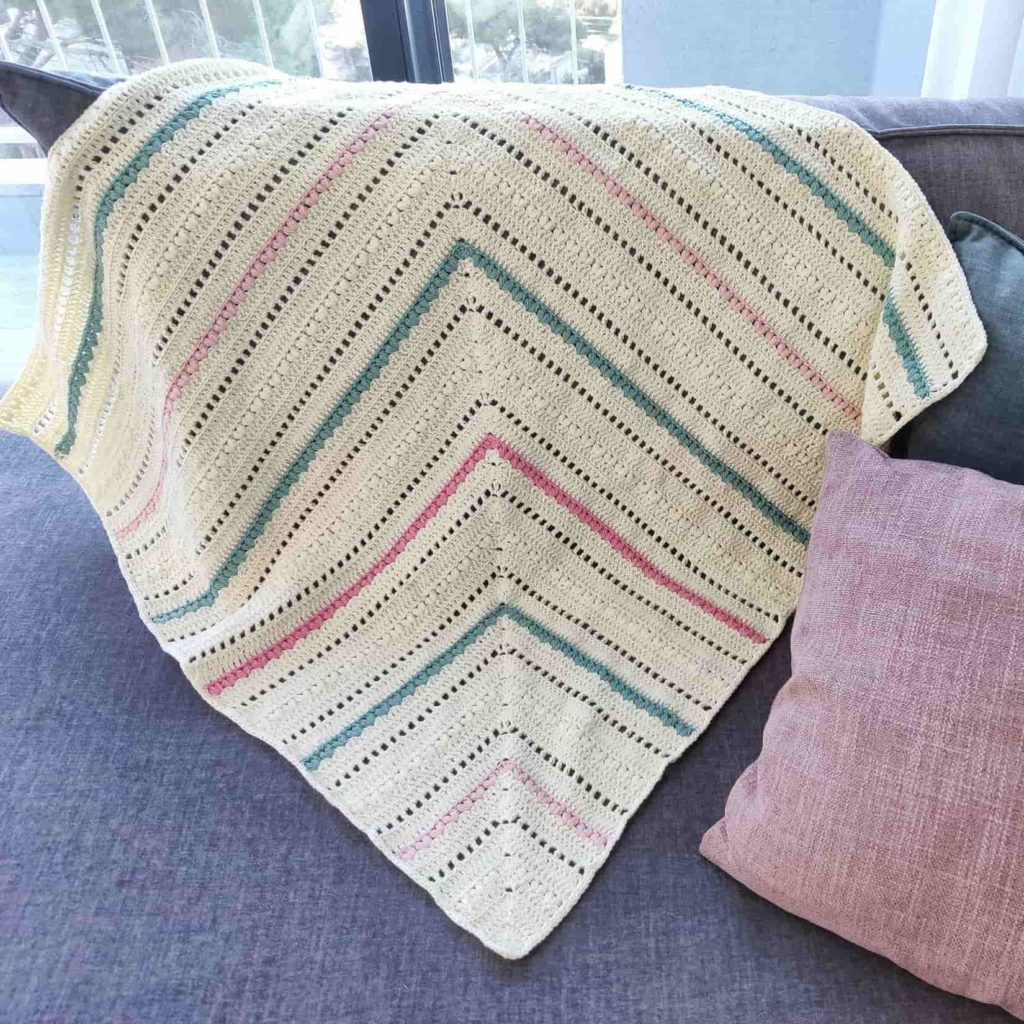
I guess you already know I like to spear myself the long starting chain whenever I can. With this Mitered Butterflies Baby Blanket crochet pattern, as the name suggests, it’s not different, you are starting from one corner, and just continuing to increase.
In this mitered baby blanket crochet pattern, the fun mitered square technique is combined with a beautiful texture, that creates a unique baby blanket crochet pattern!
Scroll down for the free written instructions!
** Some of the links in this post may include affiliate links. Making a purchase through one of these links pays me a small referral fee at no added cost to you. These small fees add up and help me keep the blog running. View our disclosure and privacy policy for more information.
How to Crochet a Mitered Square Blanket?
The crochet mitered square is a bit similar to the corner to corner crochet method, in the sense that it spears you the long starting chain and leaves out the stress of counting your chains at the beginning.
There are 2 ways to start a crochet Mitered square.
The first one that we will be using in our Mitered Butterflies Blanket crochet pattern, and the best one when working on a blanket in my opinion, is starting by making a square, and then increasing by working on 2 of its sides. I also used this method in my Mitered Tulips Blanket.
The second way to make a mitered crochet square, which is more suitable for shawls like the In Bloom Ruana, is to start the corner by working (2 dc, ch2, 2 dc) into a magic ring, and just keep increasing by working back and forth.
Want to save this post for later? Go ahead and PIN it!
How to Crochet a Double Crochet Mitered Square Video Tutorial
This video tutorial of the Double Crochet Mitered Square, will show you how to work rows 1-3 of the Mitered Butterflies Blanket.
Hovering Butterflies Crochet Stitch Video Tutorial
This is a video tutorial for the Hovering Butterflies stitch that is used in the blanket.
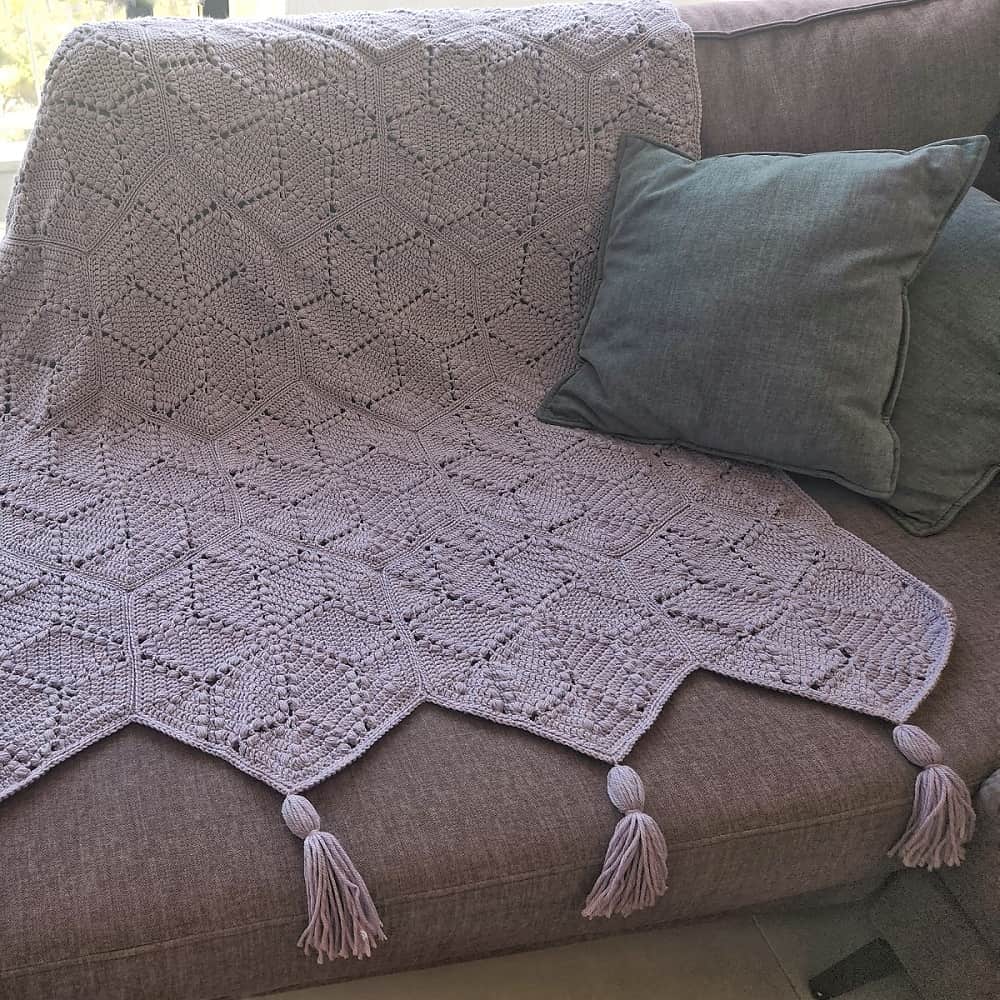
Butterfly Stitch Crochet Blanket
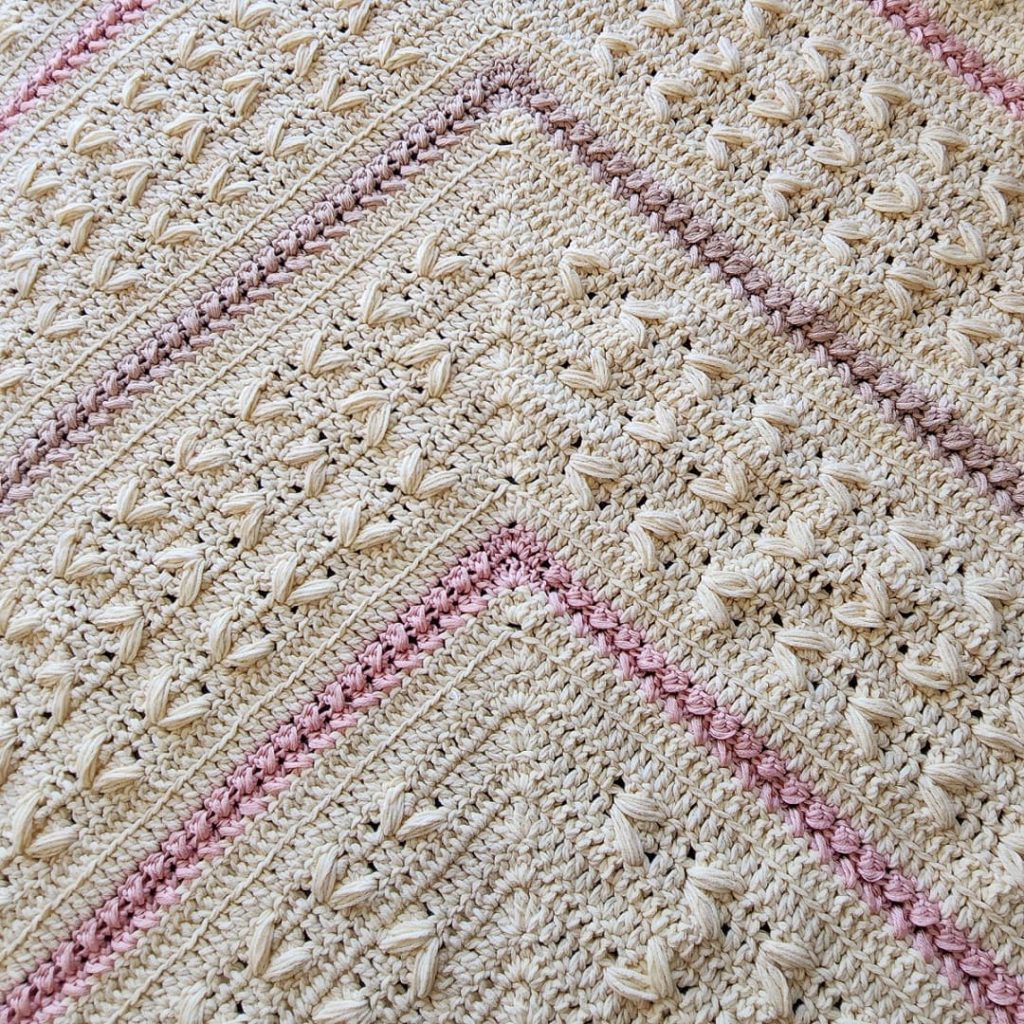
The stitch in this butterflies baby blanket crochet pattern made me think of little butterflies that are flattering over the blanket.
To create this butterfly crochet stitch we are using a puff crossed stitch. The puff stitch helps make the “butterfly” more noticeable in comparing to working just a crossed double crochet stitch.
Mitered Baby Blanket PDF Crochet Pattern
You can find the ad-free PDF pattern with the full photo-tutorial at one of my shops below:


Materials
– Crochet hook 4.5 (I love the Etimo Hooks).
– Worsted (#4) weight yarn – I used Knit Picks – Comfy Worsted for the main color, and leftover yarns I had in my stash for colors B and C.
Total amount of yarn needed:
Color A – 550 grams/1,100m/1,199yds
Color B – 50 grams/100m/109yds
Color C – 50 grams/100m/109yds
– 1 Stitch marker (optional)
Finished Size – 36×36” (92×92 cm)
Gauge (in pattern):
Working rows 1-3 will result in an approx. 2.5” (6.3 cm) wide square.
Do you prefer photo tutorials? Get the premium, ad-free, full photo-tutorial, printable PDF version onRavelry or Etsy!
Abbreviations (US)
ch – chain
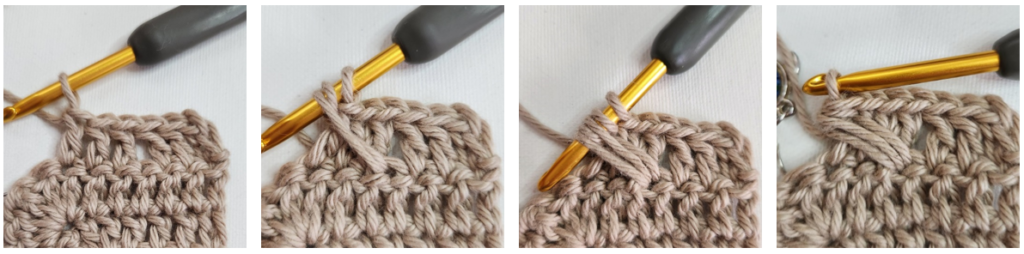
C-puff2 – crossed puff2: (yo, insert hook into skipped st, yo and pull up a loop in a diagonal to the height of the dc’s) x 2 times, yo and pull through all 5 loops.
dc – double crochet
flo – work in front loop only
PM – place markers
sc – single crochet
st – stitch
STsc – stacked single crochet: work 1 single crochet in the first stitch, then work another single crochet into the left leg of the single crochet you just worked.
tr – treble crochet
yo – yarn over
How to crochet the Stacked Single Crochet (STsc):
This stitch is an alternative to double crochet, its intention in this pattern is to replace the ch3, or ch2 + dc at the beginning of the pattern and get a straighter edge.
At the beginning of the row, do not chain, keep your yarn behind your hook and work 1 single crochet in the first stitch, then work another single crochet into the left leg of the single crochet you just worked.
How to crochet the C-puff2 (Crossed puff2):
(yo, insert hook into skipped st, yo and pull up a loop in a diagonal to the height of the dc’s) x 2 times, yo and pull through all 5 loops.
Pattern Notes
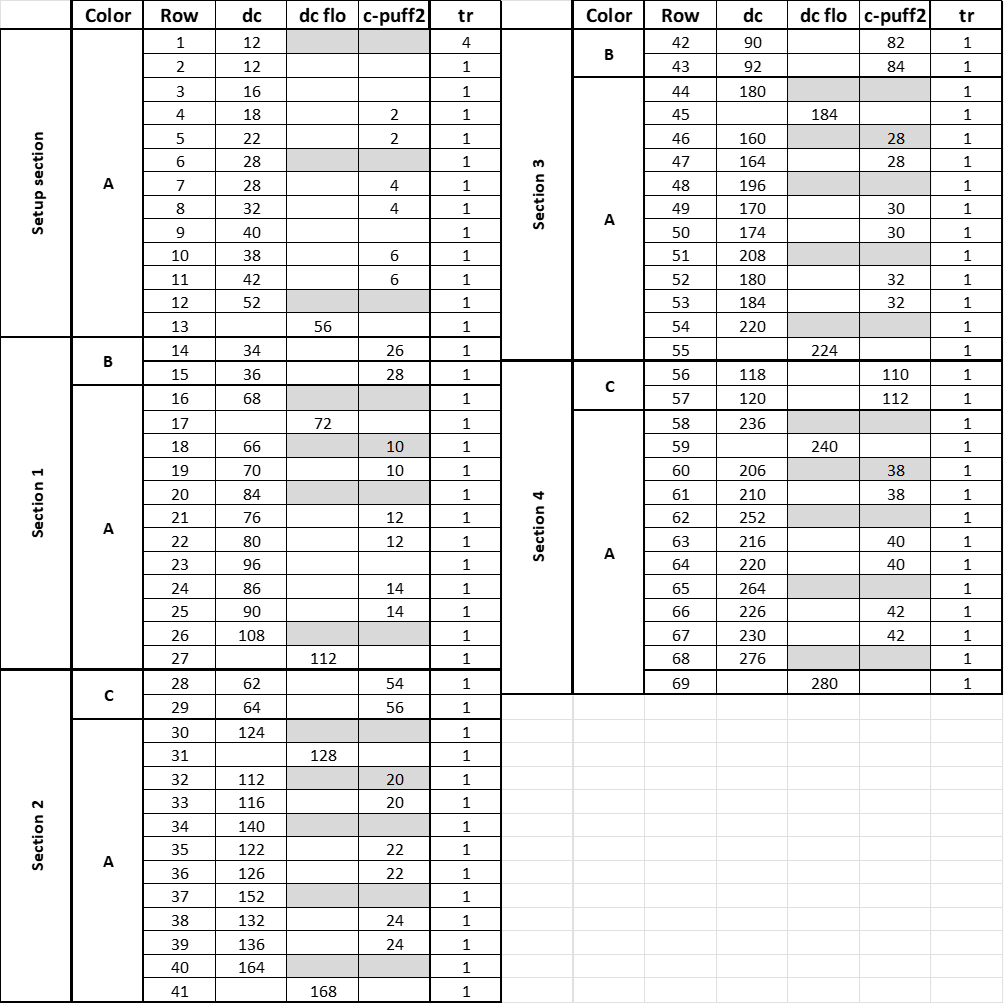
- There is a stitch count table after the written instructions.
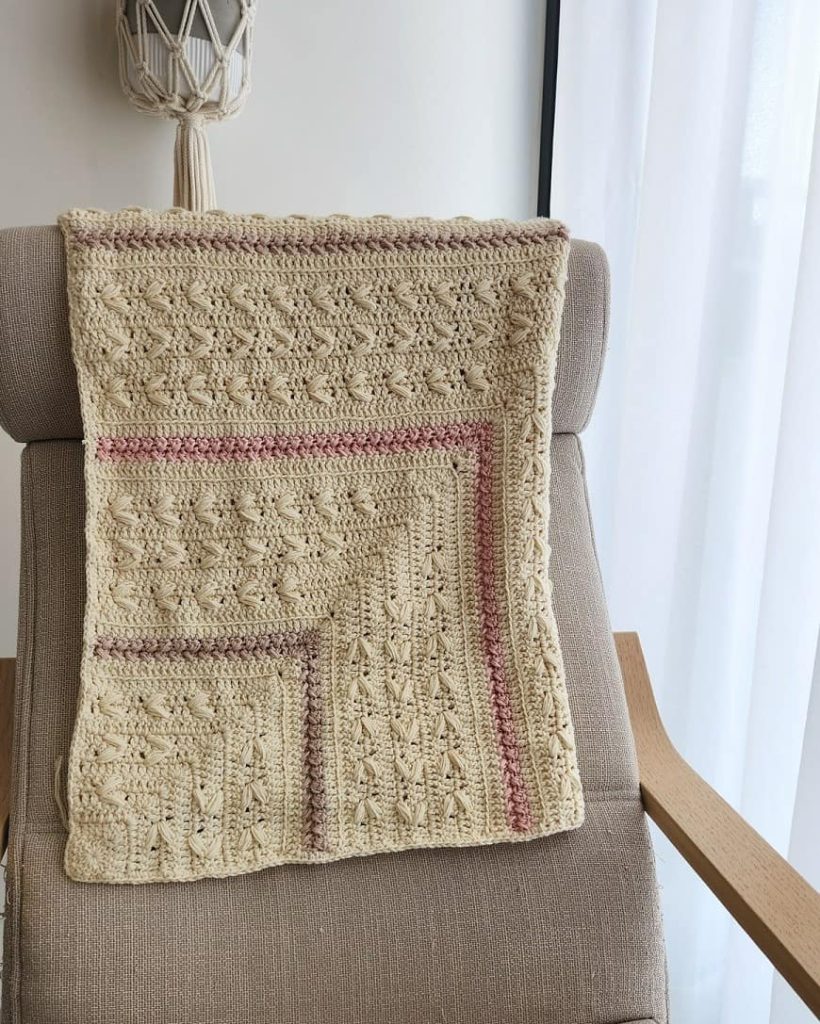
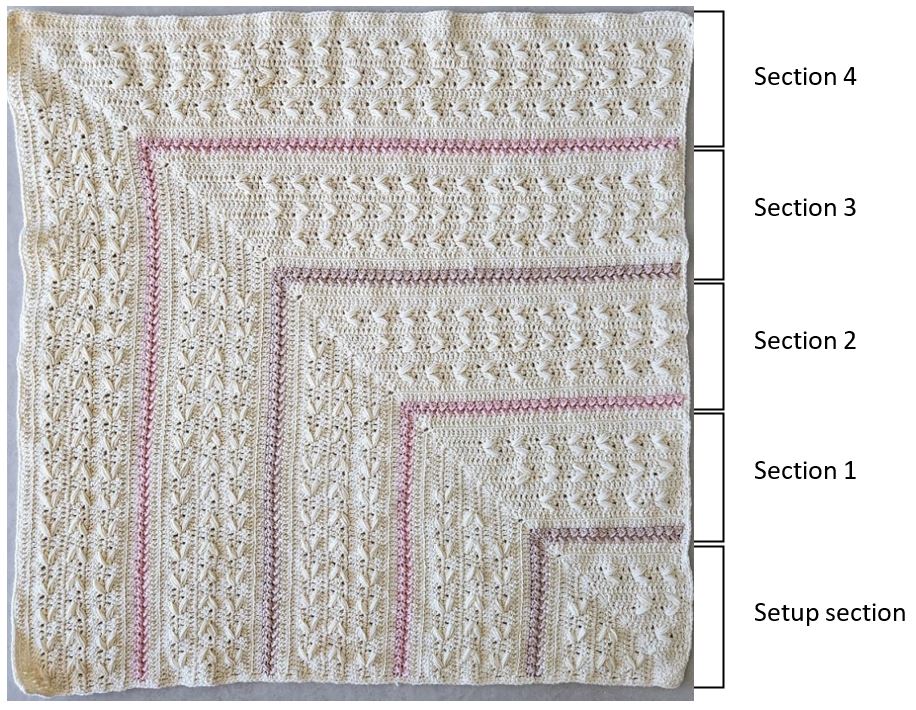
- The blanket is worked in the Mitered method – from one corner to corner (similar to the C2C method, but without the decreasing), you can make it as big as you’d like.
- Place marker in the corner stitch (tr) and move marker along the rows to make it easier to find the corner.
- To help with stitch count: every row adds 4 stitches (2 in each side).
- STsc is an alternative to the 1st double crochet, its intention in this pattern is to get a straighter edge. If you prefer, you can replace it with ch3, or ch2 + dc at the beginning of each row.
- After working the C-puff2, make sure to crochet the dc into the next dc and not the last one you’ve worked into.
- When changing color: at the last stitch of the row, before changing color, start the stitch as normal, before you pull the yarn through the 2 loops to finish the stitch, wrap the new color around the hook and then pull through.
- To make it easier to follow the pattern, I have divided the blanket into sections as follows:
Baby Shower Blog Hop
This pattern was featured at the Baby Shower Blog Hop which was hosted by Kristine from Ambassador Crochet. Check out the event for all the free crochet patterns that are perfect for your next baby shower!
Mitered butterflies baby blanket written instructions
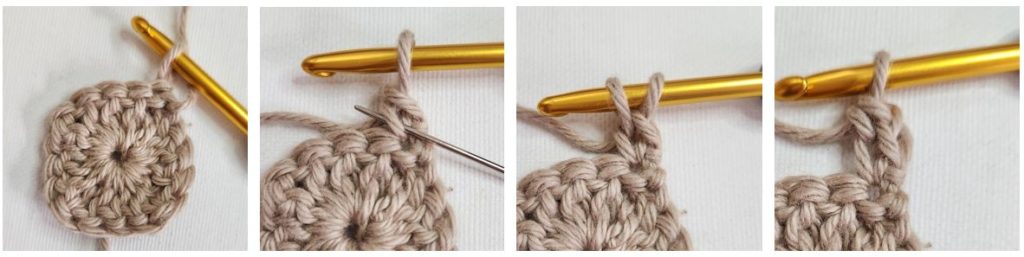
Setup Section – see video for rows 1-3.
With color A
Make a magic ring.
Row 1 (WS): Ch4 (counts as 1tr), working into the ring:
3dc, (1tr, 3dc) x3 times, ss to top of ch-4. Pull the ring tight, turn. (12 dc, 4 tr)
Row 2 (RS): STsc (counts as 1dc here and throughout) in 1st tr, 1dc in next 3 dc, [2dc, 1tr-PM, 2dc] in next tr, 1dc in next 3 dc, 1dc in next tr, turn. (12 dc, 1 tr)
Row 3 (WS): STsc in 1st dc, 1dc in next 5 dc, [2dc, 1tr-PM, 2dc] in next tr, 1dc in next 6 dc, turn. (16 dc, 1 tr)
* To meet gauge, make sure the length in the center of the square is approx. 2.5in/6.3cm.
Row 4 (RS): STsc in 1st dc, 1dc in next 2 dc, skip next dc, 1dc in next 3 dc, 1C-puff2 in skipped dc, 1dc in next dc, [2dc, 1tr-PM, 2dc] in next tr, 1dc in next dc, skip next dc, 1dc in next 3 dc, 1C-puff2 in skipped dc, 1dc in next 3 dc, turn. (18 dc, 1 tr, 2 C-puff2)
** After working the C-puff2, make sure to crochet the dc into the next dc and not the last one you’ve worked into.
Row 5 (WS): STsc in 1st dc, 1dc in next dc, skip next dc, 1dc in next 3 sts, 1C-puff2 in skipped dc, 1dc in next 4 dc, [2dc, 1tr-PM, 2dc] in next tr, 1dc in next 2 dc, skip next dc, 1dc in next 3 sts, 1C-puff2 in skipped dc, 1dc in next 4 dc, turn. (22 dc, 1 tr, 2 C-puff2)
Row 6 (RS): STsc in 1st dc, 1dc in each st until tr (corner), [2dc, 1tr-PM, 2dc] in next tr, 1dc in each st to the end of the row, turn. (28 dc, 1 tr)
Row 7 (WS): STsc in 1st dc, * 1dc in next 2 dc, skip next dc, 1dc in next 3 dc, 1C-puff2 in skipped dc; repeat from * one more time, 1dc in next dc, [2dc, 1tr-PM, 2dc] in next tr.
1dc in next dc, * skip next dc, 1dc in next 3 dc, 1C-puff2 in skipped dc, 1dc in next 2 dc; repeat from * one more time, 1dc in next dc, turn. (28 dc, 1 tr, 4 C-puff2)
Row 8 (RS): STsc in 1st dc, 1dc in next dc, * skip next dc, 1dc in next 3 sts, 1C-puff2 in skipped dc, 1dc in next 2 dc; repeat from * one more time, 1dc in next 2 dc, [2dc, 1tr-PM, 2dc] in next tr.
1dc in next 2 dc, * skip next dc, 1dc in next 3 sts, 1C-puff2 in skipped dc, 1dc in next 2 dc; repeat from * one more time, 1dc in next 2 dc, turn. (32 dc, 1 tr, 4 C-puff2)
Row 9 (WS): STsc in 1st dc, 1dc in each st until tr (corner), [2dc, 1tr-PM, 2dc] in next tr, 1dc in each st to the end of the row, turn. (40 dc, 1 tr)
Row 10 (RS): STsc in 1st dc, * 1dc in next 2 dc, skip next dc, 1dc in next 3 dc, 1C-puff2 in skipped dc; repeat from * until 1 dc before tr (corner), 1dc in next dc, [2dc, 1tr-PM, 2dc] in next tr.
1dc in next dc, * skip next dc, 1dc in next 3 dc, 1C-puff2 in skipped dc, 1dc in next 2 dc; repeat from * until last dc, 1dc in next dc, turn. (38 dc, 1 tr, 6 C-puff2)
Row 11 (WS): STsc in 1st dc, 1dc in next dc, * skip next dc, 1dc in next 3 sts, 1C-puff2 in skipped dc, 1dc in next 2 dc; repeat from * until 2 dc before tr (corner), 1dc in next 2 dc, [2dc, 1tr-PM, 2dc] in next tr.
1dc in next 2 dc, * skip next dc, 1dc in next 3 sts, 1C-puff2 in skipped dc, 1dc in next 2 dc; repeat from * last 2 dc, 1dc in next 2 dc, turn. (42 dc, 1 tr, 6 C-puff2)
Row 12 (RS): STsc in 1st dc, 1dc in each st until tr (corner), [2dc, 1tr-PM, 2dc] in next tr, 1dc in each st to the end of the row, turn. (52 dc, 1 tr)
Row 13 (WS): STsc in 1st dc, 1dc in flo of each dc until tr (corner), [2dc, 1tr-PM, 2dc] in flo of next tr, 1dc in flo of each dc to the end of the row, turn. (56 dc flo, 1 tr flo)
Section 1
With color B
Row 14 (RS): STsc in 1st dc, * skip next st, 1dc in next st, 1C-puff2 in skipped st; repeat from * until 1 dc before tr (corner), 1dc in next dc, [2dc, 1tr-PM, 2dc] in next tr.
1dc in next dc, * skip next dc, 1dc in next dc, 1C-puff2 in skipped dc; repeat from * until last dc, 1dc in next dc, turn. (34 dc, 1 tr, 26 C-puff2)
Row 15 (WS): STsc in 1st dc, * skip next st, 1dc in next st, 1C-puff2 in skipped st; repeat from * until 1 dc before tr (corner), 1dc in next dc, [2dc, 1tr-PM, 2dc] in next tr.
1dc in next dc, * skip next st, 1dc in next st, 1C-puff2 in skipped st; repeat from * until last dc, 1dc in next dc, turn. (36 dc, 1 tr, 28 C-puff2)
** In this row, the dc are worked into the dc and the C-puff2 into the C-puff2.
With color A
Row 16 (RS): STsc in 1st dc, 1dc in each st until tr (corner), [2dc, 1tr-PM, 2dc] in next tr, 1dc in each st to the end of the row, turn. (68 dc, 1 tr)
Row 17 (WS): STsc in 1st dc, 1dc in flo each dc until tr (corner), [2dc, 1tr-PM, 2dc] in next flo tr, 1dc in flo each dc to the end of the row, turn. (72 dc flo, 1 tr flo)
Row 18 (RS): STsc in 1st dc, 1dc in next 2 dc, * skip next dc, 1dc in next 3 dc, 1C-puff2 in skipped dc, 1dc in next 2 dc; repeat from * until 3 dc before tr (corner), 1dc in next 3 dc, [2dc, 1tr-PM, 2dc] in next tr.
1dc in next 5 dc, * skip next dc, 1dc in next 3 dc, 1C-puff2 in skipped dc, 1dc in next 2 dc; repeat from * until last dc, 1dc in next dc, turn. (66 dc, 1 tr, 10 C-puff2)
Row 19 (WS): STsc in 1st dc, 1dc in next dc, * skip next dc, 1dc in next 3 sts, 1C-puff2 in skipped dc, 1dc in next 2 dc; repeat from * until 6 dc before tr (corner), 1dc in next 6 dc, [2dc, 1tr-PM, 2dc] in next tr.
1dc in next 6 dc, * skip next dc, 1dc in next 3 sts, 1C-puff2 in skipped dc, 1dc in next 2 dc; repeat from * last 2 dc, 1dc in next 2 dc, turn. (70 dc, 1 tr, 10 C-puff2)
Row 20 (RS): repeat row 16. (84 dc, 1 tr)
Rows 21-26: repeat rows 18-20 twice. (Finishing row 26 with 108 dc, 1 tr)
Row 27 (WS): repeat row 17. (112 dc flo, 1 tr flo)
Section 2
With color C
Rows 28-29: repeat rows 14-15. (Finishing row 29 with 64 dc, 1 tr, 56 C-puff2)
With color A
Rows 30-31: repeat rows 16-17. (Finishing row 31 with 128 dc flo, 1 tr)
Row 32 (RS): STsc in 1st dc, 1dc in next 2 dc, * skip next dc, 1dc in next 3 dc, 1C-puff2 in skipped dc, 1dc in next 2 dc; repeat from * until 1 dc before tr (corner), 1dc in next dc, [2dc, 1tr-PM, 2dc] in next tr.
1dc in next 3 dc, * skip next dc, 1dc in next 3 dc, 1C-puff2 in skipped dc, 1dc in next 2 dc; repeat from * until last dc, 1dc in next dc, turn. (112 dc, 1 tr, 20 C-puff2)
Row 33 (WS): STsc in 1st dc, 1dc in next dc, * skip next dc, 1dc in next 3 sts, 1C-puff2 in skipped dc, 1dc in next 2 dc; repeat from * until 4 dc before tr (corner), 1dc in next 4 dc, [2dc, 1tr-PM, 2dc] in next tr.
1dc in next 4 dc, * skip next dc, 1dc in next 3 sts, 1C-puff2 in skipped dc, 1dc in next 2 dc; repeat from * last 2 dc, 1dc in next 2 dc, turn. (116 dc, 1 tr, 20 C-puff2)
Row 34 (RS): repeat row 16. (140 dc, 1 tr)
Rows 35-40: repeat rows 32-34 twice. (Finishing row 40 with 164 dc, 1 tr)
Row 41 (WS): repeat row 17. (168 dc flo, 1 tr flo)
Section 3
With color B
Rows 42-43: repeat rows 14-15. (Finishing row 43 with 92 dc, 1 tr, 84 C-puff2)
With color A
Rows 44-45: repeat rows 16-17. (Finishing row 45 with 184 dc flo, 1 tr flo)
Row 46 (RS): STsc in 1st dc, 1dc in next 2 dc, *skip next dc, 1dc in next 3 dc, 1C-puff2 in skipped dc, 1dc in next 2 dc; repeat from * until 5 dc before tr (corner), 1dc in next 5 dc, [2dc, 1tr-PM, 2dc] in next tr.
1dc in next 7 dc, * skip next dc, 1dc in next 3 dc, 1C-puff2 in skipped dc, 1dc in next 2 dc; repeat from * until last dc, 1dc in next dc, turn. (160 dc, 1 tr, 28 C-puff2)
Row 47 (WS): STsc in 1st dc, 1dc in next dc, * skip next dc, 1dc in next 3 sts, 1C-puff2 in skipped dc, 1dc in next 2 dc; repeat from * until 8 dc before tr (corner), 1dc in next 8 dc, [2dc, 1tr-PM, 2dc] in next tr.
1dc in next 8 dc, * skip next dc, 1dc in next 3 sts, 1C-puff2 in skipped dc, 1dc in next 2 dc; repeat from * last 2 dc, 1dc in next 2 dc, turn. (164 dc, 1 tr, 28 C-puff2)
Row 48 (RS): repeat row 16. (196 dc, 1 tr)
Rows 49-54: repeat rows 46-48 twice. (Finishing row 54 with 220 dc, 1 tr)
Row 55 (WS): repeat row 17. (224 dc flo, 1 tr flo)
Section 4
With color C
Rows 56-57: repeat rows 14-15. (Finishing row 57 with 120 dc, 1 tr, 112 C-puff2)
With color A
Rows 58-59: repeat rows 16-17. (Finishing row 59 with 240 dc flo, 1 tr flo)
Row 60 (RS): STsc in 1st dc, 1dc in next 2 dc, *skip next dc, 1dc in next 3 dc, 1C-puff2 in skipped dc, 1dc in next 2 dc; repeat from * until 3 dc before tr (corner), 1dc in next 3 dc, [2dc, 1tr-PM, 2dc] in next tr.
1dc in next 5 dc, * skip next dc, 1dc in next 3 dc, 1C-puff2 in skipped dc, 1dc in next 2 dc; repeat from * until last dc, 1dc in next dc, turn. (206 dc, 1 tr, 38 C-puff2)
Row 61 (WS): STsc in 1st dc, 1dc in next dc, * skip next dc, 1dc in next 3 sts, 1C-puff2 in skipped dc, 1dc in next 2 dc; repeat from * until 6 dc before tr (corner), 1dc in next 6 dc, [2dc, 1tr-PM, 2dc] in next tr.
1dc in next 6 dc, * skip next dc, 1dc in next 3 sts, 1C-puff2 in skipped dc, 1dc in next 2 dc; repeat from * last 2 dc, 1dc in next 2 dc, turn. (210 dc, 1 tr, 38 C-puff2)
Row 62 (RS): repeat row 16. (252 dc, 1 tr)
Rows 63-68: repeat rows 60-62 twice. (Finishing row 68 with 274 dc, 1 tr)
Row 69 (WS): repeat row 17. (280 dc flo, 1 tr flo)
Don’t fasten off and continue to work the border, after turning your blanket to the right side.
Border for crochet baby blanket (worked on the RS):
When the right side is facing you, start working the border.
With color A
1st side:
ch1 (doesn’t count as a stitch), 1sc in each dc until marker. (140 sc)
Working the corner: (1sc, ch1, 1sc) in next tr.
2nd side:
1sc in each dc until last dc (don’t work into it). (139 sc)
Working the corner: (1sc, ch1, 1sc) in last dc.
3rd side:
Work 2sc in each side of a dc, when reaching the beginning square work 1 sc in next tr and next 3 dc. (140 sc)
Work corner: (1sc, ch1, 1sc) in next tr.
4th side:
1sc in next 3 dc and in next tr. Work 2sc in each side of a dc. (140 sc)
Working 1sc in the top of the last dc you worked into (where you place the 1st sc of the 1st side). Ch1 and ss to beginning ch-1 space.
Fasten off, weave in the ends, soak and block the blanket.
Stitch Count Table
Looking for More Crochet blanket patterns?
Did you try this out? Share your project!
– Let me know how it went and leave a comment below.
– Tag me on Instagram @madebygootie
– Join and share in our FB Community
Want to save this post for later? Go ahead and PIN it!
Hi, I purchased thr Mitered Butterfly Baby Blanket. I am left-handed and the butterflies are not looking like yours….lol and I know its due to being left-handed. Any advice? Do the insert the hook from the back, front? What I’m getting is straight lines. Which I had a live video. Thank you, Susan
Hi Susan, you need to insert the hook into the skipped stitch from the front to the back.
I added a video to the post for this stitch.
You can also find it here: Hovering Butterflies Stitch Video Tutorial
Could this be made into a center out blanket instead of a mitered blanket?
I guess it is possible, I haven’t tried it, tough.
You will need to work the other corners the same way the mitered corners is worked.
Let me know how it goes!