Last Updated on July 11, 2024
Do know how it is when you have that perfect yarn lying in your stash, and you just wait for the right pattern to come along?
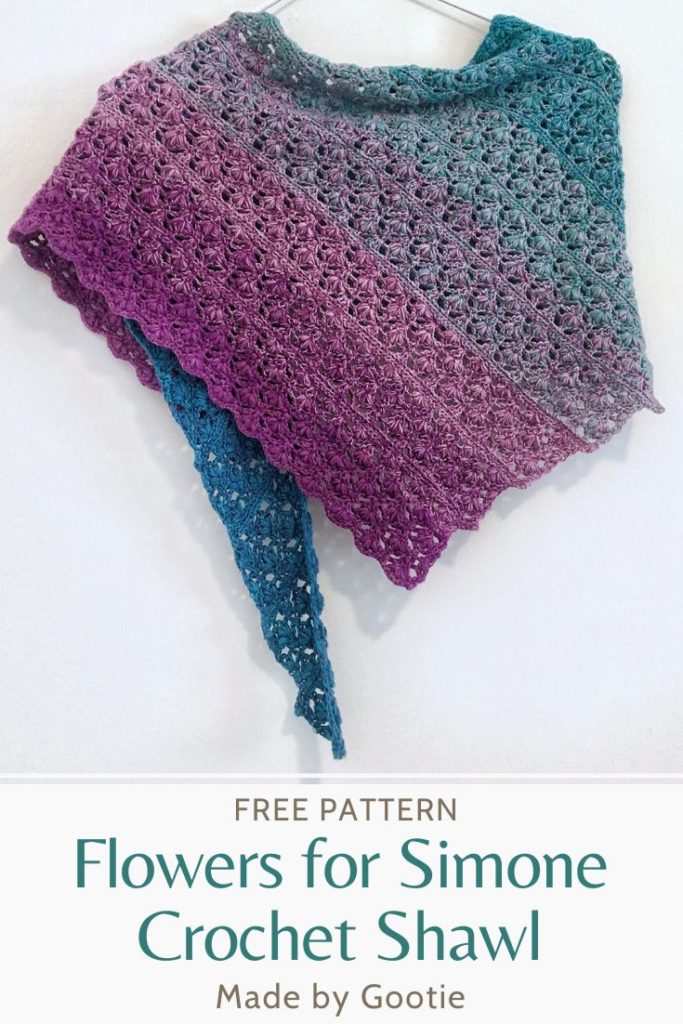
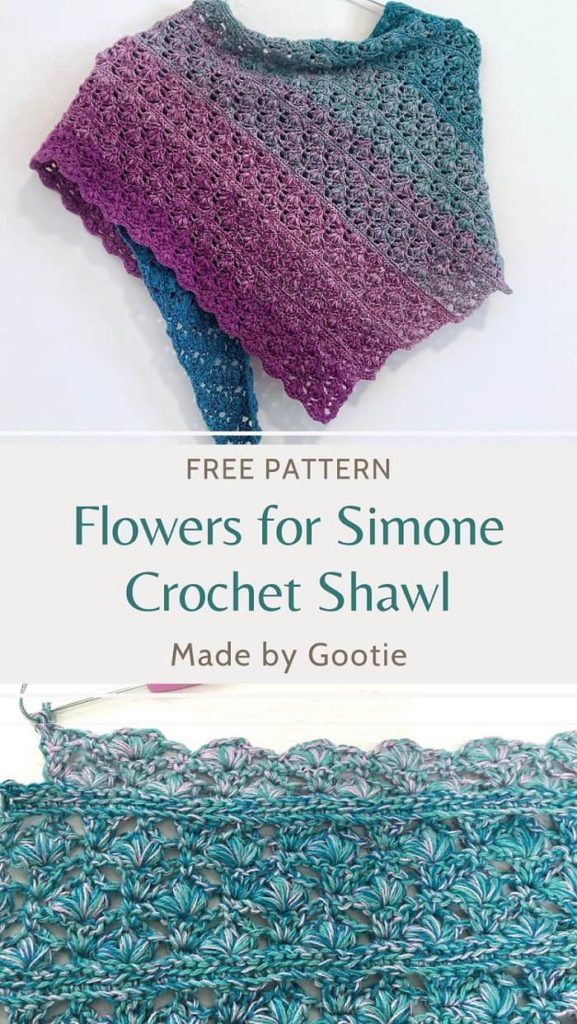
I came up with the Flowers for Simone crochet lace shawl pattern, after I got a beautiful yarn cake from my friend (Simone), and it took me several months to come up with the perfect design for this yarn.
Scroll down for the written pattern and video tutorial.
** Some of the links in this post may include affiliate links. Making a purchase through one of these links pays me a small referral fee at no added cost to you. View our disclosure and privacy policy for more information.
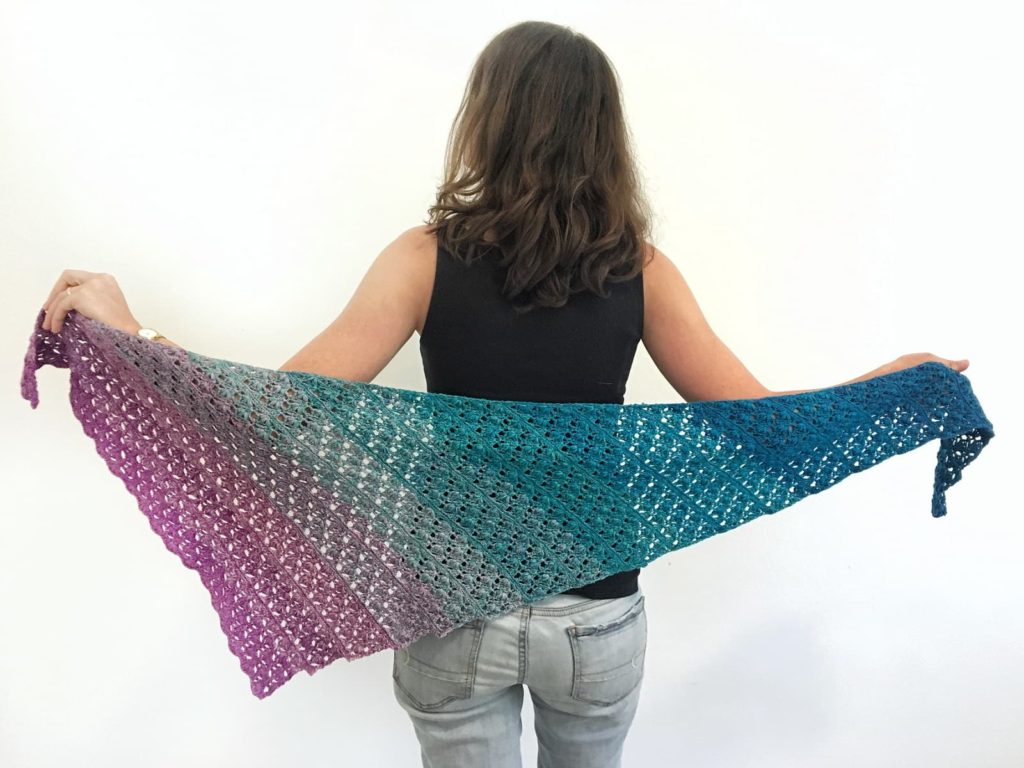
When I started working on this crochet lace shawl pattern, I wanted to create an asymmetrical lace triangle shawl pattern. I like the look of the shawl being narrow on one side, and wider on the other.
To create an asymmetric triangle shawl, the crochet shawl starts at one end and is worked in rows from side to side.
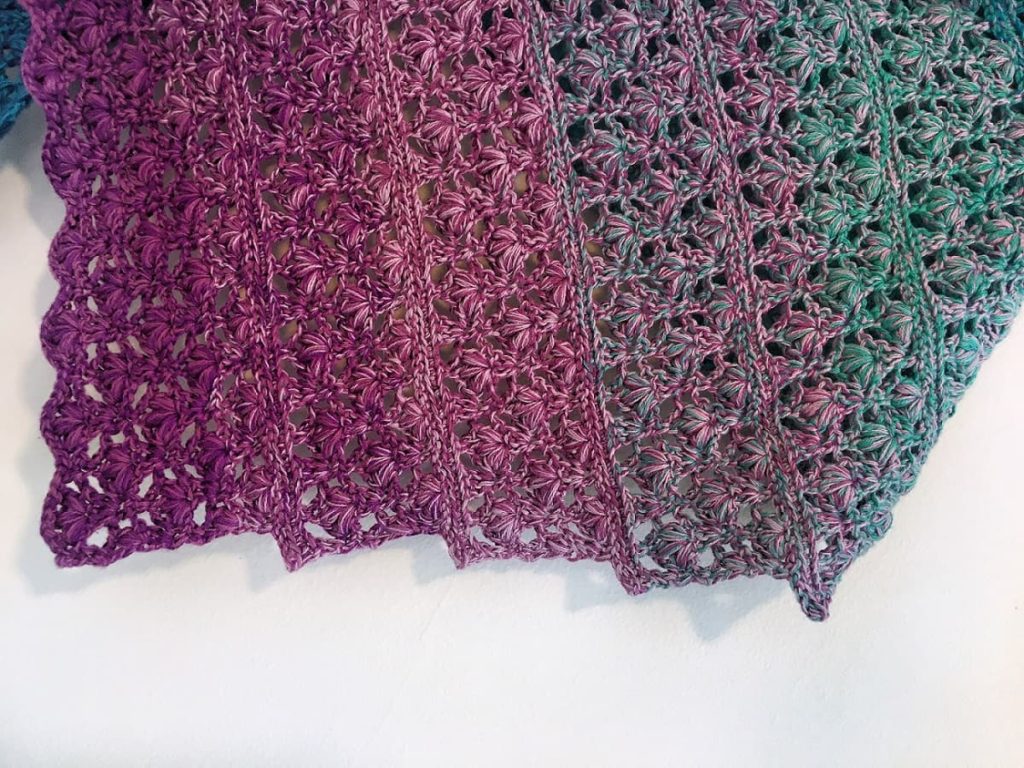
While increasing each row on one side of the shawl, you are decreasing 4 stitches every 6 rows on the other side creating “steps”- like rows and a subtle increase for the triangle.
Want to save this post for later? Go ahead and PIN it!
About the Flowers for Simone Shawl
As I mentioned before, I made this lacy crochet shawl from a beautiful yarn cake I got from a dear friend named Simone. So all you need for this shawl is one Fingering (#1) weight yarn cake for this one skein lace shawl crochet pattern.
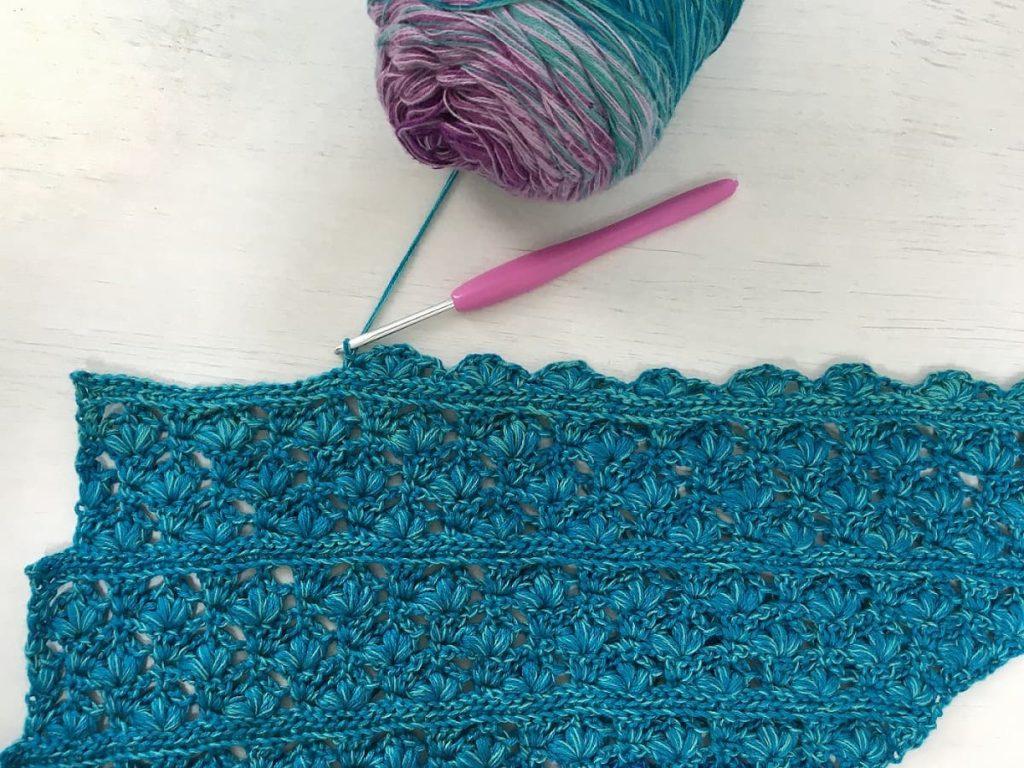
I wanted this design to be special and decided to use the beautiful Flower Lace Stitch to create a romantic shawl crochet pattern.
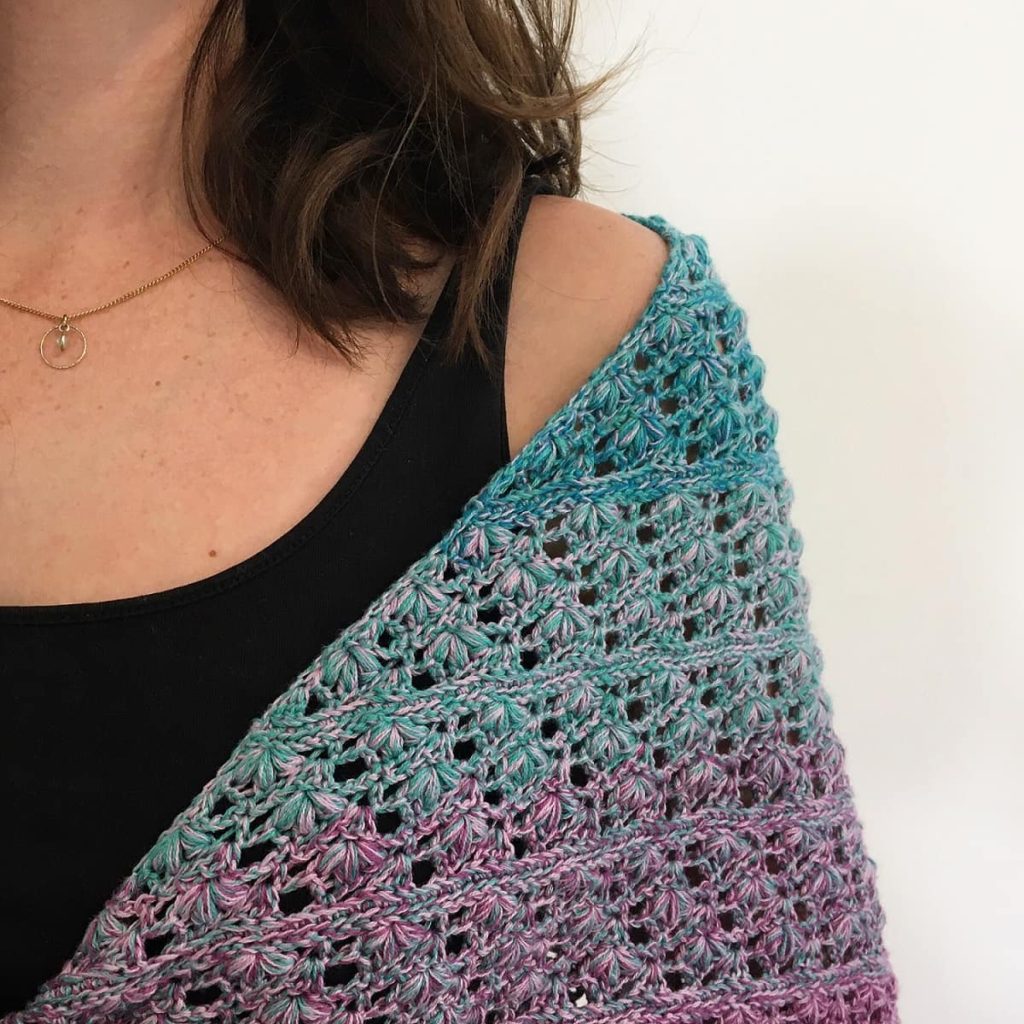
Combining the Lacy flower crochet stitch with the beautiful gradient yarn, creating a stunning lightweight crochet shawl, that is also perfect for summer!
Crochet Lace Shawl PDF Pattern
You can find the ad-free PDF pattern with the full photo-tutorial & a chart at one of my shops below:
Free Crochet Lace Shawl Pattern
* Want to save this post for later? Go ahead and PIN it!
* Add this pattern to your Ravelry queue HERE!
Skill Level – Intermediate
Materials
– 3.0 mm / D & 3.5 mm / E crochet hook (I like this hook)
– 250gr/940m/1025yds Fingering (#1) weight yarn.
– 2 stitch markers
Abbreviations (US)
RS – right side
WS – wrong side
PM – place marker
ch – chain
st – stitch
ss – slip stitch
sc – single crochet
dc – double crochet
BLO – back loop only
FLO – front loop only
yo – yarn over
Puff stitch – (yo, insert hook into next st, yo and pull up a loop) x 3 times working into same st, yo and pull through all 7 loops on hook.
How to Crochet the Puff stitch:
(yo, insert hook into next st, yo and pull up a loop) x 3 times working into same st, yo and pull through all 7 loops on hook.

Finished size – 67×30 in (170×76 cm).
Gauge (double crochet) – 22 dc and 12 rows = 4 in/10 cm with 3.5mm hook
Notes
- The shawl starts at one end and is worked from side to side. It is worked in rows, increasing each row on one side of the shawl and decreasing 4 sts every 6 rows on the other side creating “steps”.
- The last two rows of a step are the same as the first two rows of the next step.
- The shawl is worked with a 3.5mm hook, but the edging is worked with a 3.0mm.
- You can make the shawl as big as you’d like by repeating the main pattern.
- The markers at the beginning of the rows help indicate the top of the beginning chain. This is optional of course.
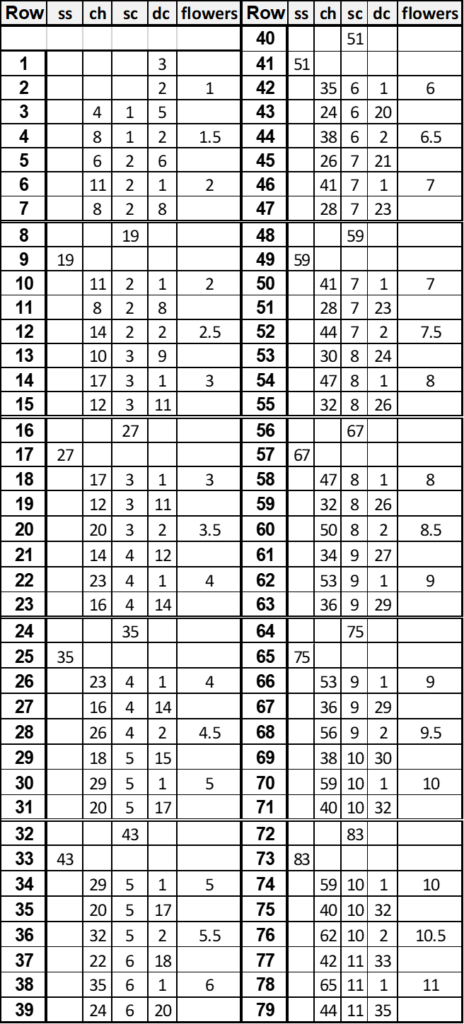
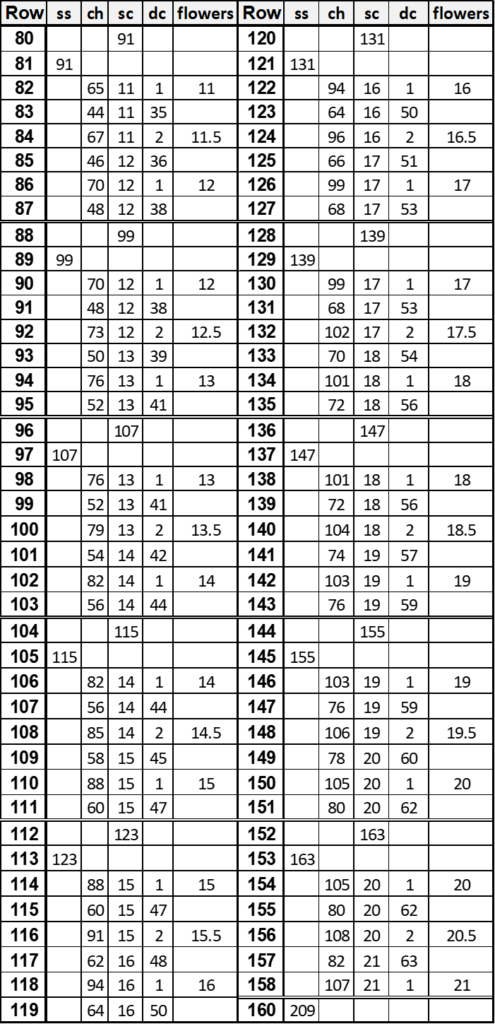
- There’s a stitch count table at the end of the written instructions. Each [1puff, ch2, 1puff, ch2, 1puff] is referred to as a flower, and each [1puff, ch2, 1dc] is referred to as half a flower. The easiest way to make sure your stitch count is correct, is to count your flowers.
- You can find a photo tutorial for the Lace Flower Crochet Stitch.
- If you prefer a chart, you can find it in the premium PDF version on Ravelry and Etsy.
- This pattern is part of the Summer Stashbusting Crochet Challenge, hosted by Mary from Kickin’ Crochet.
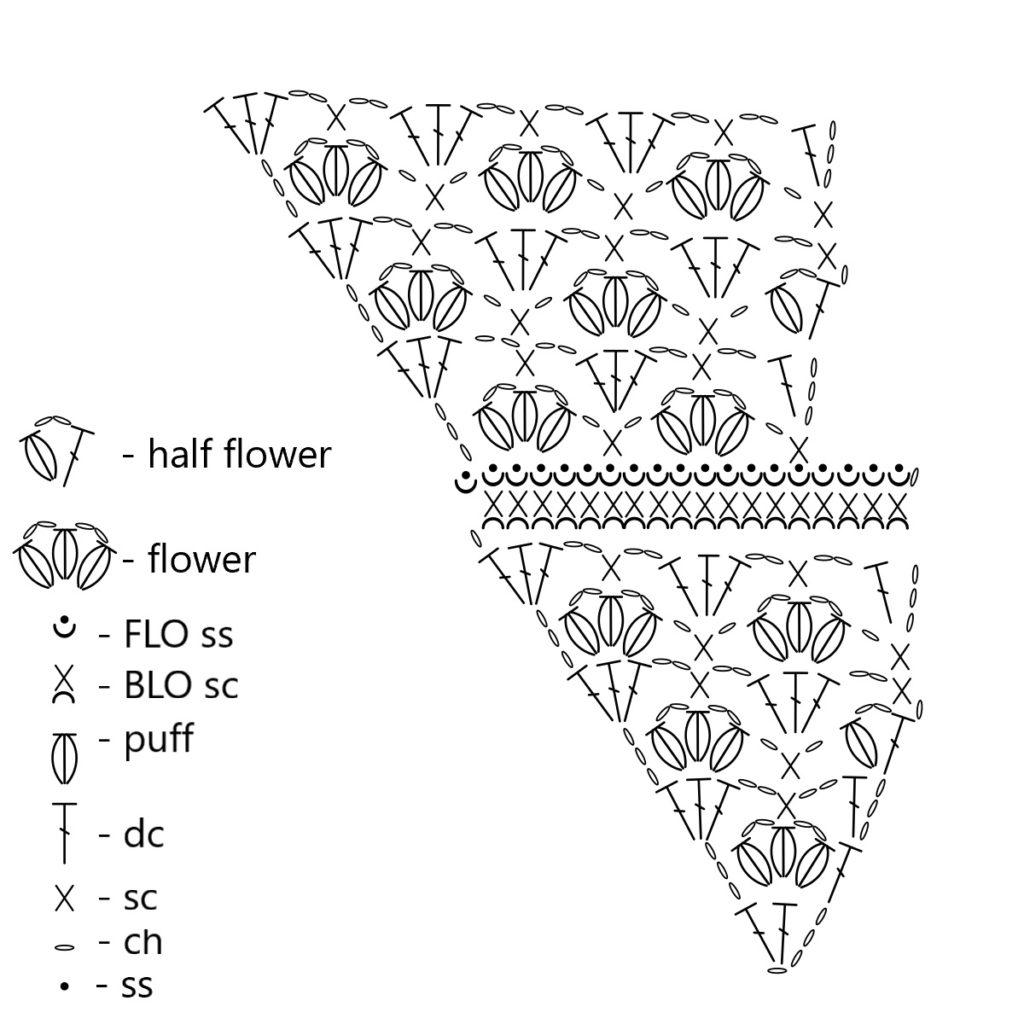
Crochet Diagram for Flowers for Simone Shawl
The stitch diagram is Exclusive content for subscribers.
In order to subscribe and unlock it, click the Grow box below, enter your email, and create a password to create your Grow account. Then each time you’ll see exclusive content, all you have to do is just sign in to your Grow account.
Flowers for Simone Shawl Written Instructions
With a 3.5mm hook
Setup
Ch4
Row 1 (WS): PM in 1st ch from hook, 2dc in 4th ch from hook (ch3 counts as 1dc), turn. (3 dc)
Row 2 (RS): ch3 (counts as 1dc)- PM in top of ch3, skip 1st dc, [1puff, ch2, 1puff, ch2, 1puff] in 2nd dc, 1dc in top of ch-3, turn. (2 dc, 1 flower)
Row 3 (WS): ch3 (counts as 1dc)- PM in top of ch3, 1dc in 1st dc, ch2, skip 1st puff & ch-2, 1sc in 2nd puff, ch2, skip ch-2 & 3rd puff, 3dc in top of ch-3, turn. (4 ch, 1 sc, 5 dc)
** Make sure to work into the right stitch of the 2nd puff, this is not the stitch that is right above it, but the stitch to its left – see photo.
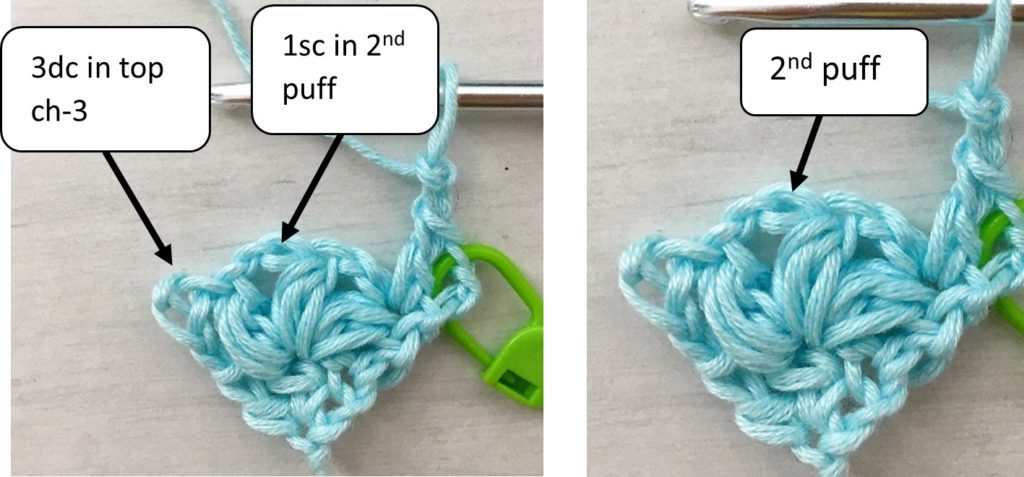
Row 4 (RS): ch3 (counts as 1dc)- PM in top of ch3, skip 1st dc, [1puff, ch2, 1puff, ch2, 1puff] in 2nd dc, ch1, skip dc & ch-2, 1sc in sc, ch1, skip ch-2 & dc, [1puff, ch2, 1dc] in top of ch-3, turn. (8 ch, 1 sc, 2 dc, 1.5 flowers)
Row 5 (WS): ch1 (does not count as a st), 1sc in 1st dc- PM, ch2, skip puff & ch-1, 3dc in sc, ch2, skip ch-1 & 1st puff, 1sc in 2nd puff, ch2, skip 3rd puff & ch-1, 3dc in top of ch-3, turn. (6 ch, 2 sc, 6 dc)
Do you prefer a chart & full-photo tutorial? Get the premium, ad-free, full photo-tutorial, printable PDF version on Ravelry or Etsy!
Row 6 (RS): ch3 (counts as 1dc)- PM, skip 1st dc, [1puff, ch2, 1puff, ch2, 1puff] in 2nd dc, ch1, skip 3rd dc & ch-2, 1sc in sc, ch1, skip ch-2 & 1st dc, [1puff, ch2, 1puff, ch2, 1puff] in 2nd dc, ch1, skip dc & ch-2, 1sc in sc, turn. (3 ch, 2 sc, 1 dc, 2 flowers)
Row 7 (WS): ch3 (counts as 1dc)- PM in top of ch3, 1dc in 1st sc.
* ch2, skip ch-1 & 1st puff, 1sc in 2nd puff, ch2, skip 3rd puff & ch-1, 3dc in sc; Repeat from * to end of row (last 3dc will be in top of ch-3), turn. (8 ch, 2 sc, 8 dc)
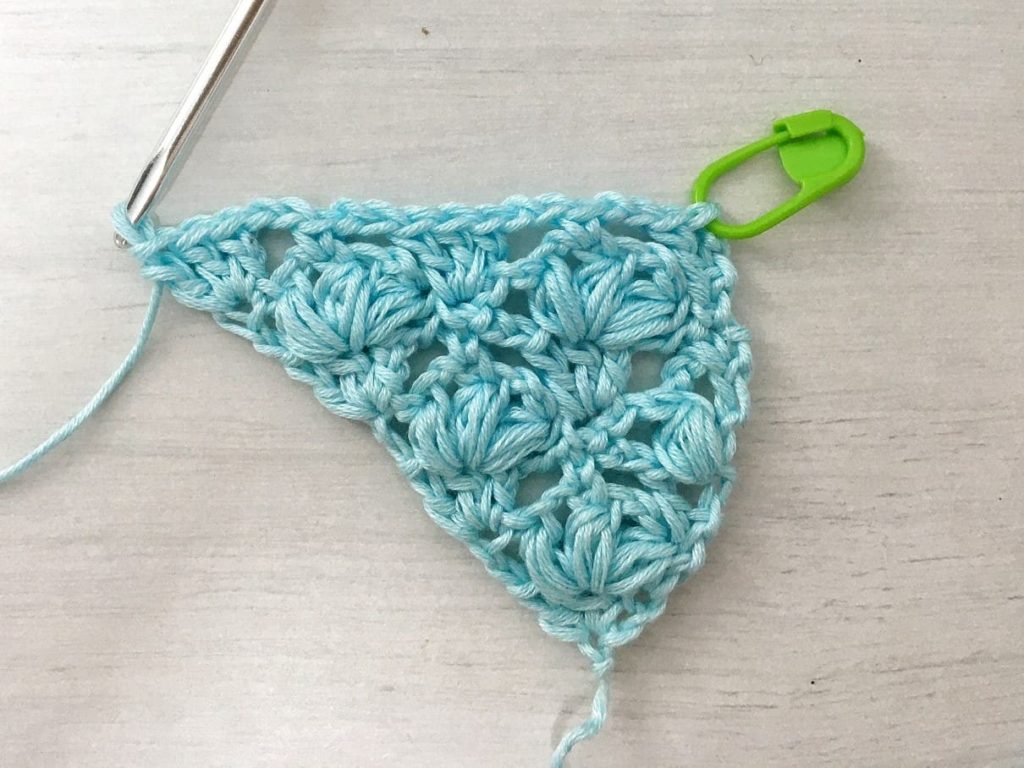
Main Pattern – see stitch count table from now on
Row 8 (RS): ch1 (counts as 1sc)- PM, 1BLO sc in each st (don’t skip ch’s) to end of row.
** This row is tricky, make sure you are not missing any chains and count your sts at the end (in the Stitch Count Table – the ch1 is counted as sc).
Row 9 (WS): ch1 (does not count as a st)- PM, 1FLO ss in each sc to end of row, last ss will be in ch-1 of previous row, turn.
** Working into the 1st ch-1 from prev. round creates a smooth line at the edge of the shawl.
Row 10 (RS): ch3 (counts as 1dc)- PM, skip 2 ss, [1puff, ch2, 1puff, ch2, 1puff] in next ss, ch1, skip 3 ss, 1sc in next ss.
* ch1, skip 3 ss, [1puff, ch2, 1puff, ch2, 1puff] in next ss, ch1, skip 3 ss, 1sc in next ss; Repeat from * until last 4 sts, turn.
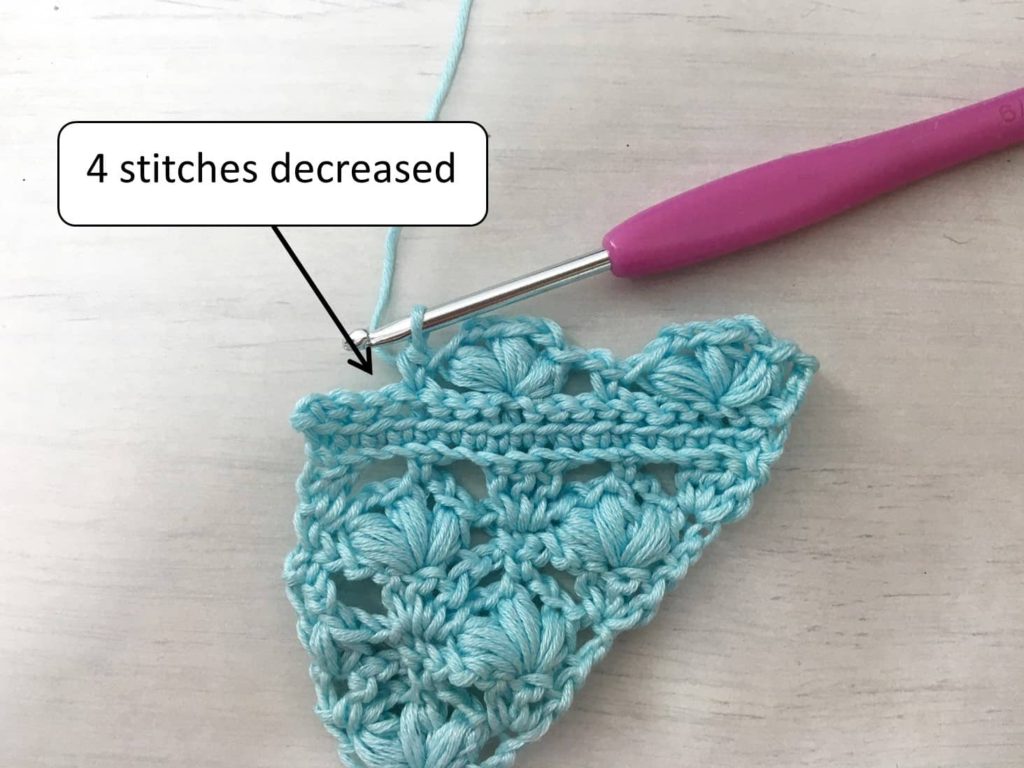
Row 11 (WS): ch3 (counts as 1dc)- PM in top of ch3, 1dc in 1st sc.
* ch2, skip ch-1 & 1st puff, 1sc in 2nd puff, ch2, skip 3rd puff & ch-1, 3dc in sc; Repeat from * to end of row (last 3dc will be in top of ch-3), turn.
Row 12 (RS): ch3 (counts as 1dc)- PM in top of ch3, skip 1st dc, [1puff, ch2, 1puff, ch2, 1puff] in 2nd dc, ch1, skip dc & ch-2, 1sc in sc, ch1, skip ch-2 & dc.
* [1puff, ch2, 1puff, ch2, 1puff] in 2nd dc, ch1, skip dc & ch-2, 1sc in sc, ch1, skip ch-2 & dc; Repeat from * to last 2 dc, [1puff, ch2, 1dc] in top of ch-3, turn.
Row 13 (WS): ch1 (does not count as a st), 1sc in 1st dc- PM, ch2, skip puff & ch-1, 3dc in sc.
* ch2, skip ch-1 & 1st puff, 1sc in 2nd puff, ch2, skip 3rd puff & ch-1, 3dc in sc; Repeat from * to end of row (last 3dc will be in top of ch-3), turn. (6 ch, 2 sc, 6 dc)
Row 14 (RS): ch3 (counts as 1dc)- PM, skip 1st dc, [1puff, ch2, 1puff, ch2, 1puff] in 2nd dc, ch1, skip 3rd dc & ch-2, 1sc in sc.
* ch1, skip ch-2 & 1st dc, [1puff, ch2, 1puff, ch2, 1puff] in 2nd dc, ch1, skip dc & ch-2, 1sc in sc; Repeat to end of the row, turn.
Row 15 (WS): ch3 (counts as 1dc)- PM in top of ch3, 1dc in 1st sc.
* ch2, skip ch-1 & 1st puff, 1sc in 2nd puff, ch2, skip 3rd puff & ch-1, 3dc in sc; Repeat from * to end of row (last 3dc will be in top of ch-3), turn.
Work main pattern (rows 8-15) 17 more times (or until your desired length).
Work rows 8-14, then work edging.
Edging (WS)
with a 3.0 mm hook – work as just another row of the pattern.
ch1, 1BLO ss in each st (each ch of ch-2 space) to the end of the row.
Bind off, weave in the ends, and block the shawl.
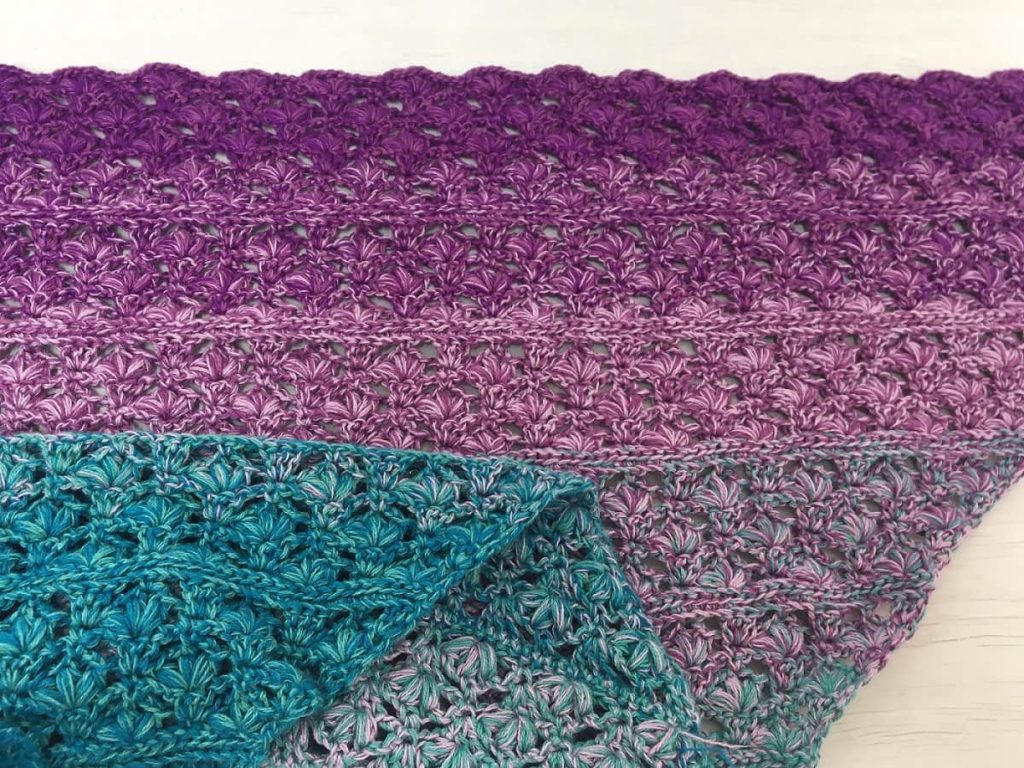
What Weight Yarn Should I Use For a Shawl?
This question depends on the pattern you are using.
While making a lightweight crochet shawl, you would want to use either Lace (#0), Fingering (#1) or Sport (#2) weight yarns, to keep the beautiful lacy texture.
If you want to make a warm crochet shawl, then use a thicker yarn. This way your shawl would also work up faster.
Did you try this out? Share your project!
– Let me know how it went and leave a comment below.
– Tag me on Instagram @madebygootie
– Join and share in our FB Community
Want to save this post for later? Go ahead and PIN it!





What was the name of the yarn cake you used?
Hi Marti!
I used a yarn cake I got as a gift, the yarn is called Lola Farbverlaufsgarn 4-fach.
This is the manufacturer’s website, I don’t know the specific colorway I used, but this one looks the closest to what I had:
https://www.garnmanufaktur.com/farbverlaufsgarne/lola/lola-classic/lola-farbverlaufsgarn-classic-bobbel-salvia/a-13372
I hope it helps 🙂
Agat