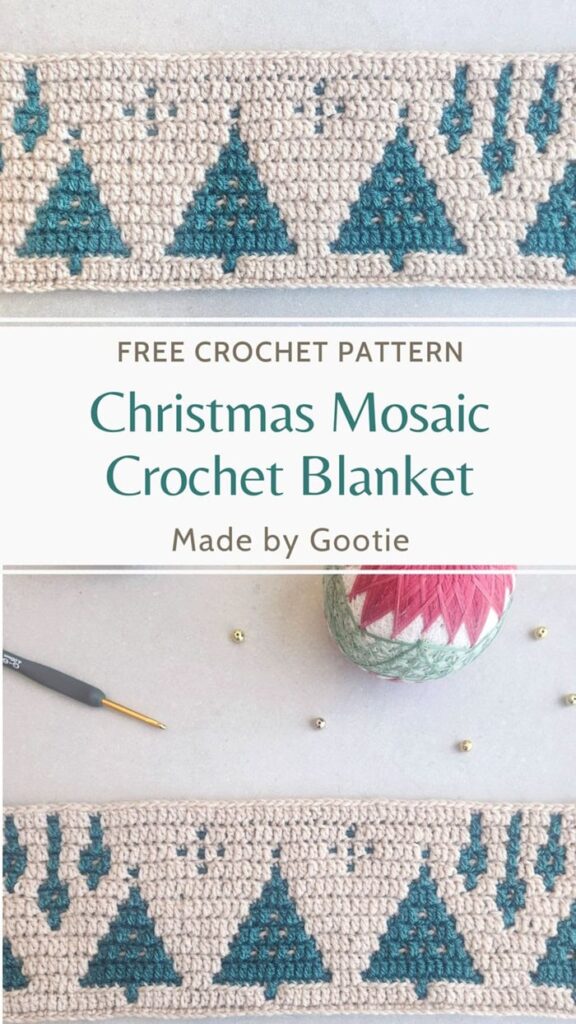
Christmas Trees Mosaic Crochet Blanket Pattern
Last Updated on July 23, 2025
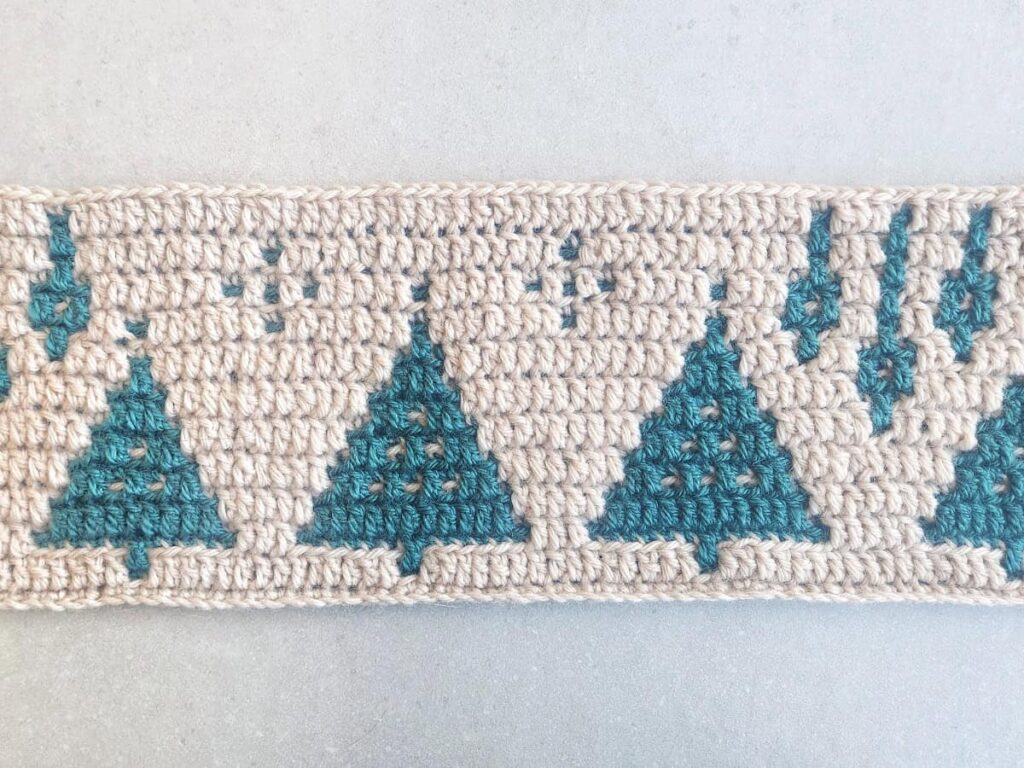
I designed the Christmas Trees mosaic crochet blanket pattern as part of the Christmas in July Blanket crochet along. This overlay mosaic crochet pattern features beautiful Christmas trees, decorated with hanging Christmas lights.
You can work this crochet mosaic pattern as part of the Christmas in July blanket, or use this pattern as its own, it will make a lovely crochet Christmas table runner!
Scroll down for the written instructions and chart.

** Some of the links in this post may include affiliate links. Making a purchase through one of these links pays me a small referral fee at no added cost to you. These small fees add up and help me keep the blog running. View our disclosure and privacy policy for more information.
About the Overlay Mosaic Crochet Method
In the overlay mosaic method, you are working only on the front side of your work, this means you only work from right to left. This way you are alternating the colors on each row, and cut off the yarn at the end of each row.
The mosaic technique uses only 2 crochet stitches – single crochet which is worked in the back loop of the row below, and double crochet which is worked in the front loop of the stitch 2 rows below (dropped down dc). The dc stitches cover the sc stitches from the row before, and that is why it’s called “Overlay Moasic”.
I know it might sound complicated, but trust me, it is not! If you want to try out another pattern first, you can make my Bohemian Mosaic Placemat, which has a detailed photo tutorial and video tutoial.
Want to save this post for later? Go ahead and PIN it!
The Christmas in July Mosaic Blanket Crochet-Along
The Christmas in July Mosaic Crochet-Along from Juniper & Oakes and features a stunning mosaic crochet blanket pattern that uses the overlay mosaic crochet technique to craft intricate, holiday-themed, colorwork designs without the hassle of yarn tangling or endless ends to weave in.
For her blanket, Erin used the super soft Swish DK yarn by WeCrochet. You can also get the yarn kit for this blanket at a discounted price!
The free crochet-along will run through July 2nd-29th, featuring an 8-section mosaic blanket, when a new section is released twice a week. The instructions and charts for each section will be available for free on the designers’ blogs (no free download).
If you prefer to work at your own pace with a cohesive and ad-free PDF, you can purchase the full blanket eBook. The eBook is available for a discounted price during the event.


Materials
For the Christmas in July Blanket:
– Crochet hook 5.0 mm / H (I love the Etimo Hooks).
– Swish DK (#3) weight yarn
– Total amount of yarn needed for a 50 in (127 cm) strip :
Color A (main): 130gr/293m/320yds
Color C: 70gr/157m/172yd
Finished Size –
Height: 6 inch (15.2 cm) (can be made higher), width: 50 inch (127 cm).
Width of 1 repeat section: 11.5 inch (29.2 cm)
Gauge (in pattern): 18 sts and 18 rows = 4 in/10 cm with a 5.0 mm / H hook.
Abbreviations (US)
BBS – Beginning Border Stitch: A standing sc through the post (or the ‘v’) of the stitch below, ensuring that both legs of the stitch on the WS are to the outside of the blanket. (For right-handed crocheters the legs would be secured to the right of the stitch and vice versa for left-handed crocheters.) Click here for a video tutorial.
BLOsc – Back Loop Only Single Crochet: Insert hook in back loop of indicated st, yo and pull up a loop, yo and draw through both loops on hook.
BLOHDC – Back Loop Only Half Double Crochet
ch – Chain
dc – Double Crochet
EBS – Ending Border Stitch: A sc through the post (or the ‘v’) of the stitch below, ensuring that both legs of the stitch on the WS are to the outside of the blanket. (Similar to BBS, but the back legs of the stitch are secured to the opposite side.) Click here for a video tutorial.
FLOdc – Front Loop Only Double Crochet: Yo, insert hook in front loop of st below the indicated st, yo and pull up a loop, yo and draw through two loops on hook, yo and draw through remaining two loops on hook.
Fsc – Foundation single crochet: Insert hook in back loop of indicated st, yo and pull up a lp, yo and draw through both lps on hook.
HDC – Half Double Crochet
RS – Right Side
sc – Single Crochet
Notes
- The pattern is worked from right to left on Right Side only. (If you are left handed, feel free to work from left to right according to the chart below).
- Every row is worked in a different color.
- Fasten off at the end of each row.
- Every row begins with a beginning border stitch & ends with an ending border stitch.
- How to change the width of the blanket: You may choose to repeat the pattern as many times as you wish. Make sure your Foundation Row is made up of any multiple of 48 plus 3 extra stitches. The Christmas in July Blanket is made using 4 repeats.
- The patterns include a chart and written instructions below. You may want to refer to each.
- The colors on the chart indicate how the finished project will look.
- The pattern is worked up in two colors.
- You can start the pattern by making a foundation chain like the pattern advised, or make a foundation single crochet (FSC).
Save time and work over your yarn tails!
Instead of weaving in all the yarn tails in the end, work over the previous rows’ tails at the beginning and end of each row.
When working a single crochet, keep the yarn tail between your working yarn and hook, then pull the yarn through to finish the stitch.
When working a double crochet, start the stitch normally and when about to pull the yarn to finish the stitch, move the yarn tail between your working yarn and hook, then pull the yarn through to finish the stitch.
At the end of the row, work over the yarn tail before reaching the end of the row.
Christmas Trees Mosaic Crochet Diagram

Christmas Trees Mosaic Crochet Pattern
The pattern is worked over a multiple of 48 + 3 sts.
Row 1: With Color A, BBS in 1st, BLOsc across, EBS in last.
Row 2: With Color C, BBS in 1st, BLOsc across, EBS in last.
Row 3: With Color A, BBS in 1st, * FLOdc x8, BLOsc x1, FLOdc x14, BLOsc x1, FLOdc x16, BLOsc x1, FLOdc x7; repeat from * across, FLOdc x1, EBS in last.
Row 4: With Color C, BBS in 1st, * BLOsc x8, FLOdc x1, BLOsc x14, FLOdc x1, BLOsc x16, FLOdc x1, BLOsc x7; repeat from * across, BLOsc x1, EBS in last.
Row 5: With Color A, BBS in 1st, * FLOdc x2, BLOsc x13, FLOdc x3, BLOsc x11, FLOdc x5, BLOsc x13, FLOdc x1; repeat from * across, FLOdc x1, EBS in last.
Row 6: With Color C, BBS in 1st, * BLOsc x3, FLOdc x11, BLOsc x5, FLOdc x9, BLOsc x7, FLOdc x11, BLOsc x2; repeat from * across, BLOsc x1, EBS in last.
Row 7: With Color A, BBS in 1st, * FLOdc x3, BLOsc x11, FLOdc x5, BLOsc x9, FLOdc x7, BLOsc x11, FLOdc x2; repeat from * across, FLOdc x1, EBS in last.
Row 8: With Color C, BBS in 1st, *BLOsc x4, FLOdc x2, BLOsc x1, FLOdc x1, BLOsc x1, FLOdc x1, BLOsc x1, FLOdc x2, BLOsc x7, FLOdc x2, BLOsc x1, FLOdc x1, BLOsc x1, FLOdc x2, BLOsc x9, FLOdc x2, BLOsc x1, FLOdc x1, BLOsc x1, FLOdc x1, BLOsc x1, FLOdc x2, BLOsc x3*, repeat across, BLOsc x1, EBS in last.
Row 9: With Color A, BBS in 1st, * FLOdc x4, BLOsc x9, FLOdc x7, BLOsc x7, FLOdc x9, BLOsc x9, FLOdc x3; repeat from * across, FLOdc x1, EBS in last.
Row 10: With Color C, BBS in 1st, * BLOsc x5, FLOdc x2, BLOsc x1, FLOdc x1, BLOsc x1, FLOdc x2, BLOsc x9, FLOdc x2, BLOsc x1, FLOdc x2, BLOsc x11, FLOdc x2, BLOsc x1, FLOdc x1, BLOsc x1, FLOdc x2, BLOsc x4; repeat from * across, BLOsc x1, EBS in last.
Row 11: With Color A, BBS in 1st, * FLOdc x5, BLOsc x7, FLOdc x9, BLOsc x5, FLOdc x5, BLOsc x1, FLOdc x5, BLOsc x7, FLOdc x4; repeat from * across, FLOdc x1, EBS in last.
Row 12: With Color C, BBS in 1st, * BLOsc x6, FLOdc x2, BLOsc x1, FLOdc x2, BLOsc x11, FLOdc x3, BLOsc x6, FLOdc x1, BLOsc x6, FLOdc x2, BLOsc x1, FLOdc x2, BLOsc x5; repeat from * across, BLOsc x1, EBS in last.
Row 13: With Color A, BBS in 1st, * FLOdc x6, BLOsc x5, FLOdc x11, (BLOsc x3, FLOdc x5) x2, BLOsc x5, FLOdc x5 *, repeat across, FLOdc x1, EBS in last.
Row 14: With Color C, BBS in 1st, * BLOsc x7, FLOdc x3, BLOsc x13, FLOdc x1, BLOsc x6, FLOdc x1, BLOsc x1, FLOdc x1, BLOsc x6, FLOdc x3, BLOsc x6; repeat from * across, BLOsc x1, EBS in last.
Row 15: With Color A, BBS in 1st, *FLOdc x6, BLOsc x5, FLOdc x11, (BLOsc x3, FLOdc x5) x2, BLOsc x5, FLOdc x5*, repeat across, FLOdc x1, EBS in last.
Row 16: With Color C, BBS in 1st, * BLOsc x8, FLOdc x1, BLOsc x18, FLOdc x1, BLOsc x3, FLOdc x1, BLOsc x3, FLOdc x1, BLOsc x4, FLOdc x1, BLOsc x7; repeat from * across, BLOsc x1, EBS in last.
Row 17: With Color A, BBS in 1st, * BLOsc x1, FLOdc x7, BLOsc x1, FLOdc x7, BLOsc x1, FLOdc x6, BLOsc x1, FLOdc x2, BLOsc x3, FLOdc x2, BLOsc x1, FLOdc x2, BLOsc x3, FLOdc x3, BLOsc x1, FLOdc x7; repeat from * across, BLOsc x1, EBS in last.
Row 18: With Color C, BBS in 1st, * BLOsc x26, FLOdc x1, BLOsc x1, FLOdc x1, BLOsc x2, FLOdc x1, BLOsc x2, FLOdc x1, BLOsc x1, FLOdc x1, BLOsc x11; repeat from * across, BLOsc x1, EBS in last.
Row 19: With Color A, BBS in 1st, * BLOsc x1, FLOdc x1, BLOsc x1, FLOdc x5, BLOsc x1, FLOdc x5, BLOsc x1, FLOdc x1, BLOsc x1, FLOdc x1, BLOsc x1, FLOdc x7, BLOsc x3, FLOdc x2, BLOsc x1, FLOdc x2, BLOsc x3, FLOdc x3, BLOsc x1, FLOdc x5, BLOsc x1, FLOdc x1; repeat from * across, BLOsc x1, EBS in last.
Row 20: With Color C, BBS in 1st, * BLOsc x27, FLOdc x1, BLOsc x3, FLOdc x1, BLOsc x3, FLOdc x1, BLOsc x12; repeat from * across, BLOsc x1, EBS in last.
Row 21: With Color A, BBS in 1st, * BLOsc x1, FLOdc x15, BLOsc x1, FLOdc x10, BLOsc x1, FLOdc x3, BLOsc x1, FLOdc x3, BLOsc x1, FLOdc x12; repeat from * across, BLOsc x1, EBS in last.
Row 22: With Color C, BBS in 1st, * BLOsc x27, FLOdc x1, BLOsc x3, FLOdc x1, BLOsc x3, FLOdc x1, BLOsc x12; repeat from * across, BLOsc x1, EBS in last.
Row 23: With Color A, BBS in 1st, *FLOdc x27, BLOsc x1, FLOdc x3, BLOsc x1, FLOdc x3, BLOsc x1, FLOdc x12; repeat from * across, FLOdc x1, EBS in last.
The Difference Between Overlay Mosaic and Inset Mosaic
The difference between those two techniques:
Overlay Mosaic
- You only work on the front side – from the right to the left.
- Each row is worked with a different color – you cut the yarn at the end of each row, and left with loose ends.
- The sc are worked into the back loops and the dc are worked into the front loops.
Inset Mosaic
- You work back and forth – both on the right and wrong side.
- Each color is worked in 2 following rows – yarn can be carried out on the side of your work, no need to cut the yarn.
- Both sc and dc stitches are worked into the full stitch (both loops).

Did you try this out? Share your project!
– Let me know how it went and leave a comment below.
– Tag me on Instagram @madebygootie
– Join and share in our FB Community
Want to save this post for later? Go ahead and PIN it!
Hello there!
I’m loving the pattern. It’s turning out beautifully and the instructions are super easy to follow.
I did come across what I think might be an error in the written directions.
(Row 13: With Color A, BBS in 1st, * FLOdc x6, BLOsc x5, FLOdc x11, “(BLOsc x3, FLOdc x5) x3;” repeat from * across, FLOdc x1, EBS in last.)
I believe it should be (BLOsc x3, FLOdc x5) x2 And then BLOsc x5, FLOdc x5, repeat, FLOdc x1, EBS in last.
Thank you for sharing!
Hi Ray,
Thank you for pointing that out!
I’m sorry about it, it has been fixed 🙂